Create Dynamic Split Screen Video in 2026
Create polished split screen video for tributes & social reels. Learn photo animation, editing, audio sync, & mobile formats in our 2026 guide.
You're probably not making a split screen video because you want a clever edit. You're making one because a single frame doesn't feel like enough.
Maybe it's a birthday reel where you want childhood photos beside present-day clips. Maybe it's an anniversary tribute that pairs an old scanned print with a recent smile. Maybe it's a memorial video, and you need the finished piece to feel gentle, alive, and respectful instead of static. That's where split screen works so well. It lets two moments breathe at once.
Done well, a split screen video bridges the gap between a simple slideshow and something that feels edited with intention. It can hold memory and motion in the same frame, which is exactly why it feels so strong in modern tribute work, especially in vertical formats like Instagram Reels.
Table of Contents
- Why Split Screen Videos Create Powerful Tributes
- Animate Still Photos for a Living Memory Effect
- Arranging Your Clips in a Video Editor
- Syncing Motion and Sound for Emotional Impact
- Adapting Your Split Screen for Mobile and Reels
- Your Workflow for Fast Polished Tribute Videos
Why Split Screen Videos Create Powerful Tributes
A tribute edit usually asks one frame to do too much. It has to show the person, the time, the feeling, and the change across years. A split screen video solves that problem by letting two related moments live side by side.
That's why it works so well for family storytelling. You can place a childhood photo next to a recent clip, a wedding portrait next to an anniversary toast, or two reactions from different years in one shared visual beat. The viewer doesn't have to choose which moment matters more. The edit says both matter.
A classic technique that still feels fresh
Split screen isn't a social media gimmick. It's a long-established film and video technique in which one frame is divided into multiple simultaneous images. Historically, filmmakers used an optical printer to combine separately shot actions onto the same negative, long before digital editing made the process easier, as described in this overview of split-screen film history).
That history matters because it explains why the effect still feels cinematic when you use it carefully. Even in a short tribute reel, split screen carries the language of professional storytelling. It suggests comparison, connection, parallel time, and emotional echo without needing a word of explanation.
Practical rule: Use split screen when the relationship between two moments is the story. Don't use it just because you have extra footage.
Why it hits emotionally
The strongest tribute edits usually do one of three things:
- They compare past and present. An old portrait beside a current family video can say more than a caption ever could.
- They hold two reactions together. A parent laughing on one side and a child laughing on the other creates instant emotional continuity.
- They preserve context. One side can carry the main memory while the other side adds atmosphere, location, or a second point of view.
For inspiration on how people structure remembrance and celebration edits, this collection of tribute video examples is useful because it shows how emotional pacing often matters more than flashy transitions.
There's also a practical reason split screen fits modern platforms. A summary of experimental research reported by Cognition Today says split-screen videos produced about a 4% increase in user engagement, about 4% higher engagement than subtitles alone, and a 4% increase in positive emotional response, with no change in information recall, according to this discussion of split-screen engagement research. For tribute work, that doesn't mean you should force the format. It means the format can hold attention a little longer when the composition is clear and emotionally grounded.
A good tribute doesn't just show memories. It lets them speak to each other.
Animate Still Photos for a Living Memory Effect
The fastest way to make a split screen tribute feel amateur is to drop totally static photos into a dynamic edit. One panel moves. The other panel sits there like a pasted rectangle. The contrast feels accidental, and the emotion flattens out.
A better approach is to turn each photo into a subtle motion clip before you ever start arranging the split layout. Old family pictures respond especially well to this. A gentle camera drift, a soft push-in, or a restrained sense of movement can make the image feel less like an archive item and more like a lived moment returning for a few seconds.

Start with the right kind of motion
For tribute work, subtle motion usually beats dramatic motion. You're not trying to turn a family photo into an action sequence. You're trying to preserve the softness of the original while giving the edit enough life that it belongs beside real video.
Three motions tend to work reliably:
- A slow pan across faces when the photo includes several people and expressions matter.
- A gradual push toward the subject when one person should carry the emotional weight.
- A light environmental drift when the background itself is part of the memory, such as a porch, lake, church, or garden.
What doesn't work as well is motion that pulls attention to the effect instead of the person. Fast zooms, heavy parallax, and exaggerated camera swings can feel out of place in birthday, memorial, and anniversary edits.
If the viewer notices the motion before they notice the face, the movement is too aggressive.
Prepare old photos before the edit
Scanned prints, faded snapshots, and phone captures of framed photos can all work. They just need a little care before animation.
A simple prep checklist helps:
- Clean obvious distractions. Crop out scanner edges, fingers, table corners, or damaged borders if they pull the eye.
- Pick one subject priority. If the image is busy, decide who or what the motion should emphasize.
- Accept analog texture. Grain, softness, and light fading often add warmth. Don't overcorrect every imperfection.
- Avoid tiny crop windows. If you animate a very tight crop from a low-quality scan, the result can feel brittle on a large screen.
If you want to create motion from a single still image quickly, this photo animation tool is built for exactly that kind of tribute workflow. The main advantage isn't novelty. It's speed and consistency when you need a short MP4 clip that already feels ready to edit.
Think in pairs, not singles
The smartest way to prep source material for split screen is to choose image pairs before you animate them. Don't animate random photos and hope they'll fit together later.
Useful pairings include:
| Pairing idea | Why it works in a split screen video |
|---|---|
| Childhood photo and present-day clip | Builds an immediate past-to-present contrast |
| Two photos from the same place in different years | Creates continuity through setting |
| Portrait and candid image | Balances stillness with personality |
| Individual photo and family group shot | Connects one person to the wider story |
This often allows tribute editors to save time. When the pairing is emotionally clear from the start, the eventual split layout almost arranges itself. You're no longer solving a design problem. You're expressing a relationship.
Arranging Your Clips in a Video Editor
Once your clips are moving, the split screen build becomes mechanical in the best possible way. Every editor handles the controls a little differently, but the core process stays the same. Put clips on separate video tracks, resize them, crop them, and position them so each panel feels intentional.
Professional workflows usually start the same way. Editors place clips on a timeline, then resize and crop each layer so they don't overlap. Common failure points include mismatched lighting and uneven audio levels, so it helps to correct color and normalize sound before export, as noted in this guide to split-screen production workflow.
The basic logic behind every layout
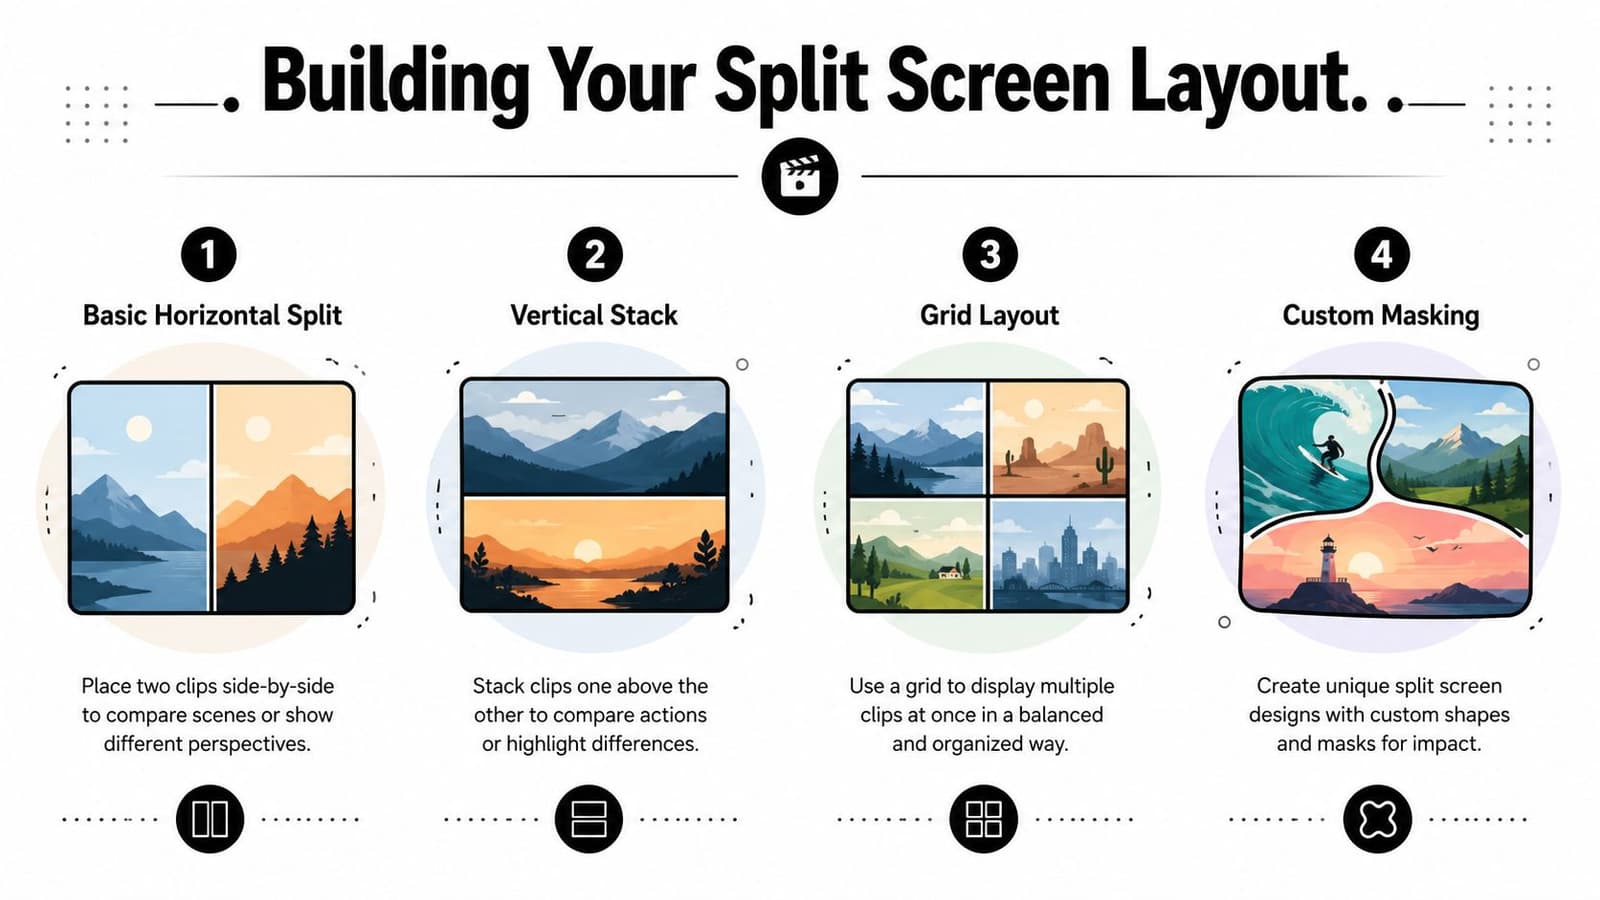
You don't need a special split-screen button to make a strong split screen video. You need control over three things:
- Track stacking. Each clip sits on its own video layer.
- Scale and position. Shrink or move each clip so it occupies the right area of the frame.
- Crop or mask. Remove the unwanted portion so the clips meet cleanly.
For tribute edits, start with simple layouts first. A clean half-and-half split almost always looks more polished than a busy collage. Save grids and custom masks for projects where every panel adds meaning.
Here's a useful demo to watch before you build your own: BLOG_YOUTUBE_EMBED:Y4NYiZ5kM7A
For Premiere Pro and Final Cut Pro
In Adobe Premiere Pro, place the first clip on V1 and the second on V2. Open Effect Controls, then adjust Scale and Position until the clips sit where you want them. Use the Crop effect if you need a hard split.
In Final Cut Pro, stack clips vertically in the timeline, then use the Transform controls to resize and reposition. For more precise framing, apply a crop and fine-tune each side until the composition feels balanced.
A few layout choices work particularly well in tribute edits:
- 50/50 vertical split for comparing two moments directly
- Top and bottom stack when one shot is wider and the other is more portrait-friendly
- Three-panel strip when you want a rhythmic progression across time
For DaVinci Resolve
Resolve handles this cleanly once you know where to look. Put clips on separate tracks in the Edit page. Use the Inspector panel for Zoom, Position X, and Position Y.
For hard-edged splits, the Cropping controls are usually enough. If you want diagonal or curved panel boundaries, Resolve's masks give you more flexibility, but for memorial and family reels I'd keep the shapes simple. Fancy geometry can distract from the material.
Editing note: Resolve is excellent for matching old scans and newer phone clips because its color tools make it easier to unify mixed sources.
For Mobile Apps like CapCut and InShot
Mobile apps are surprisingly capable for split screen video if the layout is simple. In CapCut, add your base clip, then use Overlay for the second clip. Resize with pinch controls, move it into place, and crop or mask as needed. In InShot, picture-in-picture style layouts work in much the same way.
The limitation on mobile isn't whether you can build the split. It's how precisely you can fine-tune spacing, alignment, and color. If your tribute depends on subtle panel balance, desktop editing still gives you more control.
A quick comparison helps:
| Editor | Best for | Watch out for |
|---|---|---|
| Premiere Pro | Detailed timeline work and flexible effects | Easy to overbuild transitions |
| Final Cut Pro | Fast arrangement and clean interface | Magnetic timeline can surprise beginners |
| DaVinci Resolve | Strong color correction and precision | More panels and controls to learn |
| CapCut and InShot | Quick vertical edits and mobile publishing | Less precise for delicate tribute pacing |
What makes the layout feel polished
Most split screens fail for ordinary reasons, not dramatic ones. One clip is brighter. One has harsher contrast. One panel is visually louder and steals the whole frame.
Check these before export:
- Match exposure first. If one side looks sunny and the other looks muddy, the split feels accidental.
- Keep headroom consistent. Faces should sit at similar visual heights unless you want intentional asymmetry.
- Choose one dominant panel. Even balanced designs need a visual leader.
- Soften the urge to over-transition. Clean cuts often feel more mature than constant wipes and animated borders.
The edit should feel like one memory told through two windows, not two clips competing for attention.
Syncing Motion and Sound for Emotional Impact
A split screen video can look technically correct and still feel emotionally flat. The missing piece is usually sound. Viewers may notice the layout first, but they feel the rhythm before they analyze the composition.
That matters even more in tribute work. When old photos have been animated into short clips, motion alone doesn't create emotion. Emotion comes from when the movement starts, when it settles, and what the music is doing underneath.

Choose one emotional center
The biggest audio mistake in split screen editing is letting every clip keep its own sound. A laugh on the left, room noise on the right, and music underneath creates clutter fast. Instead, choose one of these approaches:
- Music-led edit. Best for memorials, birthdays, and anniversary reels where mood matters most.
- Single live-audio moment. Best when one real sound deserves space, such as a toast, greeting, or laugh.
- Music with selective natural sound. Use this sparingly for emphasis, not constantly.
If both panels contain live video, pick one audio source as the primary voice of the moment. Lower or mute the other unless it adds something unmistakably valuable.
Clean audio feels more emotional because the viewer doesn't have to fight the edit to understand it.
Cut to musical movement, not just visual movement
Editors often line up cuts to what changes visually. That's useful, but for tribute pieces it's usually better to cut to the musical phrase. A photo animation easing in on the beat is nice. A panel change that lands with the rise of a melody feels intentional.
Try this process:
- Drop your music track in first.
- Mark the strong beats, lyric changes, or phrase endings.
- Place your biggest emotional visual changes on those markers.
- Let smaller motion continue through the gaps.
That approach keeps the edit from feeling robotic. Not every cut has to hit a drum beat. Some should land on a held note or a breath between lines.
Build contrast with restraint
Emotional impact often comes from contrast. One side of the split may hold a calm portrait while the other shows movement. One panel may stay on screen longer while the other changes. That contrast works best when the soundtrack supports it instead of competing with it.
A few reliable choices:
- For memorial tributes, use slower transitions and let clips breathe.
- For birthday reels, a brighter rhythm can support quicker panel swaps.
- For anniversary edits, softer pacing with gentle motion usually feels more timeless.
If you're unsure, simplify. A quiet, well-timed split screen with one strong music cue usually lands better than a crowded edit full of sound effects and constant movement.
Adapting Your Split Screen for Mobile and Reels
A split screen layout that looks balanced on a laptop can fall apart on a phone. That's where many otherwise good edits lose their impact. Small faces become tiny. Text shrinks too far. One panel dominates because the viewer is holding the frame vertically, rather than in a horizontal orientation.
Guidance for vertical split-screen storytelling specifically emphasizes previewing on mobile, balancing composition, and preserving subject placement so both halves remain understandable, and notes that this remains an underserved topic because many tutorials still focus on standard horizontal video, as discussed in this vertical split-screen overview.
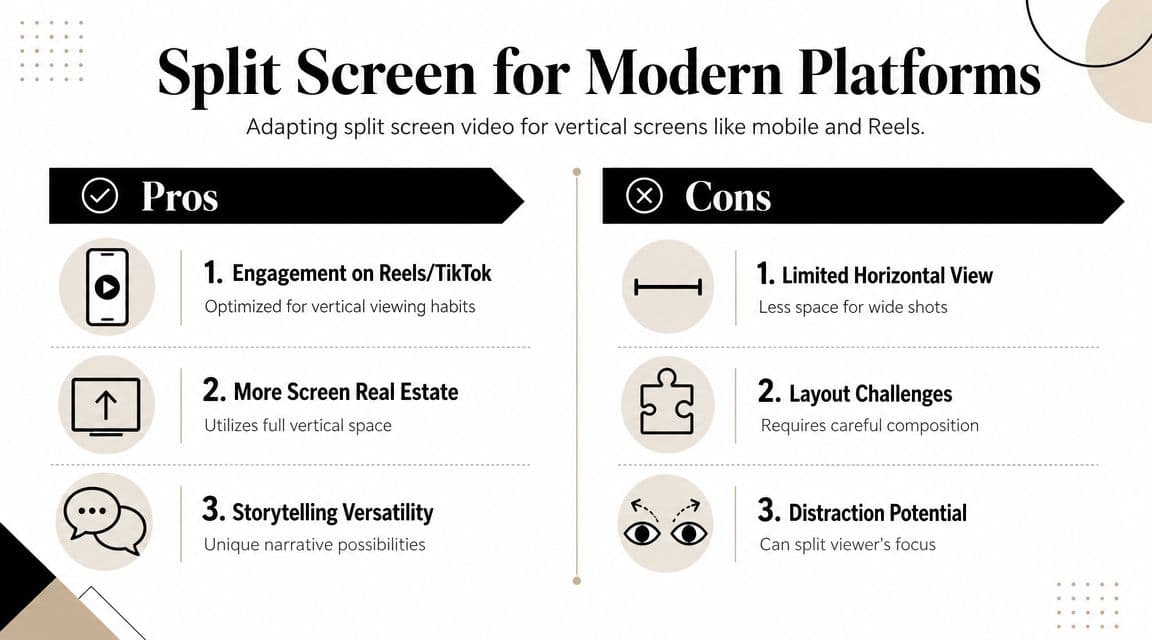
What works in 9 by 16
For Reels and similar formats, simple compositions usually win. A clean vertical split with one subject per side reads faster than a dense multi-panel design.
These choices tend to hold up best:
- Two-panel vertical split when both subjects need equal weight
- Top and bottom layout when faces are framed centrally
- One main panel with a smaller support panel when one memory should lead
For creators working specifically on social-ready animated photo content, this guide on how to animate a photo for Instagram is helpful because it keeps the platform format in view instead of treating mobile as an afterthought.
What usually fails on phones
The phone screen is unforgiving. Anything that depends on fine detail or complex panel relationships gets harder to read quickly.
Common problems include:
| Problem | Why it hurts the edit |
|---|---|
| Tiny faces in multi-panel grids | Emotional connection disappears |
| Off-center subjects | Cropping makes one side feel broken |
| Thin text and delicate fonts | Readability drops fast |
| Busy borders and heavy effects | They compete with the memory itself |
This is also where many editors make the wrong assumption: if the split screen works in 16:9, it can just be reframed for 9:16 later. Usually it can't. Vertical-first tribute edits need different composition choices from the start.
Preview on an actual phone before you export the final version. The edit has to read at thumb-scrolling speed.
A good rule is to protect the faces first and everything else second. If that means simplifying the layout, simplify it. Tribute work isn't the place to prove how many panels you can fit into a frame.
Your Workflow for Fast Polished Tribute Videos
The fastest way to keep a tribute edit tasteful is to use the same repeatable sequence every time. That prevents the project from turning into a pile of effects, experiments, and half-finished layout ideas.
A practical split screen video workflow looks like this:
- Turn still photos into short motion clips. Give each image a gentle movement that matches the mood of the memory.
- Choose the final aspect ratio early. Decide whether the piece is for 16:9, 1:1, or 9:16 before you build the layout.
- Pair moments with purpose. Put clips together because they relate emotionally, not just because they fit the frame.
- Stack, crop, and position in the editor. Keep the layout clean and readable.
- Choose a primary audio strategy. Let music or one live moment lead. Don't let every clip talk at once.
- Unify the image before export. Match color, contrast, and brightness so the piece feels like one edit.
A short finishing checklist helps even more:
- Check face placement. Important expressions should survive both desktop and phone viewing.
- Trim anything repetitive. Tribute edits usually improve when they get slightly shorter.
- Use one shared look. A single color treatment across all clips often does more than a stack of effects.
- Export and watch once without editing. If a panel pulls attention for the wrong reason, you'll feel it immediately.
One last pro move is applying a consistent grade or filter across the whole timeline after your clip-by-clip fixes. That final pass can pull scanned prints, animated photos, and phone video into the same emotional world.
A polished tribute doesn't need complicated tricks. It needs clear pairings, gentle movement, and enough restraint to let the memories carry the weight.
If you want a faster way to turn old photos into motion clips before you build your edit, Photo for Video makes that part simple. It turns a single still image into a short living-memory MP4 that fits naturally into tribute reels, memorial videos, anniversary edits, and family keepsakes.