How to Make a Transparent GIF: A Step-by-Step Guide
Learn how to make a transparent GIF using Photoshop, GIMP, and free online tools. Our guide covers background removal, optimization, and avoiding common errors.
You’ve probably seen the problem already. You make a sweet little animated sticker, a name tag for a memorial reel, or a floating photo element for a tribute video, and it looks fine by itself. Then you place it over a colored background and suddenly there’s a hard white box around it. The whole thing feels homemade in the wrong way.
A transparent GIF fixes that. It lets the subject, text, or decorative element sit on top of another background without bringing its old background along for the ride. That matters when you’re layering animated flowers over a photo montage, adding a glowing candle graphic to a remembrance slide, or dropping a moving cutout of a loved one into a video edit.
Most tutorials on how to make a transparent gif assume you’re starting with a crisp digital asset on a clean background. That’s not how real family projects usually work. A lot of tribute makers are working from old scans, faded prints, phone photos of photos, and images with dust, texture, or uneven lighting. Those details change what works and what fails.
Table of Contents
- Why Your GIF Needs a Transparent Background
- Understanding How GIF Transparency Actually Works
- The Fastest Method Using Free Online Tools
- Creating Professional Results with Adobe Photoshop
- Optimizing and Troubleshooting Common GIF Problems
- When to Use Alternatives to GIF
Why Your GIF Needs a Transparent Background
A non-transparent GIF traps your design inside its original rectangle. That’s why a logo, handwritten name, flower accent, or animated portrait cutout can look awkward the moment you place it over a colored slide, patterned background, or video clip.
Transparent GIFs solve that by removing the background so only the part you want stays visible. For family tribute work, that often means a softly animated portrait, a floating “In Loving Memory” title, or a decorative element that needs to sit cleanly over photos and footage without looking pasted on.
![]()
If you’re building a montage and need to place a still or animated element over video, it helps to understand how layered visuals behave before you start. A guide on adding an image to video makes that part easier once your transparent asset is ready.
What a transparent GIF is good for
Some uses are practical, some are emotional, and a few are just visual cleanup:
- Memorial video overlays that sit on top of photos or footage without a white box
- Social story stickers for birthdays, anniversaries, and keepsake reels
- Simple website graphics that need to blend into the page background
- Animated text elements that move without carrying a background rectangle
Practical rule: If the GIF needs to sit on top of another image, color, or video, transparency usually matters more than fancy animation.
There are three reliable paths. Use a free online editor when the background is simple. Use Photoshop when edges need real control. Use a different format entirely when you need smoother transparency than GIF can provide.
That last point matters. A transparent GIF is useful, but it isn’t magic. If your source image is a noisy old scan with paper texture and color bleed, you’ll need to work more carefully than a typical sticker tutorial suggests.
Understanding How GIF Transparency Actually Works
GIF transparency is old technology, and that explains most of its quirks. The GIF format was introduced by CompuServe in 1987, and transparency arrived in the GIF89a extension in 1989 through a single Transparent Color Index value in the palette, as documented in GIF transparency and animation notes from GIFLIB.
That sounds technical, but the practical version is simple. A GIF can mark one palette color as transparent. Not soft. Not semi-see-through. Just transparent or not transparent.
Think cookie cutter not soft brush
The easiest way to understand it is to think of a cookie cutter. The cutter removes a shape cleanly, but it doesn’t create a soft blended edge. That’s how GIF transparency behaves.
A modern format like PNG can handle gradual edge fade. GIF can’t. It uses binary transparency, which means a pixel is either visible or invisible.
That limitation is why these problems show up:
- Jagged edges around hair, lace, veils, smoke, and soft shadows
- Halos when the original background color clings to anti-aliased edges
- Rough cutouts when the subject was photographed against a messy or uneven background
Why old family photos are harder
Scanned photos make all of this more obvious. A clean digital icon might have one obvious white background to remove. An old print often has several near-whites, scanner noise, paper texture, and faded edges all mixed together.
If the background isn’t truly one color, a one-color transparency system will show its limits fast.
That’s why some quick tools look great on logos and fail on portraits. It’s not always user error. Sometimes the format itself is fighting you.
A few practical takeaways help:
| Situation | What GIF handles well | What GIF handles poorly |
|---|---|---|
| Solid background graphic | Very well | Rarely a problem |
| Simple sticker art | Well | Minor edge cleanup may be needed |
| Portrait with soft hair edges | Fair | Halos and jaggedness are common |
| Old scanned photo | Unpredictable | Texture and color bleed cause problems |
Once you know that, the workflow choices get easier. If your image has a plain background, use a fast remover. If it has fragile edges, treat the cutout like restoration work, not a one-click export.
The Fastest Method Using Free Online Tools
If you need a result today and don’t want to open Photoshop, free online tools are the fastest way to make a transparent GIF. For simple backgrounds, they’re often good enough.
When online tools work well
Tools like EZGIF work best when the background is uniform and easy to identify. According to EZGIF’s transparency help page, online removers succeed on over 90% of uniform backgrounds, can use up to 30% shade tolerance for similar tones, and let you apply changes to selected frame ranges such as 1-8 of 15 to speed processing by over 50%.
That means they’re a strong fit for:
- Logos on a flat background
- Simple text animations
- Decorative icons or shapes
- A short animated element made from a clean photo cutout
They’re a weaker fit for old scans, textured paper, or images with fine wisps of hair and soft shadow detail.
If your goal is a quick moving tribute element, one easy starting point is to animate a photo first, then strip the background only if the source stays visually simple.
A quick workflow in EZGIF
The basic process is straightforward:
-
Upload your GIF, image sequence, or video If you’re starting from stills, build the GIF first. If you already have a GIF, upload it directly.
-
Open the transparency or background removal tool Most free editors let you click the background color you want removed.
-
Pick the exact background color This works best when the background is one obvious tone, such as white, black, or a flat studio color.
-
Adjust fuzziness carefully The fuzziness setting tells the tool to remove similar shades, not just one exact color. A low setting is safer. A higher setting helps catch anti-aliased edge tones, but it can also eat into skin, clothing, or facial detail.
-
Preview frame edges Don’t just check the center of the image. Zoom your attention to hairlines, shoulders, collars, and the outer edges of hands.
-
Apply to all frames or selected frames If only part of the animation needs the same background removal, selective frame ranges can save time.
This walkthrough helps if you want to watch the mechanics before trying it yourself:
A good online-tool result usually starts with a good source. If the background is inconsistent, the transparency tool will be inconsistent too.
What beginners usually get wrong
Most failed attempts come from one of three mistakes:
- Too much fuzziness and the subject starts losing edge detail
- Too little fuzziness and a bright outline stays behind
- No frame check so some frames look clean and others keep remnants of the background
For a memorial project, online tools are fine when the visual is simple and the deadline is tight. If the photo is very important and the edges need to feel polished, move to Photoshop before you spend too long trying to rescue a bad automatic cutout.
Creating Professional Results with Adobe Photoshop
Photoshop is slower, but it gives you the control that quick tools don’t. If you’re cutting out a person from a family portrait, isolating hands holding flowers, or preparing a moving portrait for a tribute reel, that control is worth it.
Why Photoshop wins on difficult cutouts
For complex subjects, the Pen Tool is the cleanest place to start. Based on Photoshop workflow guidance for transparent GIFs, using the Pen Tool can achieve over 98% edge fidelity, compared with 70% for Magic Wand on complex backgrounds.
That gap matters on real people. Magic Wand is fine for a bold graphic on a plain field. It’s not the tool I’d trust for a faded portrait where the jawline blends softly into a discolored backdrop.
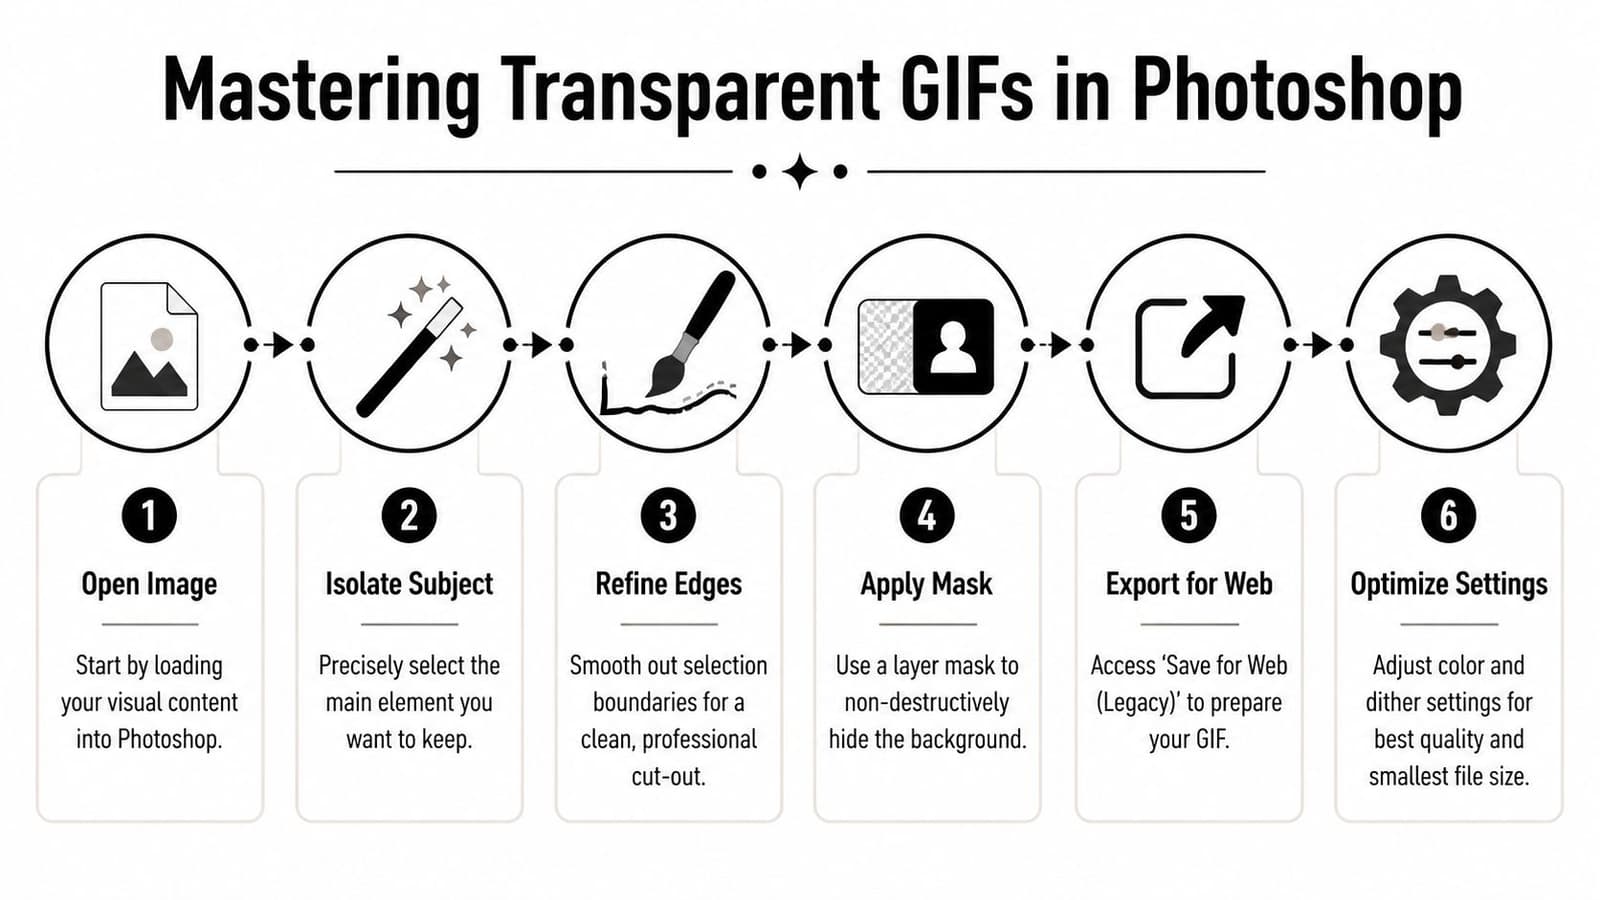
A practical workflow looks like this:
-
Open the image or import frames as layers
For animation, use Photoshop’s layer and timeline workflow so each frame stays editable. -
Cut out the subject with the Pen Tool
Build a path around the important shape first. Don’t obsess over tiny imperfections on the first pass. Get the major silhouette right. -
Convert the path to a selection
A small feather can help avoid a harsh cut edge, especially on older portraits. -
Use a layer mask instead of deleting the background
Masks let you paint corrections back in. That matters when an ear, hairline, or shoulder edge needs refinement. -
Build or refine the animation in the Timeline panel
Make sure each frame is aligned cleanly. Even a good cutout looks amateur if the motion jitters.
The export settings that make or break the result
The most important part of how to make a transparent gif in Photoshop isn’t the cutout. It’s the export.
Use File > Export > Save for Web (Legacy) and pay close attention to the settings. Two of them matter more than people think.
-
Transparency must be checked
If it isn’t, the GIF exports with a solid background. -
Matte should match the destination background when appropriate
The same Photoshop guidance notes that checking Transparency and matching the Matte color to the destination background can reduce halo artifacts by 80%.
That matte setting is where many family tribute projects go wrong. If your GIF will sit over a dark memorial slide, exporting with a light matte can leave a pale fringe. If the GIF is going over a light background, the opposite can happen.
Best export habit: Decide where the GIF will live before exporting it. A cutout meant for a dark video overlay should not be exported the same way as one meant for a white webpage.
A few more Photoshop choices help:
| Setting | Better choice for cleaner GIFs | What happens if you ignore it |
|---|---|---|
| Cutout tool | Pen Tool for complex edges | Wand selections often leave rough borders |
| Transparency | Checked | Background comes back opaque |
| Matte | Matched to final background | Halos become more visible |
| Dither | Moderate and controlled | Too much can make edges dirty |
If you’re cutting out an old photo, do some cleanup before the selection step. Dust, scanner noise, and uneven paper tone can trick even a careful selection. A quick pass to simplify the background often saves more time than trying to fix every edge after export.
Optimizing and Troubleshooting Common GIF Problems
The hard part often comes after export. The GIF technically works, but the edges look crunchy, the file feels clumsy, or the animation doesn’t sit naturally in the edit.

Fixing halos jagged edges and bad transparency
Most transparency problems trace back to source cleanup, not just export settings. If you see a pale fringe, leftover background color, or missing edge detail, stop changing random toggles and inspect the original image.
Use this checklist:
-
Halos around the subject
This usually comes from anti-aliased edge pixels that still contain the original background color. Revisit the cutout and, if you’re in Photoshop, make sure the matte choice matches where the GIF will be placed. -
Jagged outlines
GIF transparency is hard-edged by nature. If the edge has soft detail like hair, lace, or smoke, simplify the cutout and accept that GIF may not be the ideal final format. -
Background remnants in some frames
In animated work, one clean frame doesn’t mean the whole GIF is clean. Scrub through every frame edge. -
Animation jitter
The subject may be cut out correctly, but the layers or frames aren’t aligned consistently.
Clean transparency depends on consistency. One bad frame can ruin the whole illusion.
Working with old scanned family photos
Most generic tutorials prove insufficient for the complexities of scanned prints. A scanned print can include paper grain, faded border tone, dust, tiny cracks, and uneven shadows from the scan itself. Those details confuse automated removal tools.
A video guide focused on this problem notes that old scanned photos create halo effects and incomplete transparency, and that AI background removers that succeed 90% of the time on modern images can fail as high as 40% on low-resolution scans in this use case, as discussed in this scanned-photo background removal reference.
That lines up with what many editors run into. A clean product photo behaves predictably. A photo of a loved one from an old album usually doesn’t.
Try this before removing the background:
- Crop tightly first so the tool has less irrelevant background to interpret
- Correct uneven brightness if one side of the scan is darker than the other
- Reduce obvious dust and specks before selecting the subject
- Increase contrast gently so the subject edge separates more clearly
- Avoid aggressive automatic removal first if the photo has faded edges around hair or clothing
If the image is precious, use a non-destructive workflow. Duplicate the layer, mask instead of erase, and test your GIF over the actual background it will use in the final memorial or anniversary video. The checkerboard preview inside an editor doesn’t tell you everything. A halo that seems minor on transparent gray can scream once placed over black, navy, or sepia footage.
When to Use Alternatives to GIF
A transparent GIF is useful, but sometimes it’s the compromise, not the goal. If you need broad compatibility and a simple overlay, GIF still works. If you need cleaner edges or smoother transparency, another format is often better.
Use GIF when simplicity matters
GIF is still practical when:
- The animation is short and simple
- The background you removed was flat and easy
- You need a format many tools can open quickly
- The visual reads more like a sticker than a cinematic overlay
For decorative memorial elements, simple title accents, or small looping graphics, that can be enough.
Use other formats when quality matters more
If your source comes from video or you need better transparency retention, a video-first workflow is stronger. A tutorial on the After Effects to Photoshop route notes that rendering a QuickTime file with RGB+Alpha preserves the transparency channel, and importing those frames into Photoshop before GIF export can retain up to 92% of the alpha transparency, as shown in this After Effects and Photoshop workflow reference.
That matters because GIF doesn’t support soft partial transparency the way modern formats do. For overlays with delicate edges, a transparent video file is often the professional answer.
Use alternatives when:
| Format choice | Best for | Why you’d pick it |
|---|---|---|
| GIF | Simple looping sticker-style graphics | Easy and widely recognized |
| APNG | Cleaner transparent edges in supported environments | Better for smooth alpha-style visuals |
| Transparent video | Tribute edits, reels, compositing | Better for motion overlays and nuanced edges |
If you’re building a remembrance reel from still images, short motion clips, and layered text, it also helps to think beyond GIF entirely. A guide on how to turn a picture into a video online is often closer to the final workflow families need than a pure GIF tutorial.
If you’re creating a memorial, birthday, or anniversary video from one treasured image, Photo for Video can turn a still photo, including old scans and digitized prints, into a gentle motion clip ready for tribute edits and reels. It’s built for real family keepsakes, with privacy-minded auto-deletion after 7 days and exports that fit naturally into your video workflow.
Enhanced by the Outrank app