Converting MPEG to MP3: A Practical Guide for 2026
Learn safe and easy methods for converting MPEG to MP3. Our guide covers free software, online tools, and quality settings to preserve your most precious audio.
You've probably got a file like this somewhere right now. An old .mpg or .mpeg video from a camcorder transfer, a CD backup, or a family DVD rip that still opens, but barely feels current. The picture may be soft, the colors may be off, yet the audio still matters. A parent's toast. A wedding prayer. A grandparent laughing in the background before anyone realized those ordinary sounds would become precious.
That's why converting mpeg to mp3 is often less about format compatibility and more about preservation. You're not just pulling sound out of a video. You're trying to save a voice in a form you can archive, edit, share, and use again in a tribute video without making it sound thin, harsh, or over-compressed.
Table of Contents
- Why You Need to Convert MPEG to MP3
- Choosing Your Conversion Method
- Using Free Desktop Software like VLC and Audacity
- For Power and Batch Conversions Use FFmpeg
- Navigating Online Converters Safely
- Optimizing Quality Metadata and Troubleshooting
Why You Need to Convert MPEG to MP3
A lot of family archives live in awkward formats. Someone copied a tape to a computer years ago. A photo slideshow program exported an MPEG file. A memorial service was saved to disc and later ripped to a hard drive. The video still exists, but what people usually want to keep is the sound.
A common example is a birthday or anniversary montage. You may want to lift a short speech from an old MPEG clip and place it under a newer sequence of scanned photos. That's much easier when the audio exists as a standalone MP3 you can drop into any editor.
The same applies to memorial projects. If the video quality is dated but the voice is clear enough, extracting the audio can turn one old file into the emotional center of a new keepsake. If you're assembling visuals from old prints, a guide on making a picture movie from family photos can help with the visual side while you preserve the original sound separately.
Why MP3 still matters
MP3 became the practical standard for portable audio because it made files much smaller without sounding obviously worse to most listeners. The format was standardized in 1992, and it achieved a 12:1 reduction in file size from CD audio without perceptible quality loss for most listeners, which is why it remained central to extracting audio from legacy MPEG files (ManiacTools on MPEG Audio Layer III).
That matters for family projects because MP3 still works almost everywhere. Phones play it. Video editors import it. Cloud storage handles it easily. If a relative asks you to send “just the speech,” MP3 is the file they'll be able to open.
Practical rule: If the video is replaceable but the voice isn't, extract the audio now and store it separately.
What's actually happening during conversion
An MPEG file often contains both video and audio. When you convert it to MP3, you're either extracting the audio stream or decoding and re-encoding it into a new audio-only file. The job sounds simple, but sentimental files deserve care because every lossy re-encode can shave off detail.
That's why the best workflow isn't just “pick any converter and hope for the best.” It's choosing a method that keeps quality high, keeps the original safe, and avoids handing private family material to a random website.
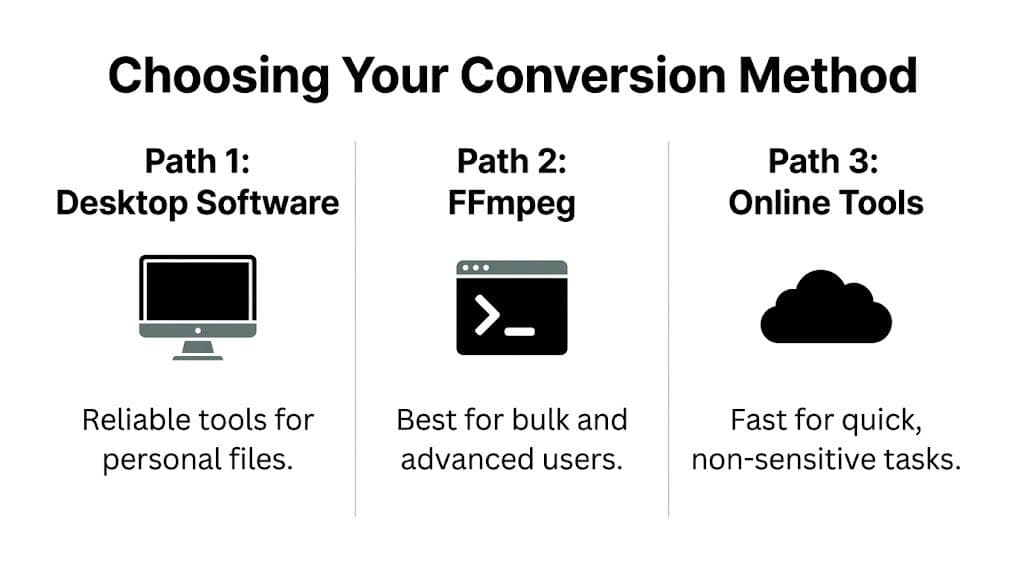
Choosing Your Conversion Method
There isn't one best tool for everyone. The right method depends on three things: how comfortable you are with software, how many files you need to process, and how private those files are.
For most family keepsake work, I'd sort the options like this: desktop software first, FFmpeg second if you want more control, online converters last. That order reflects quality and safety, not convenience.
Quick comparison
| Method | Best for | Strengths | Trade-offs |
|---|---|---|---|
| Desktop software | One file or a few sentimental files | Private, easy to use, good control | Slower for big batches |
| FFmpeg | Large archives and repeat jobs | Precise settings, automation, reliable | Command line can feel intimidating |
| Online tools | Non-sensitive throwaway files | Fast access from any browser | Privacy concerns, less control, quality can vary |
What usually works best
Desktop tools hit the sweet spot for most readers. You keep files on your own machine, you can preview them before converting, and you're less likely to accidentally choose poor settings. This is the route I recommend when the file contains a speech, voicemail-like message, ceremony audio, or anything else you can't recreate.
FFmpeg is better when you've inherited a folder full of MPEG clips and need a repeatable process. It also helps when one file opens strangely in a regular app and you want more direct control over what gets extracted.
Online converters are only worth considering when the content isn't personal and you need a quick result from a locked-down device. That convenience is real. So are the risks.
Use the tool that matches the value of the file, not just the speed of the task.
A simple way to decide
If you're unsure, use this checklist:
- Choose desktop software if you want a visual interface and don't want your files leaving your computer.
- Choose FFmpeg if you need batch conversion, cleaner control over settings, or a lossless intermediate workflow.
- Choose an online tool only if the file isn't sensitive and you've checked its privacy and quality options carefully.
The biggest mistake I see is people treating every conversion job the same. A disposable screen recording and a last surviving clip of a loved one don't deserve the same workflow.
Using Free Desktop Software like VLC and Audacity
For many users, this is the safest starting point. Free desktop software gives you a visible workflow, doesn't require coding, and keeps sentimental files on your own computer.
Use VLC for fast extraction
VLC is a practical first choice because many people already have it installed. It's widely trusted, with over 3 billion downloads since 2001, and it can convert a 5-minute, 50 MB MPEG clip into a 5-10 MB MP3 file in under 10 seconds on modern hardware using its built-in Audio MP3 profile (DataHacker on MPEG audio standards).
Here's the basic workflow in VLC:
- Open Media and choose Convert / Save.
- Add your MPEG file.
- Click Convert / Save again.
- In Profile, choose Audio - MP3.
- Pick a destination filename ending in
.mp3. - Start the conversion.
That works well when the source file is already clean and you mainly need a simple audio extract.
The settings that matter
Don't just accept whatever default appears if VLC lets you edit the profile.
Use settings aimed at preservation, not minimum size:
- Bitrate choice: For voices and music that matter, choose a higher-quality MP3 setting rather than a low-bitrate preset.
- Sample rate: Keep it aligned with common audio standards so the file drops cleanly into editing software later.
- Destination naming: Save with a meaningful filename right away, such as
Grandpa_1998_Birthday_Speech.mp3.
Save the original MPEG file in a separate folder before converting anything. If you make a poor encode choice, you want the untouched source available.
Use Audacity when the audio needs care
VLC is good at extraction. Audacity is better when you need to listen, trim, and gently improve the result before export.
A practical workflow looks like this:
- Import the original audio, or import a WAV intermediary if you extracted one first.
- Listen for dead air at the start and end.
- Trim only obvious silence or camera handling noise.
- Apply gentle fades if the clip will open or close a tribute video.
- Normalize if levels vary too much, but avoid aggressive processing.
Audacity is especially useful when the sound isn't evenly recorded. Older home video audio often jumps in volume. One person leans toward the camcorder mic, another stands across the room, and the ambient noise shifts throughout the clip.
When to use both tools together
This is the workflow I trust most for family material:
- Use VLC to get the audio off the MPEG quickly, or use FFmpeg for a cleaner intermediate.
- Open that audio in Audacity.
- Do light cleanup only.
- Export the final MP3 for the project.
That gives you both speed and control. You aren't locked into one app's defaults, and you're less likely to overprocess a voice that should still sound human.
A good rule for keepsake audio is restraint. Remove distractions. Don't sterilize the recording.
For Power and Batch Conversions Use FFmpeg
FFmpeg is the tool I reach for when the job needs precision. If you have a folder of MPEG files from an old DVD archive, camcorder transfer, or family video backup, FFmpeg makes converting mpeg to mp3 faster and more repeatable than any point-and-click app.
The safest high-quality approach
For sentimental audio, my preference is not to jump straight from MPEG to MP3 if the source is fragile. I first extract a lossless WAV file, listen to it, then make the MP3 from that checked file.
Use this command:
ffmpeg -i input.mpg -vn -acodec pcm_s16le output.wav
What it does:
-i input.mpgloads the source file-vntells FFmpeg to ignore the video-acodec pcm_s16lewrites standard uncompressed WAV audiooutput.wavis your lossless intermediate
This approach gives you a preservation copy for editing. If the final MP3 needs to be remade later, you won't have to go back through the MPEG again.
The best archive file and the best delivery file are often different. WAV is for preserving and editing. MP3 is for sharing and dropping into projects.
Convert the checked file to MP3
Once you've listened to the WAV and confirmed it sounds right, create the MP3:
ffmpeg -i output.wav -b:a 320k final.mp3
If you want a slightly smaller file while keeping strong quality, you can also use:
ffmpeg -i output.wav -b:a 192k final.mp3
That gives you a controlled encode instead of whatever default a random app decides to use.
Batch convert a whole folder
If you're working through a family archive, FFmpeg really pays off. On many systems you can run a loop that processes every MPEG file in a folder and creates matching MP3s automatically.
A simple example for a command shell environment is:
for %f in (*.mpg) do ffmpeg -i "%f" -vn -b:a 320k "%~nf.mp3"
That command tells FFmpeg to:
- look at every
.mpgfile in the current folder - strip out the video
- encode the audio to MP3 at a chosen bitrate
- save the output with the same base filename
This is useful when you're preparing clips for a larger montage workflow. If those clips are going into a repeating visual edit, a guide on making a video loop for tribute and social edits can help you keep the visuals just as tidy as the audio.
A quick check before batching saves headaches:
- Test one file first: Make sure the output sounds right.
- Watch for odd source files: Some old MPEGs have unusual audio streams.
- Keep outputs in a new folder: Don't mix fresh MP3s with the originals.
Later, if you want to see a visual walkthrough of FFmpeg basics, this overview helps reinforce the command-line steps:
What doesn't work well
FFmpeg is powerful, but there are two mistakes people make with it.
First, they batch-convert everything before listening to a single result. That's risky with archival material. Second, they aim for the smallest file possible instead of the best usable file. For family audio, storage is usually not the actual problem. Regret is.
Navigating Online Converters Safely
Online converters are tempting because they remove friction. Upload the file, wait a moment, download the MP3, move on. For a disposable clip, that may be fine. For a private family recording, I'd be careful.
The biggest issue isn't convenience. It's that you often don't know what happens to the uploaded file, how long it stays on a server, or what conversion settings the site uses behind the scenes.
Why online tools can hurt keepsake audio
A cited concern is quality loss. A 2025 audio forensics study found that 68% of users converting legacy MPEG family videos via online tools experienced noticeable audio artifacts, and the same guidance recommends extracting a lossless WAV first with FFmpeg before encoding to MP3 for irreplaceable memorial audio (Convertio background on MPEG to MP3 quality issues).
That lines up with what many people hear in practice. Cymbals get brittle. Room tone turns swishy. Voices lose warmth. On ordinary content, that's annoying. On a memorial clip, it can feel like the life has been squeezed out of the recording.
A safer screening checklist
If you absolutely must use an online converter, screen it hard:
- Check the privacy policy: It should clearly say how long files are retained and when they're deleted.
- Look for quality controls: If you can't set bitrate or output options, the site is choosing for you.
- Avoid suspicious download flows: Extra buttons, pop-ups, and redirects are warning signs.
- Skip sensitive files: If the recording is personal, offline conversion is still the better choice.
If you'd be uncomfortable emailing the file to a stranger, don't upload it to an unknown converter.
When online conversion is acceptable
There are a few cases where an online tool is reasonable. A non-personal clip. A rough test extract. A borrowed computer where you can't install software. Even then, I'd treat the result as temporary and not as the master version I'd archive.
For anything emotional or irreplaceable, use a desktop workflow or FFmpeg. The extra few minutes buy you privacy, better quality control, and peace of mind.
Optimizing Quality Metadata and Troubleshooting
Once the file converts successfully, spend a few more minutes finishing it properly. That final pass is what turns a random export into something you can find and reuse a year from now.
For tribute work, the most important quality setting is the export target. Industry best practice recommends using 192-320 kbps bitrates with a 44.1 kHz sample rate for tribute video audio, because 128 kbps can introduce audible artifacts that weaken dialogue and music (Diva Portal guidance on bitrate and sample rate)).
The final quality checklist
Use this before you archive or edit the MP3:
- Listen end to end: Don't trust the waveform alone. Check for missing opening words, clipped endings, or strange warbling.
- Name the file clearly: Use a human title like
Moms_60th_Birthday_Toast_2004.mp3. - Add metadata: Fill in title, year, and a short note if your software supports it.
- Keep the source: Store the original MPEG and, if possible, the WAV intermediate too.
If the final file sounds dull, the first thing to check is your bitrate choice. If it has no sound at all, the source MPEG may contain an audio stream your first tool didn't handle well. That's often when FFmpeg helps. If the MPEG won't open, try a different player first before assuming the file is dead.
A final practical note: if you're putting this MP3 into a finished video, watch your export settings on the video side too. Over-compressing the final MP4 can undo careful audio work, so it helps to understand how YouTube video compression affects finished tribute uploads.
When your audio is preserved and ready, Photo for Video can help you turn a single treasured image into a gentle moving clip for birthdays, memorials, anniversaries, and family keepsakes. It's a simple way to pair carefully saved audio with visuals that still feel personal, especially when you're building a tribute from old scans or one meaningful photo.