Master YouTube Video Compression for Quality
Don't let YouTube video compression ruin your content. Discover optimal export settings, codecs & bitrates for flawless uploads. Essential creator tips!
You export a tribute video. It looks clean in Premiere Pro or Resolve. The old photo still has that soft paper texture, the subtle push-in feels tasteful, and the faces hold together. Then you upload it to YouTube and the final stream comes back softer, flatter, sometimes blocky in the exact places you cared about most.
That’s the part generic compression advice usually misses.
Most youtube video compression guides are built around gameplay, vlogs, or talking-head footage. Short AI-generated animated photos are different. They’re usually low-motion, high-detail, and emotionally unforgiving. A memorial clip can survive a slightly larger file. It can’t survive smeared skin tones, broken gradients, or a face that suddenly looks digital.
The fix isn’t guessing. It’s giving YouTube the right master, with the right structure, and avoiding the export habits that make short animated photos fall apart.
Table of Contents
- Why YouTube Re-Encodes Everything You Upload
- The Perfect YouTube Export Settings Checklist
- Choosing the Right Bitrate for Your Video
- Optimizing Short Animated Photos for Maximum Clarity
- Quick Export Presets for Common Video Editors
- How to Verify Your Upload Quality and Troubleshoot
Why YouTube Re-Encodes Everything You Upload
You finish a short memorial clip, upload it, and the version on YouTube looks a little softer than the file on your drive. That is normal. YouTube creates its own delivery files for different resolutions, devices, and connection speeds, so your upload becomes source material for another round of compression.
That changes the job at export. The goal is not to produce the exact file a viewer will watch. The goal is to hand YouTube a clean, stable master that survives re-encoding with as little visible damage as possible.
Codecs are different compression systems for the same video. YouTube uses H.264 in its upload pipeline and delivers streams with codecs such as VP9 and AV1, which can reach similar visual quality at different bitrates. A cited example from GetStream’s video compression glossary shows the same concert video delivered at a much lower bitrate in AV1 than VP9. That is a useful reminder that delivery format affects both bandwidth and perceived quality.
The upload is your source master
Editors often lose quality before YouTube even starts processing. That usually happens with low-bitrate exports, repeated transcodes, or old presets that were designed to make files tiny instead of durable.
For YouTube, the safer approach is simple. Export one strong master, then let the platform make the streaming versions it needs.
Practical rule: Give YouTube the cleanest file you can justify for the project. Do not pre-compress fragile footage and expect the second encode to hold it together.
Why short animated photos are more fragile
This matters more with short AI-generated animated photos, especially tribute and memorial pieces. These clips often have very little motion, but they contain fine facial detail, soft gradients, restored textures, and slow camera moves across a still image. That combination is harder on compression than many people expect.
Fast action can hide artifacts. Slow movement across a detailed face does the opposite. If the source is weak, YouTube has less real image information to preserve in hair strands, skin transitions, eyelashes, fabric texture, and background grain.
I see this all the time with animated photo videos. The clip feels simple because not much is moving, but compression sees a tough trade-off. Large areas stay nearly static while small details need to stay clean, and those details are exactly what get smeared first if the upload is already compromised.
The Perfect YouTube Export Settings Checklist
A lot of YouTube quality problems start before the upload. I see it most with short AI-generated animated photos for memorials and tribute videos. The motion is gentle, the face detail matters, and small compression mistakes show up fast in skin tones, hair, fabric, and soft background gradients.
My default export checklist is built for that kind of footage. It gives YouTube a clean, durable file without bloating the workflow.
Start with the right container and codec
Use MP4 for the container and H.264 for the video codec. It is still the safest upload format across editors, transcoders, and devices.
For audio, use AAC.
If you export from FFmpeg or HandBrake, that usually means libx264 in an MP4 wrapper. In Premiere Pro, Resolve, Final Cut, or CapCut, pick the H.264 MP4 preset first, then adjust the details instead of relying on the stock preset untouched.
If your editor gives you MOV by default and the files are getting bulky, it helps to review a practical workflow for reducing MOV file size before export decisions lock in.
Use High Profile and progressive scan
For 1080p uploads, start with H.264 High Profile and keep the file progressive, not interlaced. That is the clean baseline for YouTube delivery and a better fit for modern footage.
This matters even more for animated-photo videos. Slow push-ins and subtle face movement do not hide artifacts. They expose them. Interlaced output, or mixed timeline settings from old archival sources, gives YouTube extra cleanup work and usually costs detail.
If you are working with old family footage, deinterlace before the final export. If the project is built from stills or AI-animated photos, keep the whole timeline progressive from the start.
Set the GOP with intent
Keyframe spacing is one of those settings editors skip until a file comes back looking worse than expected.
A good starting point for 1080p is a keyframe interval at half the frame rate with 2 consecutive B-frames, as noted earlier from the Speechify reference already cited in this article. In practice, use:
- 24 fps: keyframe every 12 frames
- 30 fps: keyframe every 15 frames
- 25 fps: keyframe every 12 or 13 frames, depending on the encoder
That structure tends to hold together well on low-motion, high-detail material. It also improves scrubbing and seeking after upload.
I would not treat this as a law. Some encoders hide GOP controls, and some NLE presets handle them well enough behind the scenes. Still, if you have the option, setting it intentionally is better than guessing.
Keep audio simple and compatible
Audio is usually straightforward here.
Use:
- AAC
- Stereo, unless the project has a real reason to go wider
- A standard sample rate from your editor’s normal export path, usually 48 kHz
For tribute videos, viewers notice bad image quality before they notice anything fancy in the audio spec. Clean music, clean dialogue, no weird export choices.
Save one preset and stop reinventing it
Here’s the export preset I’d save for this workflow:
- Container: MP4
- Video codec: H.264
- Profile: High
- Scan type: Progressive
- Frame rate: Match the timeline
- Keyframe interval: Half the frame rate
- B-frames: 2 consecutive B-frames
- Audio codec: AAC
- Resolution: Match the intended delivery size, unless you are upscaling on purpose
A few habits matter just as much:
- Match the timeline before export. Do not animate at one frame rate and export at another unless you have a clear reason.
- Export once from the cleanest source you have. Re-encoding H.264 files over and over softens the exact details these videos need.
- Check the actual file if something looks off. MediaInfo is useful for confirming profile, scan type, frame rate, and keyframe behavior instead of trusting whatever the preset was named.
That checklist is not flashy. It is dependable, and for short animated photos with delicate facial detail, dependable usually wins.
Choosing the Right Bitrate for Your Video
Bitrate is where people either overthink the wrong thing or underthink the important thing.
For youtube video compression, bitrate isn’t about chasing the smallest file you can get away with. It’s about feeding YouTube a file with enough image information that the next compression pass still has something worth preserving.
Why bitrate still matters
Bitrate changes both file size and processing time. A 10-minute video exported at 5,000 kbit/s comes out to about 400 MB, while 10,000 kbit/s lands around 775 MB. YouTube’s upload cap is 256 GB, and a good quality 1080p source around 20 Mbps gives the platform more image data before it compresses the stream further, according to the arXiv summary of YouTube UGC compression context.
That’s the practical takeaway. You don’t win by starving the source file early. You win by handing off a solid master that survives the next stage.
VBR usually beats CBR for uploads
If your encoder gives you the choice, VBR is usually the better fit for upload masters.
A short animated photo clip doesn’t spend every second doing the same amount of visual work. Some moments are nearly still. Others contain a push-in, a gentle camera drift, or soft parallax around hair and shoulders. Variable bitrate lets the encoder spend more where the image needs it and back off where it doesn’t.
CBR can make sense in tightly controlled delivery systems. For YouTube uploads, it’s usually the less elegant choice. You’re not delivering to the viewer directly. You’re handing a master to another compression stage.
Working habit: Use bitrate as protection, not as a target to hit at the lowest possible number.
A practical bitrate table
There isn’t one magical bitrate that fits every editor, every source, and every project. But this is a usable starting table for upload masters.
| Resolution | Frame Rate | SDR Bitrate (Mbps) | HDR Bitrate (Mbps) |
|---|---|---|---|
| 720p | 24 to 30fps | 5 | Higher than SDR |
| 1080p | 24 to 30fps | 8 | Higher than SDR |
| 1440p | 24 to 30fps | 16 | Higher than SDR |
| 4K | 24 to 30fps | 35 to 45 | Higher than SDR |
For short AI-animated photos, I’d use the table as a floor, not a ceiling. If the image has delicate tonal gradients, old paper texture, or soft facial detail, a stronger upload master gives YouTube more to work with. If you also need to shrink oversized exports before upload, this guide on how to reduce MOV file size without wrecking quality is a practical companion.
A few bitrate decisions are worth keeping simple:
- 1080p memorial montage: Start around the quality range associated with a solid H.264 master, then inspect the result locally before upload.
- 4K upload for codec reasons: Use a bitrate that respects the larger frame and avoids starving detail.
- Short low-motion clips: Don’t assume “low motion” means “safe at low bitrate.” These are often the clips that show compression damage first.
Optimizing Short Animated Photos for Maximum Clarity
Short animated photos are one of the easiest ways to trigger bad-looking YouTube compression.
That sounds backward. The motion is gentle. The clip is brief. The subject is often a single photo with minimal camera movement. But those exact traits can make the encoder treat important detail like disposable detail.
Why these clips break so easily
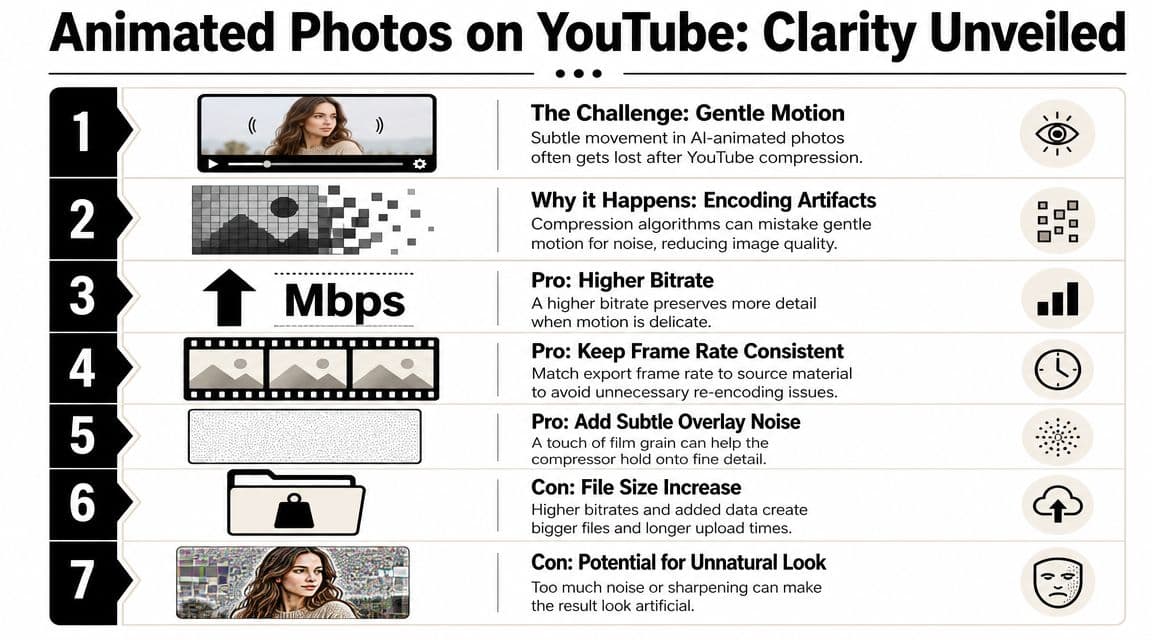
Compression works by throwing away information the system thinks viewers won’t miss. In short AI-generated photo animations, large parts of the frame barely change from moment to moment. That encourages aggressive simplification in the exact places where viewers do notice damage, such as skin tones, edges around faces, and smooth tonal areas in scanned prints.
One cited source frames this clearly. A major gap in compression advice is the behavior of short, AI-generated clips from still images, where low-motion areas get hit harder because DCT-based compression discards detail in quadrants with minimal change. The same source says 40% of AI animation users report “ruined memorials” from artifacts like blocky skin tones, and suggests subtle micro-movements as a contrarian way to preserve detail according to this YouTube discussion of compression issues in animated photo clips.
What actually helps
For this kind of material, brute-force bitrate isn’t the whole answer. Better source settings help, but the strongest improvements usually come from making the clip easier for the encoder to respect.
Try these:
- Add subtle texture intentionally: A tiny amount of film grain or fine noise can keep surfaces from being treated as empty, disposable areas.
- Use gentle, continuous movement: Slow push-ins, drifting parallax, or restrained camera motion often hold up better than a mostly static frame with one isolated animated element.
- Keep frame rate consistent: If the animation was designed for a certain cadence, don’t export it at a mismatched frame rate just because a preset says so.
- Inspect gradients before upload: Skies, backgrounds, cheek tones, and faded paper can band fast.
If your source image already looks soft or small, fix that before you think about compression. This walkthrough on how to fix resolution issues before export is useful when the root problem is image quality, not the encoder.
The best-looking tribute uploads usually don’t look “processed.” They look stable, natural, and slightly over-prepared for compression.
What usually does not help
Some habits sound smart and still fail in practice.
- Massively increasing bitrate alone: It can help, but it doesn’t change how the platform treats low-motion areas.
- Oversharpening faces: This often creates halos and brittle edges that compress worse.
- Throwing 60fps at everything: If the source animation doesn’t benefit from it, you may just create more frames for the encoder to chew through.
- Letting the export preset decide everything: Short AI-generated clips are a special case. Generic presets don’t know that.
If you remember one thing here, make it this: low motion does not mean low risk.
Quick Export Presets for Common Video Editors
Theory helps once. A saved preset helps every week.
The settings below follow the same logic across editors. MP4, H.264, High Profile, progressive scan, matched frame rate, and a keyframe interval set to half the frame rate. The exact menu names change, but the checklist doesn’t.
Adobe Premiere Pro
Premiere Pro gives you the clearest path for building a reusable preset.
Open Export and start with:
- Format: H.264
- Preset: Any high-quality base preset near your target resolution
- Output name: Save to a test folder first so you can inspect the file
Then open the video settings and check these items manually:
- Resolution: Match your intended upload.
- Frame rate: Match the timeline unless you have a delivery reason to change it.
- Field order: Progressive.
- Profile: High.
- Bitrate encoding: Prefer VBR for an upload master.
- Key frame distance: Set it to half the frame rate.
Save that as a custom preset with a clear name like “YouTube 1080p High Profile” or “YouTube 4K Tribute Master.”
Final Cut Pro
Final Cut Pro hides some of the detail behind Apple’s simpler share interface, so the goal is consistency.
Export to Computer or a similarly editable path, then confirm you’re using an H.264 workflow and the correct resolution. Keep the frame rate aligned with the project. If you need deeper control, many editors round-trip through Compressor or a transcode utility after the master export.
The rule is the same. Don’t let convenience switch your cadence, scan type, or codec strategy without you noticing.
DaVinci Resolve
In Resolve, the Deliver page is where this gets locked in.
Choose:
- Format: MP4
- Codec: H.264
- Quality mode: Restrict only if you need it. Otherwise favor a high-quality master workflow.
- Advanced settings: Confirm profile, keyframes, and frame rate behavior
Resolve is excellent when you want precision. That precision only helps if you inspect the advanced panel instead of trusting the preset label.
How to Verify Your Upload Quality and Troubleshoot
The upload isn’t finished when YouTube says “processing complete.” You still need to check what version the platform gave viewers.
Start by opening your video on YouTube, clicking the player menu, and turning on Stats for Nerds. That overlay shows the kind of information editors care about when an upload looks softer than expected.
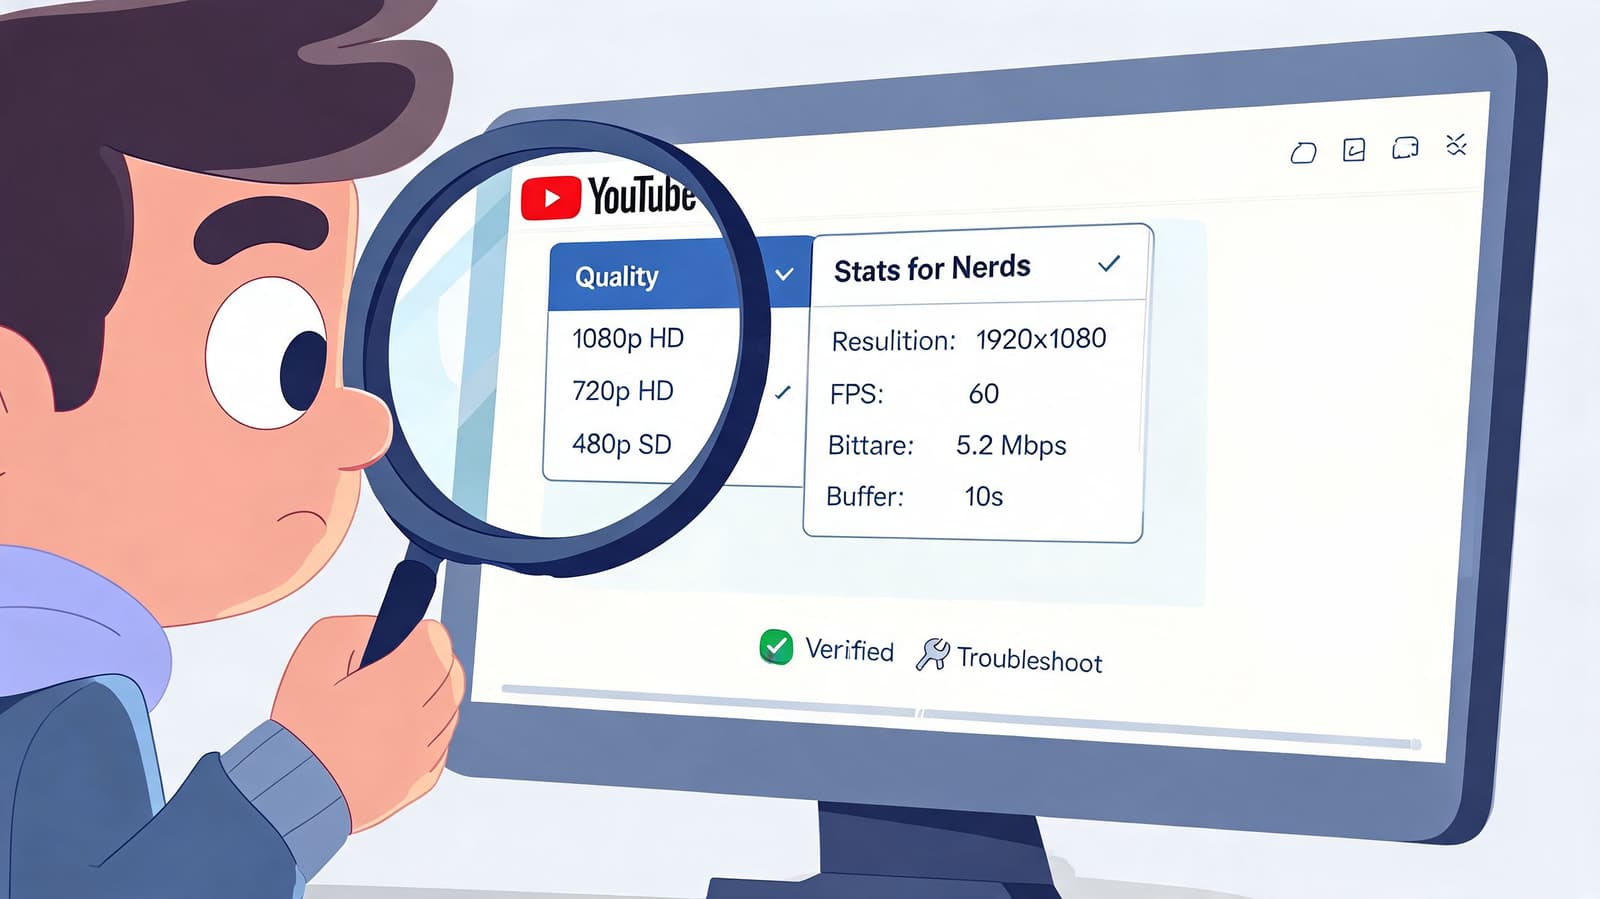
Check Stats for Nerds first
The most useful line is usually the codec line. That tells you whether YouTube delivered the video with something like avc1 or vp09. For short uploads, especially short AI-animated photo clips, that difference can be visible.
One cited source notes that creators often struggle to consistently trigger VP09 for short AI videos because those uploads can default to the more aggressive AVC1 path. It also says VP09 is often reserved for videos longer than 10 seconds, and that uploading in 4K is one of the more reliable ways to force VP09 or AV1, reducing artifacts by up to 30%, according to this YouTube discussion of VP09 behavior on short uploads.
Know what codec you got
If your short clip looks worse than expected, ask these questions in order:
- Did YouTube assign avc1 instead of vp09 or AV1?
- Did I upload a strong master, or a heavily compressed one?
- Was the clip very short and low motion?
- Did I upscale to 4K when codec quality mattered more than final viewing size?
That last point matters a lot for tribute work. A 4K upload isn’t always about viewers needing 4K. Sometimes it’s about persuading YouTube to put the video on a better compression path.
If you’re testing multiple versions, it helps to keep them short and cleanly labeled. This guide on how to trim an MP4 video for quick A/B uploads makes that easier.
Match the artifact to the likely cause
When you see a problem, name it before changing settings.
- Banding in soft backgrounds: The source may have been too compressed or the gradients too fragile.
- Blocky faces in still-photo animations: The low-motion detail likely got simplified too aggressively.
- Soft edges after upload: The master may have been weak, or YouTube may have assigned a less efficient codec.
- Seeking feels rough on phones: Recheck keyframe interval and GOP structure.
This walkthrough is worth watching while you inspect your own upload behavior:
A clean export preset gets you close. Stats for Nerds tells you what YouTube actually did with it.
If you’re turning treasured photos into short tribute clips, Photo for Video gives you a fast way to create gentle, natural-looking MP4 animations from a single still image. It’s built for memorials, birthdays, anniversaries, and family keepsakes, with exports that fit directly into real editing workflows.