Easy Ways: How Do You Compress a MOV File in 2026
Discover how do you compress a mov file on Mac & Windows with free 2026 tools. Our guide shares best settings to reduce size & preserve quality.
You finish the tribute video, watch it once more, and feel that little sting in your chest because it's right. The photo timing works. The music lands where it should. The closing shot of your dad, your grandparents, or your child's birthday candles feels worth keeping.
Then you try to send the MOV file, and it's too large for email, awkward to upload, or slow to play on someone else's phone.
That's usually when people ask, how do you compress a MOV file without ruining it. It's a fair worry, especially with keepsake videos. You're not shrinking a throwaway screen recording. You're protecting expressions, voices, old film grain, and tiny visual details that matter because they carry memory.
The good news is that safe compression is possible. You usually don't need to crush the file to the smallest size. You just need a version that's easier to share while still looking warm, clear, and trustworthy. The best results come from gentle choices, keeping your original untouched, and testing a short export before committing to the whole file.
Table of Contents
- Why Your MOV File Is So Large
- Understanding Codecs Resolution and Bitrate
- How to Compress a MOV with Free Tools
- Recommended Export Settings for Common Uses
- When to Convert Your MOV File to MP4
- Troubleshooting Common Compression Issues
Why Your MOV File Is So Large
A common version of this problem goes like this. Someone makes an anniversary montage on a Mac, exports it as a MOV, and expects to send it right away. Instead, the file is huge, the upload crawls, and family members start asking for “a smaller copy.”
That doesn't mean anything went wrong.
MOV files often come from editing software, iPhones, cameras, or QuickTime-based workflows that prioritize quality and flexibility. If your video includes full HD or 4K footage, smooth motion, music, and a long running time, the file can get heavy fast. Keepsake videos also tend to include slow pans across old photos, fades, titles, and layered audio. All of that adds up.
What makes people nervous is the next step. They assume compression means damage. Sometimes it does, especially if a tool applies harsh settings automatically. But careful compression is different. You're not trying to squeeze every last megabyte out of the file. You're trying to make a practical copy for sharing while preserving the version you love most.
Keep the original MOV untouched. Make a separate export for email, text, or upload. That one habit prevents a lot of regret.
For family videos, the goal is usually one of these:
- Share with relatives easily: The file should send or upload without friction.
- Preserve facial detail: Old photos, scanned prints, and subtle expressions should still look natural.
- Avoid over-compression: Skin tones, text overlays, and gentle motion shouldn't break into ugly artifacts.
- Create versions for different uses: One smaller copy for sharing, one better-quality copy for long-term storage.
If you approach compression as making a delivery copy, not replacing the original, the process feels much less risky. That shift matters. It helps you choose settings that respect the emotional value of the video instead of chasing the smallest possible file.
Understanding Codecs Resolution and Bitrate
The fastest way to get comfortable with compression is to stop treating MOV like the main problem. In most cases, it isn't.
MOV is the box, not the whole story
A MOV file is usually best understood as a container. Consider it a storage box. The label on the box tells you the format, but the actual size comes from what's packed inside and how it was packed.
Apple's community guidance notes that MOV files are already compressed, and making them smaller typically means exporting to smaller dimensions and lower data rates rather than expecting the .mov extension itself to shrink the file (Apple community guidance on MOV compression).
That's why changing “MOV” to something else doesn't automatically solve the issue. The big levers are inside the export settings. If you've ever struggled to preview these files, it also helps to understand which apps handle them well. A practical overview of software to play MOV files can make that side of the workflow less frustrating.
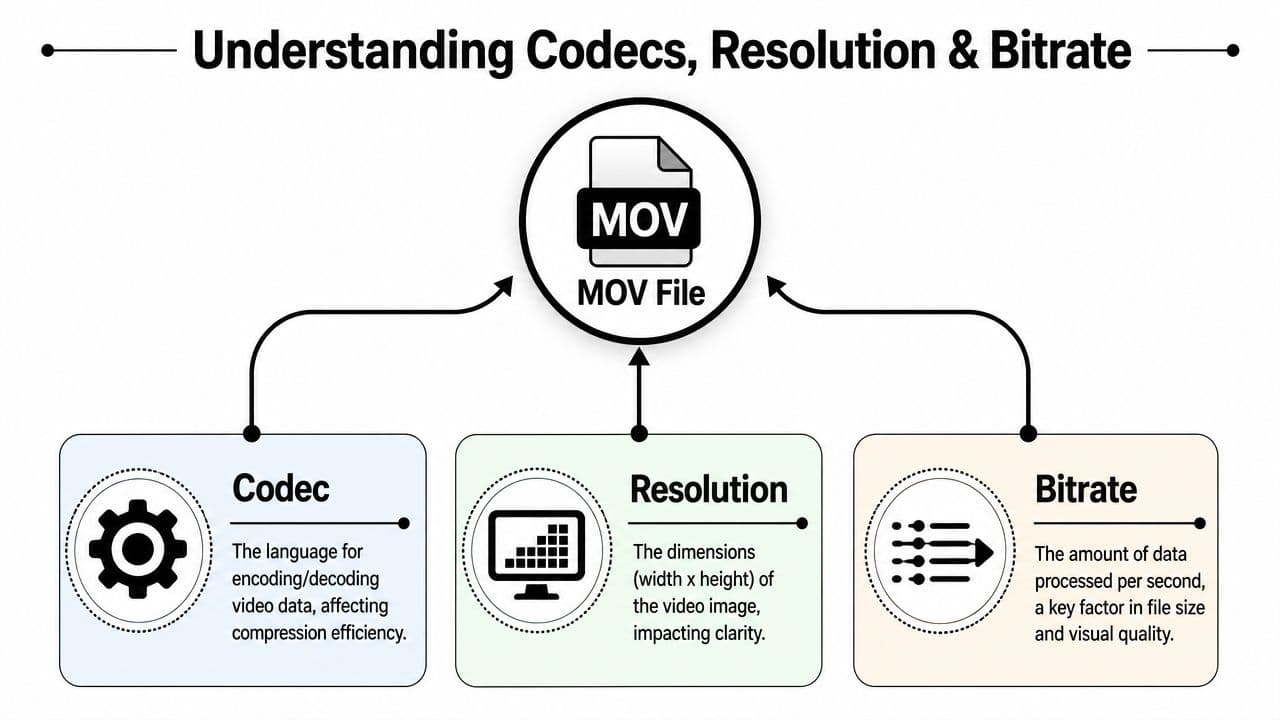
The three controls that change size most
Codec is the compression method. You can think of it as the packing technique. Two videos may look similar to your eye, but one codec may store the picture more efficiently than another.
Resolution is the frame size, such as 4K, 1080p, or 720p. It's the number of visual details the video can hold. Higher resolution can look beautiful, especially on a TV, but it also creates bigger files.
Bitrate is how much data the video gets over time. More data usually preserves more detail. Less data reduces size, but if you push it too far, the image starts to fall apart.
Here's a simple way to think about the trade-off:
| Setting | What it affects | If you lower it too much |
|---|---|---|
| Codec efficiency | Compression effectiveness | Older or less efficient choices may keep files larger |
| Resolution | Sharpness and visible detail | Faces, text, and photo texture can soften |
| Bitrate | File size and image stability | Blocking, smearing, and muddy dark areas can appear |
A fourth lever also matters in practice, frame rate, which is how many images display each second. Lowering it can save space, but motion can look less smooth. For keepsake edits built mostly from photos, gentle motion often tolerates light frame-rate reduction better than fast action footage would.
Practical rule: If a memorial montage already looks good, change one export setting at a time and check a short sample before making the whole file smaller.
Once you understand those controls, compression gets less mysterious. You're no longer asking the software to “make it smaller somehow.” You're choosing which parts of the file can be reduced without hurting the feeling of the video.
How to Compress a MOV with Free Tools
Free tools can do this job well. The trick is choosing the one that matches your comfort level.
I recommend starting with the easiest built-in option first, then moving to HandBrake if you need more control. That keeps the process calm, which matters when the video itself matters.
QuickTime Player for the simplest Mac export
If you're on a Mac and want the most straightforward answer to how do you compress a MOV file, QuickTime Player is often enough.
Open the file in QuickTime Player. Then export a new copy at a lower resolution than the original. This is the cleanest route for people who don't want a lot of settings on screen.
QuickTime is a good fit when:
- You want a quick shareable copy: Good for sending to family or posting privately.
- You don't want advanced controls: Fewer decisions means less chance of overdoing compression.
- You're working with a keepsake video that already looks right: You just need a lighter version.
The limitation is control. If the export still ends up too large, or if you want better tuning, you'll probably want HandBrake next.
A short walkthrough can help if you prefer to see the process before trying it yourself.
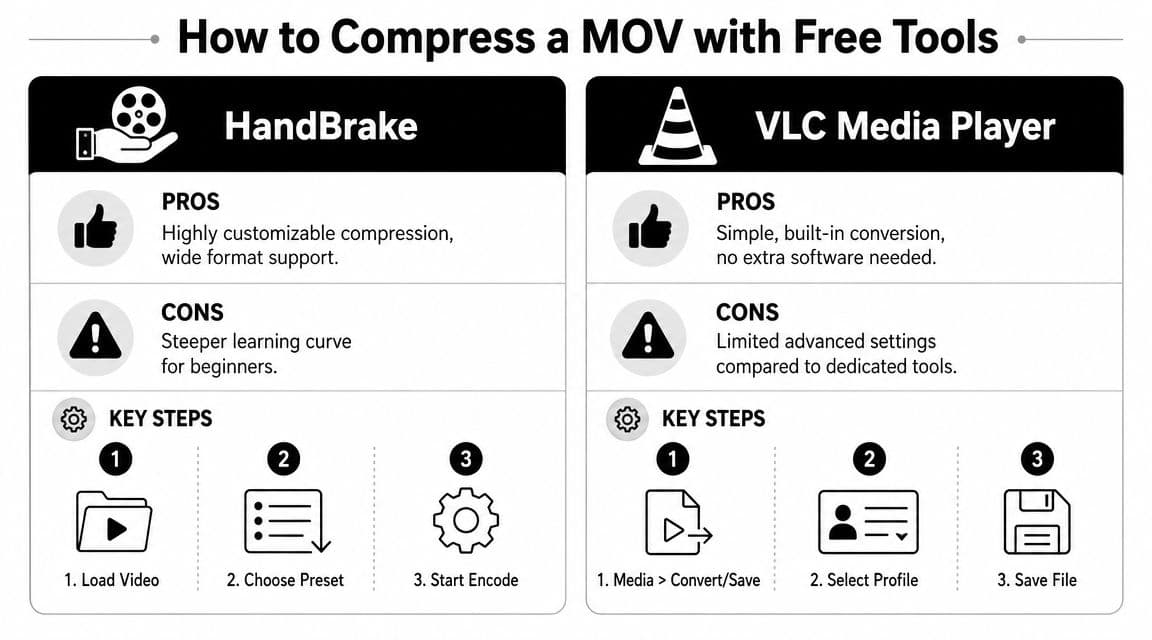
HandBrake for the best balance of control and safety
HandBrake is the free tool I'd recommend most often for keepsake videos because it gives you room to be careful. You can trim, choose a preset, adjust quality, and preview before batch exporting.
A technical walkthrough recommends a workflow that starts by cutting unwanted segments, then choosing a target codec or profile, then tuning quality controls, and finally previewing a short sample. It also warns that going below 25 fps may create jerky animation, and notes that presets like “Fast 1080p30” and “Web Optimized” are common starting points for general users (HandBrake workflow walkthrough on YouTube).
That advice lines up with what works in real life. Don't hunt for one magic button. Stack a few sensible decisions.
Try this order in HandBrake:
- Trim the video first: Remove dead air, black frames, or extra seconds at the end.
- Pick a safe preset: “Fast 1080p30” is a solid place to start for most family videos.
- Choose your format carefully: MP4 is usually the easiest for sharing, even if your source was MOV.
- Tune quality gently: Avoid dramatic reductions on the first pass.
- Preview a sample: Check faces, titles, and slow zooms before exporting the full video.
HandBrake is especially good for photo-based tribute edits because you can stay conservative. If Grandma's smile looks natural and the old-paper texture in a scanned photo still holds up, you're probably in the right range.
The best compression setting isn't universal. It depends on whether your video contains old photographs, soft dissolves, talking heads, or fast motion.
VLC when you want a basic alternative
VLC can also convert video, and it's useful if you already have it installed. It's less refined for compression work than HandBrake, but it can create a smaller, more shareable copy without much effort.
Use VLC when you want a simple backup option:
- Open VLC and choose Convert or Save
- Add your MOV file
- Select a compatible profile
- Save a new file and test playback
I'd treat VLC as the practical spare tool in the drawer. It's helpful, but if quality preservation matters most, HandBrake usually gives you a safer lane.
A privacy note about online compressors
Online MOV compressors are tempting because they feel quick. For personal tribute videos, I'd be cautious.
These files often include private family images, memorial content, children, or voice recordings. Desktop tools keep the process local, which is usually the better choice for anything sentimental. If you do use a browser-based tool, read the privacy terms first and upload only a copy you're comfortable sharing outside your device.
Recommended Export Settings for Common Uses
Compression settings should follow the job. The version you text to cousins doesn't need to match the version you keep for a TV playback or family archive.
One industry guide notes that exporting a 4K MOV as 1080p can make the file about 75% smaller, reducing frame rate from 60 fps to 30 fps can cut file size almost in half when smooth motion matters less, and switching from H.264 to the more efficient H.265 can improve compression further (practical MOV compression examples from Compresto).
That tells you where the biggest wins usually come from. Resolution first. Frame rate second, if the footage allows it. Codec choice after that.
Quick MOV Compression Settings
| Use Case | Recommended Resolution | Target Bitrate (H.264) | Notes |
|---|---|---|---|
| Email or text sharing | 720p | Lower end of your tool's H.264 quality range | Best when easy sending matters more than fine detail |
| Social posting | 1080p | Moderate H.264 setting | Good balance for tribute reels, birthday montages, and private uploads |
| Family archive or TV playback | 1080p or original resolution if needed | Higher H.264 setting | Keep more detail for faces, scanned photos, and title cards |
This table avoids one-size-fits-all numbers because content varies too much. A slideshow of old still photos behaves differently from handheld footage of a wedding dance floor. Your software's preview window matters more than chasing a fixed bitrate someone else used on a different project.
If your next step is uploading to a platform, a separate guide to YouTube video compression can help you prepare a platform-friendly version without guessing.
How to choose between H264 and H265
H.264 is the safer default when compatibility matters most. More devices, apps, and relatives' phones tend to handle it without complaint.
H.265 is worth considering when you want stronger compression efficiency and you know the playback environment is modern enough to support it well. If you're sending the file widely and you don't want support calls, H.264 is still the low-stress choice.
A simple decision rule works well:
- Choose H.264: For broad sharing, mixed devices, and less technical family members.
- Choose H.265: For smaller files when you control where the video will be played.
- Keep an archive copy: Use a higher-quality export for long-term storage, separate from your share copy.
When to Convert Your MOV File to MP4
If the video is staying inside your own editing setup, keeping it as MOV can be fine. If you're sharing it with family, uploading it online, or sending it to people on different devices, MP4 is usually the safer choice.
This comes up constantly with keepsake videos. One person watches on a MacBook, another on an Android phone, another on a smart TV, and one cousin tries to open it in an older Windows app. A MOV file may work perfectly for you and still create friction for everyone else.
That's why converting during compression often makes sense. You're solving two problems at once. You reduce file size and improve compatibility.
In practical terms, choose MP4 when:
- You want fewer playback issues: It's the easier handoff format.
- You're uploading to the web: Most platforms expect it.
- You're sending to non-Apple users: It avoids a lot of avoidable confusion.
- You want one dependable share version: It's a good default for family distribution.
If someone in your family is already struggling to open the original file, a quick guide on how to play an MOV file can help explain why that happens and when conversion is the simpler fix.
For sentimental videos, I'd keep the original export and create an MP4 delivery copy. That gives you flexibility later without forcing every recipient to deal with the quirks of the original format.
Troubleshooting Common Compression Issues
Compression usually goes smoothly until one of three things happens. The sound slips, the image turns mushy, or the file is still annoyingly large.
Those problems are fixable.
The audio is out of sync
This often shows up after a rushed conversion or an awkward re-encode. If the voices drift away from the mouth movement, try making a fresh export in HandBrake and keep the settings conservative.
A short test clip helps here. Export a small section with speech near the beginning and near the end. If that sample stays in sync, the full export is much more likely to behave.
The picture looks blocky or smeared
That usually means the compression was pushed too hard. Old photos, soft gradients, and dissolves are especially vulnerable because they can look fine at first glance and then break apart in shadows, faces, or text.
Try these fixes:
- Raise quality slightly: Move to a less aggressive compression setting.
- Keep the resolution higher: If text or facial detail got soft, don't downscale further.
- Avoid stacking too many reductions at once: If you lowered resolution, frame rate, and quality together, reverse one of those changes.
If a keepsake video looks “digital” after compression, the settings are probably too aggressive for the material.
The file is still too big
If the first smaller copy is still hard to send, don't panic and slash quality blindly. Work in an order that protects the look of the video.
Use this sequence:
- Trim extra seconds first: End slates, dead air, and long fades add weight without adding meaning.
- Lower resolution before crushing quality: A clean 1080p or 720p export often looks better than a blurry higher-resolution file.
- Review frame rate carefully: For gentle photo motion, a lower frame rate may be acceptable, but don't push it so low that movement feels stiff.
- Make separate versions: One for messaging, one for archive, one for playback on a TV.
That last step is the one people skip most often. One file doesn't need to do every job.
If you're building a tribute, memorial reel, or anniversary montage from treasured photos, Photo for Video can help you turn a single still image into a polished MP4 clip with gentle, natural motion. It's a simple way to create shareable living-memory moments that fit neatly into the kind of keepsake videos you're trying to preserve and deliver well.