How to Change Aspect Ratio of Video: Easy 2026 Guide
Master how to change aspect ratio of video for TikTok, Instagram & YouTube. Our 2026 guide covers Premiere Pro, mobile apps, and avoiding distortion.
You've got a video that matters. Maybe it's a calm clip of a grandparent smiling at the camera, a birthday montage built from old photos, or a short tribute you want to post where family will see it. Then you open your editor, change the orientation from horizontal to vertical, and suddenly the frame cuts off a face, pushes someone to the edge, or adds bars that make the moment feel smaller than it should.
That's why learning how to change aspect ratio of video isn't just a formatting task. It's a reframing decision. The software can resize a canvas in seconds, but it can't decide what part of the memory deserves to stay centered.
If you approach aspect ratio changes with that in mind, your edits get better fast. You stop asking only, “What size does this platform want?” and start asking, “What must this shot protect?”
Table of Contents
- Why Changing Aspect Ratio Is an Artistic Choice
- The Three Framing Methods Crop Pad or Stretch
- Changing Aspect Ratios in Professional Video Editors
- Quickly Changing Aspect Ratios with Free and Web Tools
- Platform Presets and Export Settings to Avoid Distortion
- Conclusion Putting It All Together
Why Changing Aspect Ratio Is an Artistic Choice
You pull up an old family video that feels complete in widescreen. Grandma is on the left, a grandchild runs in from the right, and the pause before they hug is what makes the clip matter. Then a platform asks for vertical, and the frame has to change.
That decision shapes the memory as much as the export settings do.
A ratio change is not just a formatting task. It changes emphasis, proximity, and sometimes meaning. A wide frame can hold relationships between people and the room around them. A taller frame can bring one face closer and make the moment feel more immediate, but it can also strip away the context that gave the shot its tenderness in the first place.
Personal videos make this trade-off harder. In a birthday montage, the detail you lose might be a hand resting on a shoulder at the edge of frame. In a memorial piece, it might be the date on a card, the grain of an old print, or the empty space beside someone that makes the image feel quiet rather than crowded.
What the frame communicates
Composition influences feeling. Space around a subject can make a clip feel reflective, calm, or distant in a good way. A tighter vertical framing can feel intimate and direct. Neither is automatically better. The right choice depends on what the viewer needs to notice first, and what should remain visible long enough to register emotionally.
I usually judge the shot by asking one question first. What is the memory about?
If the answer is a person's expression, a closer vertical version may work well. If the answer is the interaction between two people, or the sense of place around them, forcing that shot into a narrow frame can weaken it even if the result looks more native on a phone screen.
Practical rule: If the emotional point of the shot sits near the edge, test a fitted or padded version before cropping anything.
Meaningful videos need a higher bar
Brand clips and product demos can survive aggressive reframing because the message is often simple. Personal footage usually carries more fragile information. Small visual details do a lot of the storytelling. A glance between siblings. A half-visible arm pulling someone closer. Decorations in the background that place the scene in a specific home and a specific year.
That is why the best version is not always the one that fills every pixel of a platform layout. Sometimes the stronger edit keeps more of the original frame, even if that means accepting borders or a little unused space.
A practical way to evaluate the shot:
- Start with the viewing context: Is this meant for a Story, a Reel, a tribute slideshow, or standard playback on a TV or laptop?
- Protect the emotional center: Faces, gestures, interactions, handwritten notes, and environmental context usually matter more than a full-frame look.
- Treat reframing like editing: Changing ratio changes attention. Attention changes meaning.
Once you approach aspect ratio this way, the software choices become easier to judge. You stop asking only, “Will this fit?” and start asking, “Will this still feel like the moment I'm trying to preserve?”
The Three Framing Methods Crop Pad or Stretch
Before you touch any export button, decide how the new frame will be built. Every resize falls into one of three methods. Crop, pad, or stretch.
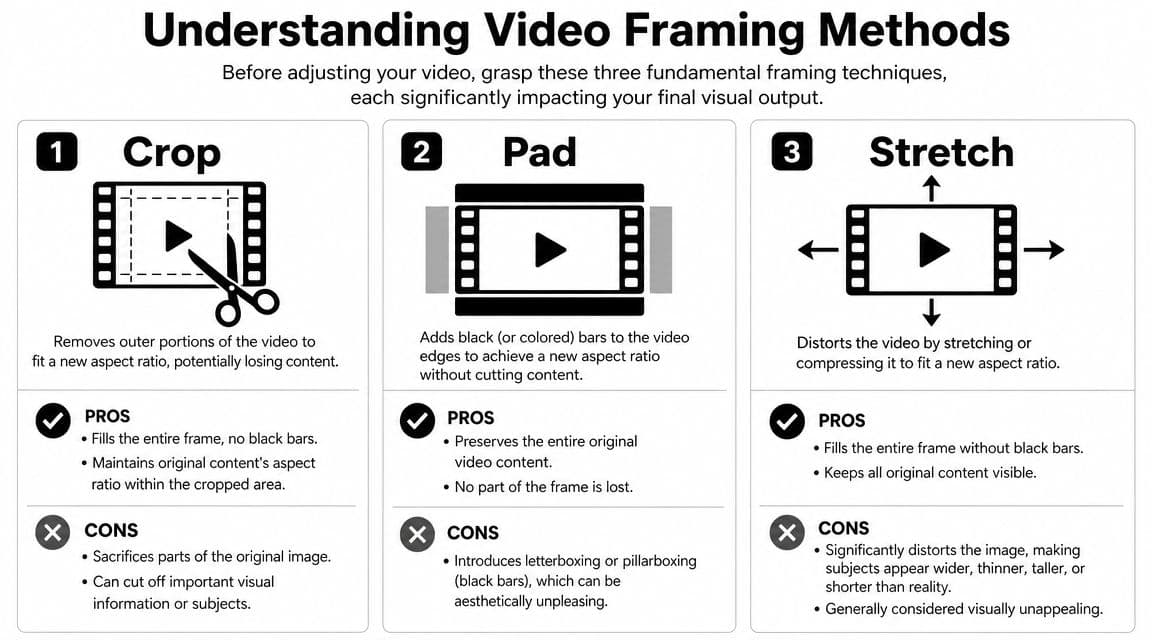
Think of the same example in each case: a gently animated family photo turned into video. Two people stand side by side. One is slightly off-center. There's meaningful background detail around them.
Crop fills the frame by sacrificing edges
Cropping means the new aspect ratio is filled completely, but some of the original image is removed. In many editors, this is the visual result you get when you choose a fill-style option.
It's often the cleanest-looking result on social platforms because there are no bars. It also creates the biggest risk. If your subject was composed for a horizontal composition, a vertical crop can remove one person's shoulder, cut off hair, or eliminate negative space that made the shot feel balanced.
Use crop when:
- The subject is already central: A single face or torso in the middle usually converts well.
- The edges don't matter: Background scenery can often be trimmed without harm.
- The platform experience matters most: Full-screen vertical playback benefits from a filled frame.
Avoid it when:
- The shot contains multiple people: Someone always ends up too close to the edge.
- Text or handwriting appears near the margins: Cropping partial words looks careless.
- The original image was composed deliberately wide: You can flatten the mood by forcing it narrow.
Pad keeps everything and adds space
Padding means the entire original image stays visible inside the new shape. The empty space around it appears as bars or as a custom background.
Microsoft's support guidance for Clipchamp explicitly separates fill from fit, with fill removing black bars and fit restoring borders. Clideo also allows custom dimensions, zoom, position, and background color adjustments, which makes the decision less about picking a preset and more about protecting the composition without awkward cropping (Clipchamp fit and fill guidance).
Padding is the safer choice for personal media because it doesn't throw away image content. It can also look intentional if you use the background thoughtfully.
A padded frame often feels more respectful than a tight crop when the original material contains irreplaceable details.
Good uses for padding include:
- Tribute edits: Full faces, clothing, and handwritten elements remain intact.
- Old photos with borders or texture: Preserving the entire artifact matters.
- Group shots: Nobody gets cut out for the sake of platform conformity.
The downside is visual. Bars can look passive or unfinished if you don't style them well.
Stretch keeps all content but distorts reality
Stretching forces the source to fill the new frame by warping it. People can look wider, thinner, taller, or compressed. It technically solves the fill problem and preserves all original content, but it changes the image itself.
That's why it's usually the wrong choice for meaningful footage. A memorial clip shouldn't make a face look misshapen. A wedding clip shouldn't turn natural posture into something subtly off.
There are rare exceptions, such as stylized graphics or background layers where distortion isn't noticeable. For people, old photos, and keepsakes, stretching is the method to avoid.
The fastest way to choose
If you're stuck, use this order:
- Try padding first for anything sentimental.
- Test cropping second if the subject remains centered and clean.
- Skip stretching unless you're working with non-human visuals.
That simple hierarchy prevents most bad conversions before they happen.
Changing Aspect Ratios in Professional Video Editors
Professional editors don't need another button tour. What matters is a repeatable workflow that turns one master sequence into multiple deliverables without wrecking composition.
The best habit is to finish your master edit first, duplicate the timeline, and then reframe for each destination. That keeps your original pacing and mix intact while giving you room to make platform-specific composition choices.
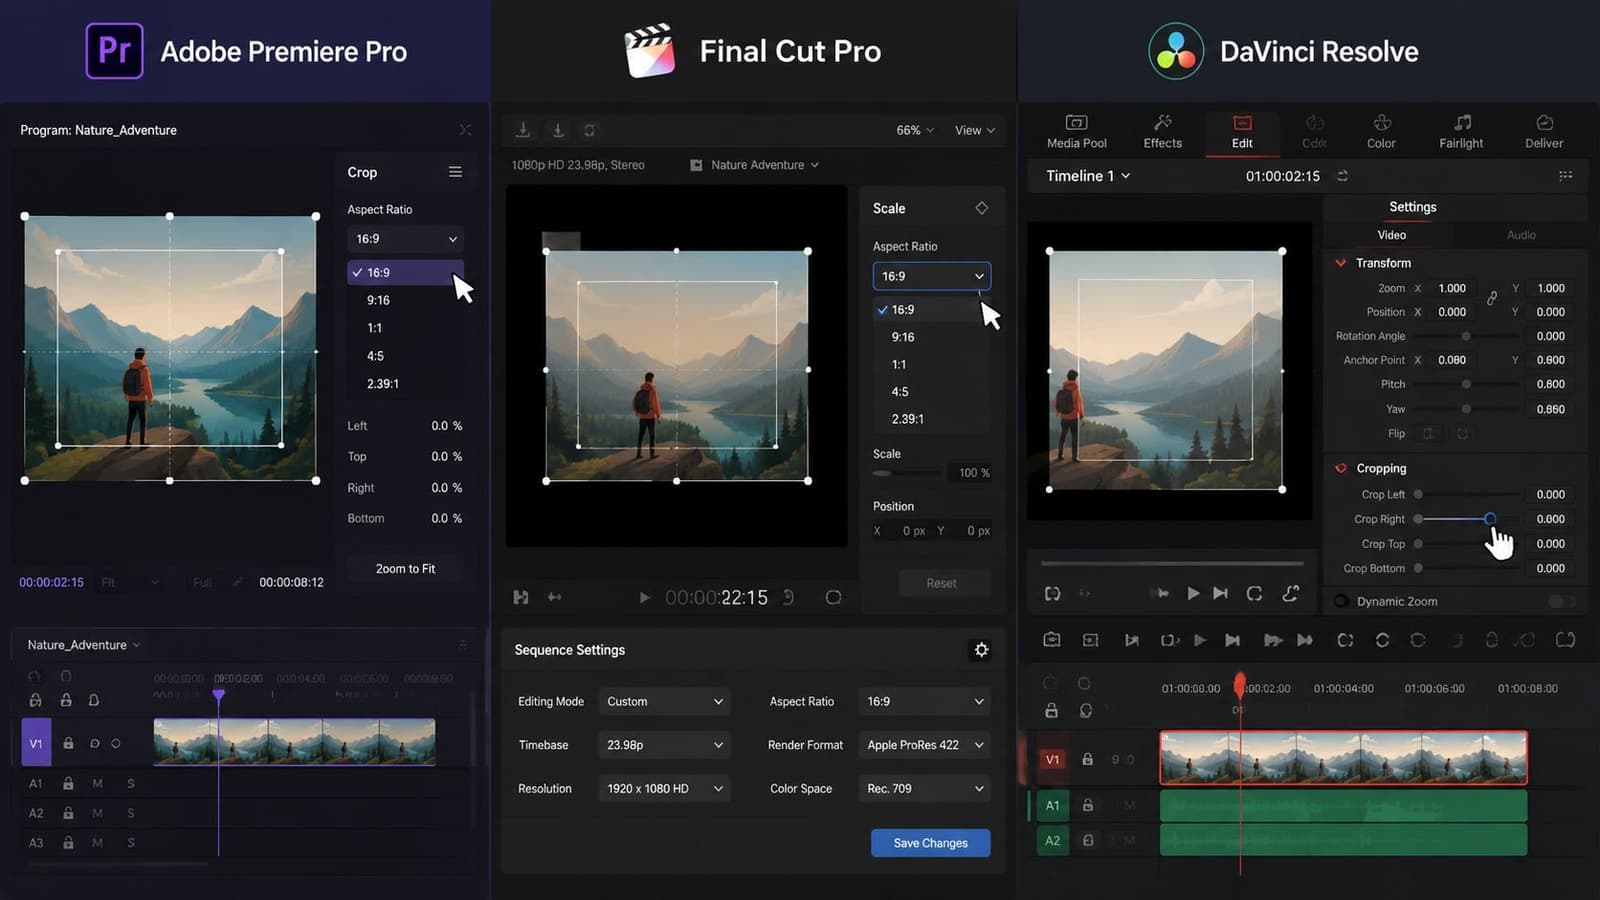
Adobe Premiere Pro
Adobe Premiere Pro is especially strong when you need a fast social version from a finished wide-format edit. Adobe tutorials show a workflow where you switch a sequence to a vertical format such as 1080 × 1920 for 9:16, then use Auto Reframe to track and scale the subject automatically after selecting the target ratio (Adobe Premiere Pro Auto Reframe tutorial).
That automation helps most with clips that have one clear subject moving through frame. It won't understand emotional context on its own, so you still need to review every shot.
A practical Premiere workflow looks like this:
- Duplicate the master sequence: Keep the original safe.
- Change the sequence target ratio: Use the destination you need.
- Run Auto Reframe: Let the software do the first pass on tracking.
- Manually fix the problem clips: Group shots, text overlays, and edge-heavy shots usually need hand adjustment.
- Check vertical titles and graphics: Even strong reframing can leave text too close to the top or bottom.
If your converted sequence also looks soft, squeezed, or overly enlarged, it helps to review common video resolution fix steps before exporting again.
Final Cut Pro
Final Cut Pro works best when you treat aspect ratio changes as project-level decisions first and clip-level decisions second. Change the project properties for the new shape, then inspect each shot for center, headroom, and edge detail.
Smart conform tools can save time, but they're not a substitute for judgment. Final Cut is often fast on clean single-subject clips and less reliable on layered edits, old scans, or montages with animated movement.
What usually works in Final Cut:
| Workflow need | Best approach |
|---|---|
| Single speaker or portrait shot | Use automatic conform, then trim position manually |
| Group scene or family gathering | Reframe by hand shot by shot |
| Old photo pan or slow push-in | Preserve the original image first, then crop only if safe |
DaVinci Resolve
Resolve gives you strong reframing control, especially if you're already comfortable moving between the Cut and Edit pages. Smart reframe-style tools can accelerate rough adaptation, but Resolve shines when you need to finesse problem shots yourself.
That's useful for tribute work because sentimental footage rarely behaves like clean commercial footage. Old scans may have uneven borders. Home video may have shaky framing. A face might drift off-center during a gentle zoom.
What automation gets right and wrong
Automatic subject tracking is a real workflow improvement. It removes a lot of repetitive repositioning. But it doesn't know what part of the shot carries meaning.
It can keep a face centered while cropping out the hand someone is holding. It can preserve a speaker while trimming off the date overlay you added for context. It can follow motion and still ruin the composition.
Editor's check: Automation is for first passes. Emotional footage still needs human approval on every cut.
For professional work, the strongest method is simple. Build one polished master. Duplicate it. Reframe intentionally for each destination. Let automation save time, not make aesthetic decisions for you.
Quickly Changing Aspect Ratios with Free and Web Tools
Sometimes you don't need Premiere, Final Cut, or Resolve. You just need the clip resized, framed decently, and ready to send to family before the moment passes.
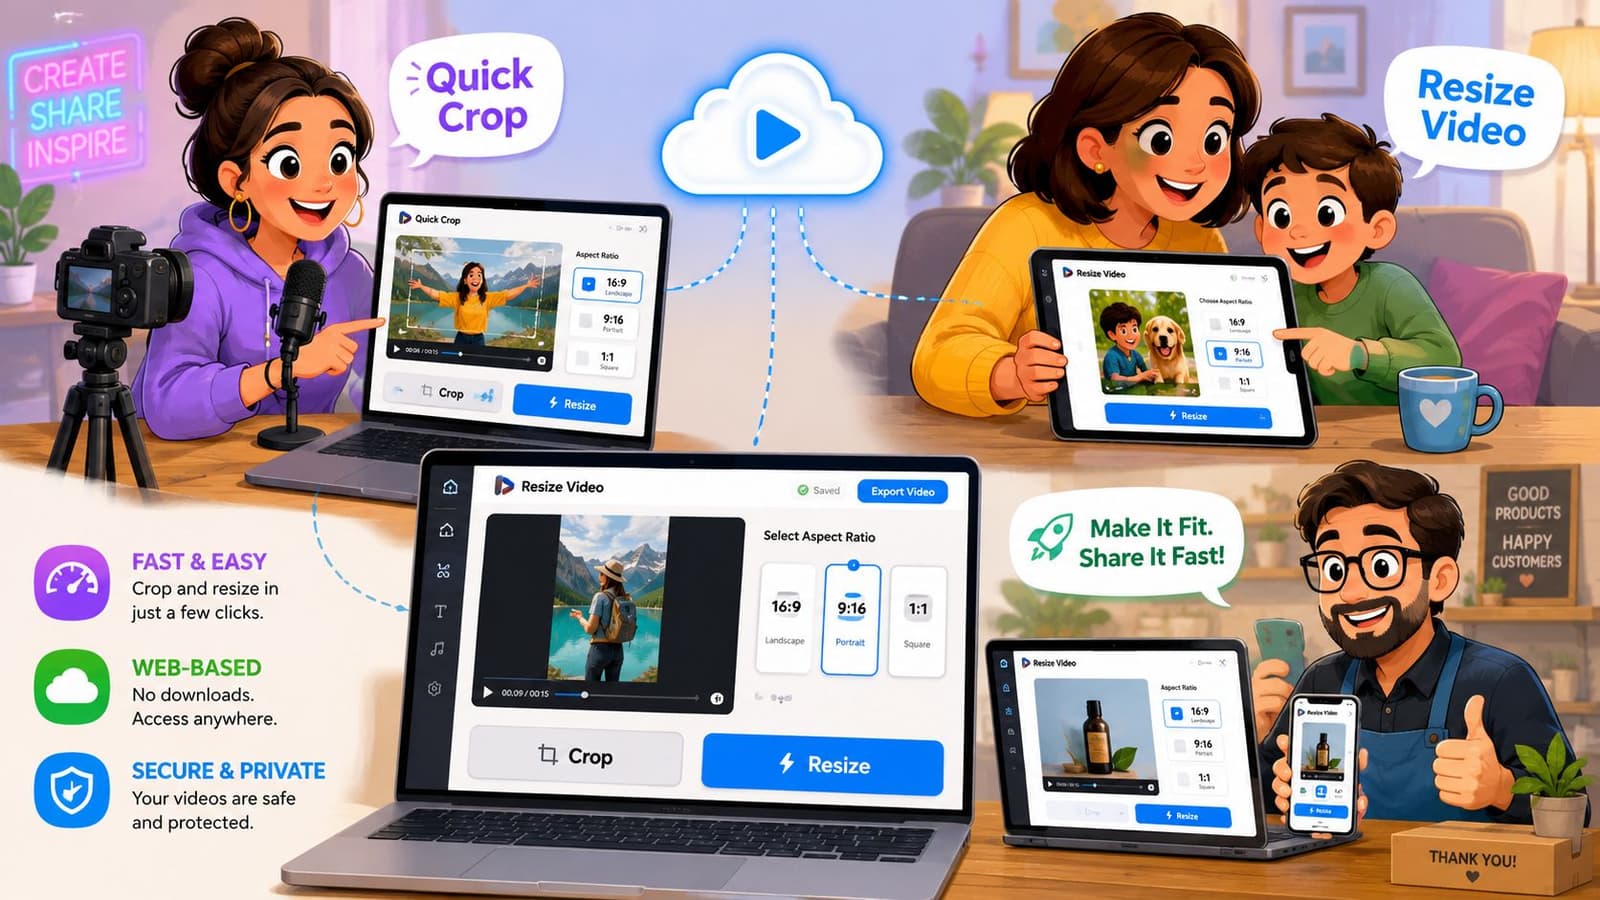
That's where browser-based tools and lightweight utilities help. They're not built for deep timeline work. They are built for speed.
Clideo for fast browser-based resizing
Clideo is useful when you want a straightforward interface and don't want to install anything. Its online resize tool allows free uploads up to 500 MB, supports presets and custom dimensions, and includes crop, zoom, position, and background-color controls before export (Clideo video resize tool limits and controls).
That combination matters more than it sounds. Presets alone aren't enough. You often need to nudge the image upward, zoom slightly, or replace black bars with a cleaner background so the result feels finished.
Use it when:
- You have one short clip to repurpose
- You need simple reframing controls
- You're helping family members who won't use pro software
Skip it if you're editing a full multi-layer tribute with lots of titles, audio timing, and precise transitions.
HandBrake and FFmpeg for utility-first workflows
HandBrake is a practical choice when your main task is conversion and basic resizing rather than creative editing. It suits users who want more control than a web app but less complexity than a full non-linear editor.
FFmpeg is different. It's for people who are comfortable with command-line tools and want exact repeatable output. It's powerful for padding workflows, batch work, and custom dimensions, but it isn't friendly if you need visual reframing decisions shot by shot.
If you edit mostly on mobile, a dedicated video converter for Android can also be a better fit than forcing a desktop-style workflow on a phone.
What free tools do well
Free and web tools are best when the clip is simple and the goal is clear. They handle these jobs well:
- Turning horizontal format into a vertical social post
- Making a square version of a family clip
- Adding background treatment around mixed-orientation media
- Exporting something shareable without a long learning curve
Here's a quick visual walkthrough if you want to see a simple resizing flow in action:
Where quick tools fall short
What they don't do well is emotional nuance. They can resize the frame. They can't tell whether the cropped edge contains the only visible hand of a loved one or the side of a faded note that matters to the family.
That means the same rule still applies. Preview the final framing before export. If a quick tool gives you a technically correct result that feels visually wrong, it's not finished.
A fast resize is only successful if the people in the video still feel present, natural, and fully seen.
Platform Presets and Export Settings to Avoid Distortion
A clean reframe can still fall apart at export. I see this most often with tribute videos, old family clips, and slideshow-style edits that looked right in the timeline but come out stretched, boxed, or oddly soft on the platform where people watch them.
The fix is straightforward. Set the platform, build the sequence in that ratio, and export in that same ratio. If those three choices do not match, the platform often makes the final decision for you, and that is usually where faces widen, heads get clipped, or black bars appear where you did not intend them.
Social Media Video Aspect Ratios for 2026
| Platform | Placement | Aspect Ratio | Recommended Resolution |
|---|---|---|---|
| Reels | 9:16 | 1080 × 1920 | |
| Stories | 9:16 | 1080 × 1920 | |
| Feed post | 4:5 | Match platform ratio preset in your editor | |
| Feed post | 1:1 | Match platform ratio preset in your editor | |
| TikTok | Standard post | 9:16 | Match platform ratio preset in your editor |
| YouTube | Shorts | 9:16 | 1080 × 1920 |
| YouTube | Standard video | 16:9 | Match widescreen sequence export |
| Stories | 9:16 | Match platform ratio preset in your editor | |
| Feed post | 4:3 | Match platform ratio preset in your editor | |
| Feed post | 4:5 | Match platform ratio preset in your editor | |
| Feed post | 9:16 | Match platform ratio preset in your editor | |
| Feed post | 1:1 | Match platform ratio preset in your editor | |
| Feed post | 16:9 | Match widescreen sequence export |
These presets are useful because they remove guesswork, but they should not replace judgment. A vertical preset may be correct for Instagram Reels, yet still wrong for a wide family scene where two people sit at opposite edges of the frame. In that case, the technical preset is right and the composition still needs work.
Export choices that keep the image honest
A few settings prevent most distortion problems:
- Match export ratio to the sequence: If the timeline is 9:16, export 9:16. Do not place a vertical edit inside a 16:9 file unless you want visible side bars.
- Use square pixels for modern delivery: Older pixel aspect settings can warp the image on current phones, tablets, and social platforms.
- Check scale behavior before export: “Fill,” “stretch,” and automatic fit settings can change the frame in ways that are easy to miss until skin tones, faces, or text look wrong.
- Preview on the kind of screen people will use: A crop that feels acceptable on a desktop monitor can feel tight and uncomfortable on a phone.
- Watch compression after upload: Fine detail, soft gradients, and low-light footage often break down first. If upload softness is the problem, these YouTube video compression tips can help you diagnose whether the issue is export quality, bitrate, or platform processing.
One more practical habit matters with personal footage. Export a short test first.
That quick check can save a meaningful shot. A memorial clip, a wedding toast, or the only usable video of a grandparent may need a different crop once you see it on the final platform, full screen, with the captions and interface elements in place.
One practical rule for platform presets
Pick the platform first. Pick the ratio second. Frame the shot for that ratio before you export.
That order protects both image quality and intent. It keeps the video from looking technically wrong, and it gives the people in the frame enough room to still feel present, natural, and remembered the way they should be.
Conclusion Putting It All Together
The best workflow is simpler than commonly believed.
Start with where the video is going. If it's for a vertical story or short-form post, build for that shape. If it's staying in standard playback, leave it wide. The destination should decide the frame, not habit.
Then choose the framing method based on what the shot must protect. Crop when the subject is central and the edges don't matter. Pad when the whole image carries meaning. Avoid stretch for people and personal memories unless distortion is part of a deliberate style.
After that, use the tool that matches your actual needs. Professional editors are ideal when you're creating multiple deliverables from one master timeline and need detailed control. Free and web tools are often enough when the job is straightforward and speed matters more than deep editing.
A useful mental checklist looks like this:
- Choose the destination first
- Protect the emotional center of the shot
- Pick crop, pad, or manual reframe intentionally
- Preview before export on the kind of screen people will use
- Export in the same ratio you framed
That's really what learning how to change aspect ratio of video comes down to. Not just resizing a rectangle, but adapting a moment so it still lands on a different screen.
The software can help. Presets, fit options, fill options, auto reframe tools, and browser resizers all save time. But the part that makes the final video feel right is still human judgment. When the footage is personal, that judgment matters more than speed.
Your memories don't need perfect technical purity. They need thoughtful framing. If the right face stays visible, the right gesture stays intact, and the feeling of the original moment survives the conversion, you did the job well.
If you're turning a treasured photo into a tribute clip before you even start resizing, Photo for Video makes that first step easier. It helps you transform a single still image into a short living-memory MP4 that you can then place into reels, montages, birthday edits, memorial videos, and family keepsakes with far less manual setup.