How to Do a Voiceover on a Video: A Practical Guide 2026
Learn how to do a voiceover on a video with our step-by-step guide. From recording on your phone to mixing for tribute edits, we cover it all.
You've probably got the video open already. The photos are in order, the transitions are set, the music is close, and maybe one clip in particular keeps catching in your throat. It looks good, but it still feels unfinished. That's usually the moment when people realize the missing piece isn't another effect. It's a voice.
For family tributes, birthday edits, anniversary slideshows, and animated photo videos, narration does something visuals can't do alone. It gives context. It tells the viewer why this image matters, what happened just before it was taken, or what the person in the frame meant to everyone around them. If you're building a keepsake from old pictures, this is often the step that turns a montage into a story. If you need help shaping the visual side first, this guide to making a memory slideshow is a useful companion.
A lot of first-time creators assume voiceover is complicated because they picture a studio, an expensive microphone, and editing software full of controls they don't understand. In practice, how to do a voiceover on a video comes down to a few decisions made in the right order. Write clearly. Record in a quiet space. Clean the audio just enough. Then sync it so the voice leads the emotion instead of fighting the visuals.
Table of Contents
- Connecting Your Voice to Your Video Story
- Planning and Writing a Script That Speaks Naturally
- Recording Clear Audio Without a Professional Studio
- Editing and Cleaning Your Voiceover Recording
- Syncing and Mixing Your Voiceover with Video
- Special Tips for Tribute Videos and Animated Photos
Connecting Your Voice to Your Video Story
You open a tribute video, and the photos are beautiful. The room is quiet. Then the voice comes in, and within one line, the whole piece either feels personal or it feels generic.
That difference rarely comes from having a perfect voice. It comes from choosing a voice that fits the story.
In personal projects, the job of narration is emotional translation. A photo of your grandfather at the kitchen table may look warm to any viewer, but the right line can tell them why that moment mattered, what kind of man he was, or why that ordinary table still means something to your family. If you are building a remembrance piece or a memory slideshow for family and friends, that layer matters as much as the visuals.
A sincere read usually works better than a polished one that feels detached. I would rather hear a slightly rough voice with real feeling than a clean recording that sounds like it belongs in a commercial. For tribute videos, viewers forgive a little imperfection. They do not forgive emotional distance.
What narration adds that music alone cannot
Music shapes mood, but words shape meaning.
A wedding portrait, a school photo, or a softly animated scan can already carry beauty on its own. Narration helps when the viewer needs one more piece of guidance. Sometimes that means context. Sometimes it means pointing attention toward a small detail. Sometimes it means giving the audience permission to feel what the visuals are already suggesting.
Use narration when the image is clear but the significance is not.
That does not mean every moment needs a spoken line. One of the most common beginner mistakes is filling every gap with explanation. In meaningful projects, restraint is part of the craft. If a photo already says enough, let it breathe. Save the voice for the moments where it adds memory, contrast, or emotional weight that the picture cannot carry by itself.
What works in meaningful projects
The strongest voiceovers for family stories usually sound like someone speaking to one person, not addressing a crowd. That tone keeps the video intimate, which matters even more when the subject is loss, gratitude, legacy, or a shared family memory.
These approaches tend to work well:
| Approach | Works well when | Often fails when |
|---|---|---|
| Gentle personal narration | You knew the person or event closely | The script turns into long explanations |
| Short reflective lines | The visuals already carry strong emotion | Every image gets narrated |
| Sparse storytelling with pauses | Memorials and legacy videos | The music is too busy underneath |
There is a trade-off in every choice. More narration gives clarity, but it can crowd the viewer's feelings. Less narration leaves room for reflection, but it can also leave important meaning unstated. The right balance depends on what your video needs the audience to understand, and what it should let them discover for themselves.
If you remember one thing from this part, let it be this. The best voiceover does more than describe the video. It helps the viewer feel the story in the way you intended.
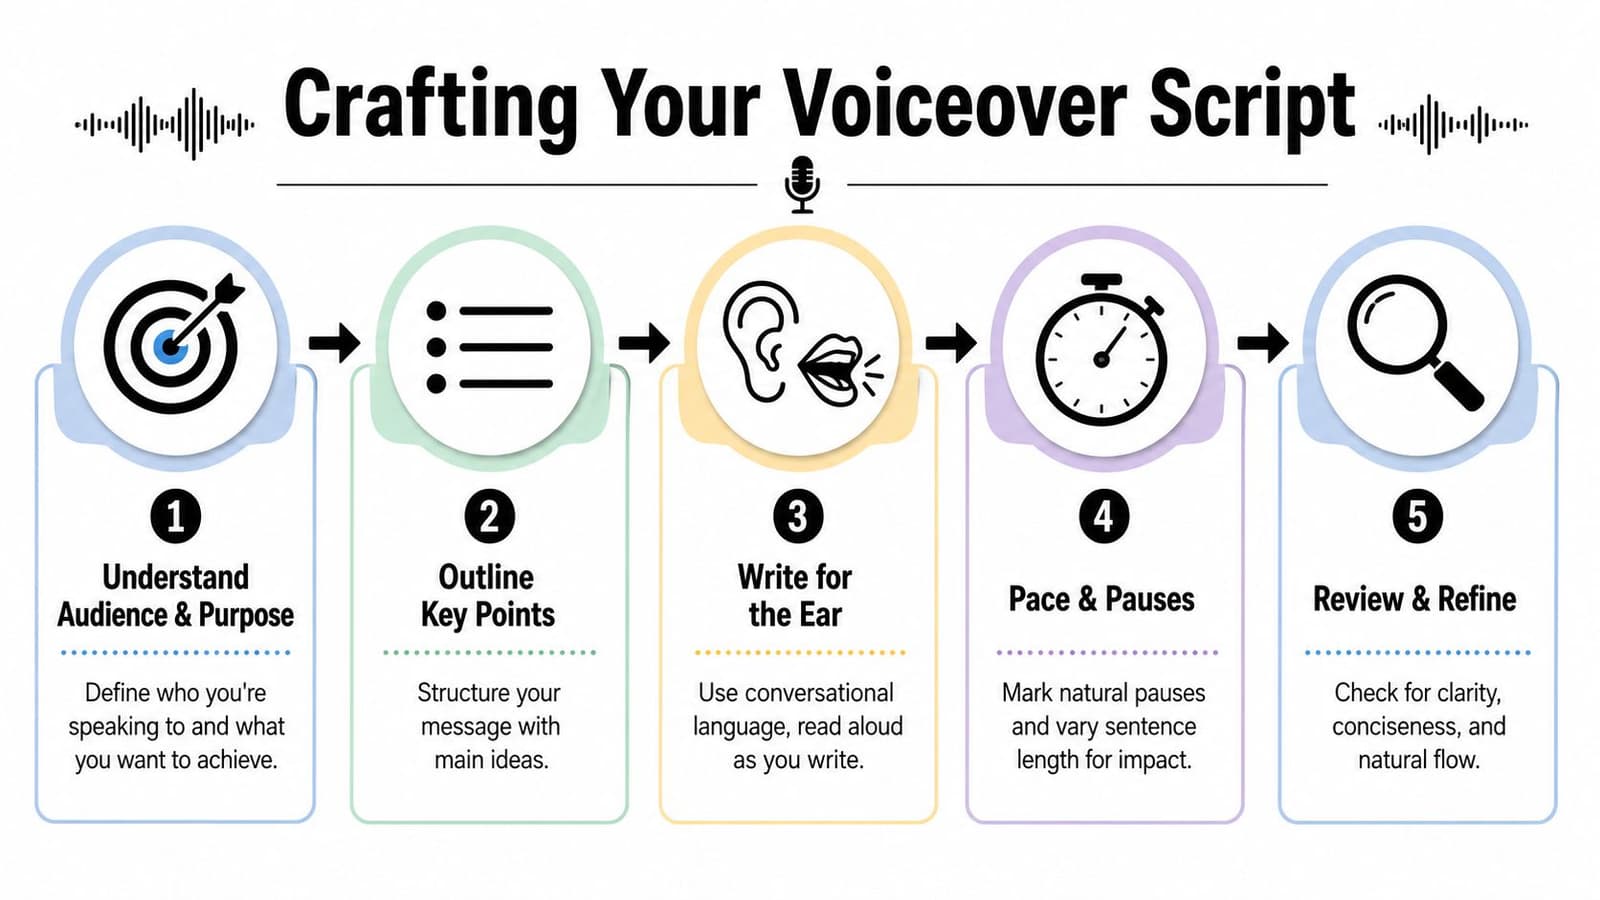
Planning and Writing a Script That Speaks Naturally
Most voiceover problems start before the mic is on. They start on the page.
A script for video has to be heard clearly on the first pass. People don't rewind a tribute video because a sentence was too formal. They just miss the line. That's why the script should sound like speech, not like an essay.
Industry guidance on advertising voiceover points to the importance of clarity and recall, and notes that U.S. advertisers spent more than $3 billion on digital audio advertising in 2020. The same guidance also says voiceover can be even more effective for memory recall than visual-only ads, which is a useful reminder that spoken wording matters as much as the pictures in front of it. That comes from WellSaid's discussion of voiceover in advertising.
What spoken writing sounds like
The easiest way to write a usable script is to say the lines out loud while you draft them. If you stumble, rewrite. If you run out of breath, split the sentence. If a phrase feels stiff, replace it with something you'd say to another person.
Good voiceover writing usually has these qualities:
- Short sentences: They're easier to record cleanly and easier to understand.
- Direct wording: “He loved Sunday dinners” works better than a more formal version.
- Natural pauses: Leave room for emotion and for the visuals to register.
- Selective detail: Add what the image can't tell us on its own.
Don't write to describe the photo. Write to deepen it.
For example, don't say, “This is Grandma standing in her garden.” The audience can already see that. A stronger line is, “She planted tomatoes every spring and acted surprised when we showed up for lunch the day they were ready.”
A simple script shape that works
If you're unsure how to do a voiceover on a video without overthinking it, use a three-part structure:
-
Open with orientation
Start with one line that grounds the viewer. “This is how we'll remember him.” Or, “These are the moments that built our family.” -
Move through a few specific memories
Pick details with texture. A habit, a phrase, a place, a routine. -
End with a feeling, not a summary
The final line should linger. It doesn't need to explain everything.
A tribute script also benefits from marking pauses directly into the text. Use line breaks, ellipses if that helps you pace privately, or simple notes like “pause.” Those marks can save you from rushing through the most important part.
Recording Clear Audio Without a Professional Studio
You can record a touching voiceover in an ordinary room. The difference comes from choosing a space that sounds calm, then speaking in a way that fits the feeling of the video.
For family tributes, memorial slideshows, and animated photo stories, clean audio matters because the voice carries memory. A little room echo can make a sincere line feel distant. A simple, close recording often feels more personal than a polished take in the wrong space.
If your project begins with still images, this guide to an app for making videos from photos can help you build the visual sequence before you record around it.
Your room shapes the sound first
Hard rooms create problems fast. Kitchens, hallways, and empty home offices tend to add slapback and a brittle edge that is hard to fix later.
Soft rooms help. A bedroom with curtains, carpet, and a full closet usually beats a better microphone in a bare room. I have heard phone recordings from quiet bedrooms that felt warmer and more believable than expensive mics used in echoey spaces.
A parked car can work well too, if the area is quiet. The upholstery absorbs reflections, and the space is small enough to keep the voice close and controlled.
Before recording the full script, test the space for 20 to 30 seconds and listen back on headphones. Pay attention to three things. Echo, background hum, and mouth-level pops on words with P and B sounds.
A simple setup works
You do not need much gear for a first project. You need a consistent position and as little noise as possible.
Use these basics:
- Record a short test take first: Read a few real lines from the script, not just “testing, testing,” so you hear your actual pacing and tone.
- Keep the mic slightly off-center: Pointing it a little past your mouth reduces plosives and harsh bursts of air.
- Stay the same distance the whole time: About 6 to 10 inches works for many phones and USB mics.
- Stand or sit upright: Good posture helps breath support and keeps your energy steady.
- Turn off noise sources: Fans, AC, dishwashers, laptop alerts, and buzzing lights all show up more than people expect.
A phone voice memo app is often enough for tribute videos. Phones can sound surprisingly good when the room is quiet and the speaker stays close. Built-in laptop microphones are less forgiving because they often capture more room sound and fan noise.
Choose the voice that belongs in the story
The right narrator is the one the viewer believes.
That does not always mean the clearest or most polished voice. A slightly shaky read from a son talking about his father may carry more weight than a smooth read from someone with perfect diction. On the other hand, if the emotion is so strong that the speaker keeps stopping, a sibling, spouse, or close friend can read the words and still keep the project personal.
Match the voice to the role the narrator plays in the story. A family tribute usually needs warmth, steadiness, and restraint. A playful birthday montage can handle more bounce and personality. For animated photos, where movement adds a dreamlike quality, a calm voice often helps the visuals feel grounded rather than overly sentimental.
One rule holds up almost every time. A steady, honest read lands better than a dramatic performance.
If you are unsure who should narrate, record the same paragraph with two different people and play both versions over the strongest image in the video. The better choice is usually obvious once you hear the voice against the memory it is meant to carry.
Editing and Cleaning Your Voiceover Recording
Editing voiceover is mostly cleanup. You're removing distractions so the words can do their job.
You do not need an advanced audio chain to get good results. In CapCut, iMovie, Descript, Audacity, Premiere Pro, Final Cut Pro, and similar tools, a beginner can make major improvements with a few basic moves. The order matters more than the software brand.
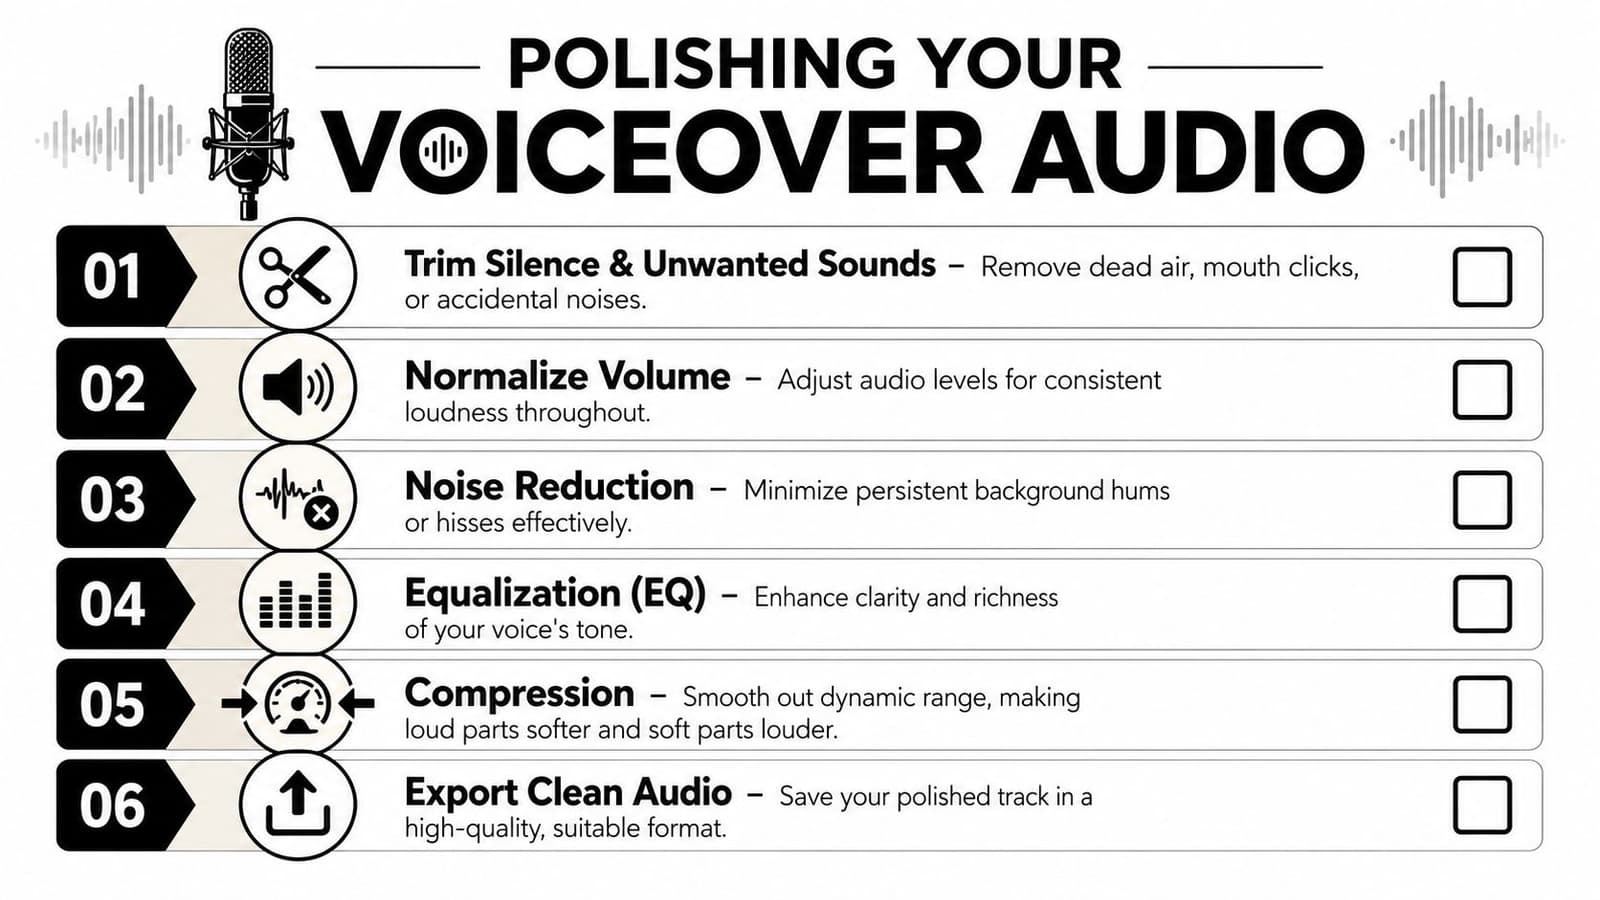
Start with cuts, not plugins
Listen through once with a pencil-and-paper mindset. Mark obvious issues before you touch any effects.
Cut these first:
- Dead space at the beginning and end
- Misreads and repeated takes
- Long pauses that feel accidental
- Mouth noises, coughs, or bumps if they distract
Leave some breathing room, especially in tribute videos. You're not trying to make the narration machine-smooth. You're trying to remove the moments that break attention.
A useful test is to listen once without watching the video. If the pacing still feels human and clear, you're on the right track.
Use basic processing gently
After trimming, apply simple cleanup. According to Lightworks' guide to voiceovers in video, key post-production steps include noise reduction, EQ, compression, and normalization. The same guide recommends a high-pass filter to remove low-frequency rumble and a modest presence boost around 3 to 6 kHz to improve clarity, followed by compression and normalization for more consistent loudness.
If those terms are new, think of them this way:
| Tool | Plain-English job | Beginner advice |
|---|---|---|
| Noise reduction | Lowers steady hiss or hum | Use lightly or voices can sound metallic |
| EQ | Shapes the tone of the voice | Cut rumble first, then add a little clarity |
| Compression | Evens out loud and soft parts | Helpful if your volume varies between lines |
| Normalization | Sets an overall consistent level | Good as a final leveling step |
Quick check: If the cleaned file sounds sharp, brittle, or oddly underwater, back off the processing.
Many initial edits go wrong because people hear a tiny bit of room noise and over-correct. A slightly natural recording with a hint of room tone is usually better than an aggressively processed voice that no longer sounds human.
One more habit matters. Always preview the voiceover with the music and video, not only in solo mode. A recording can sound clean by itself and still disappear once the soundtrack comes in.
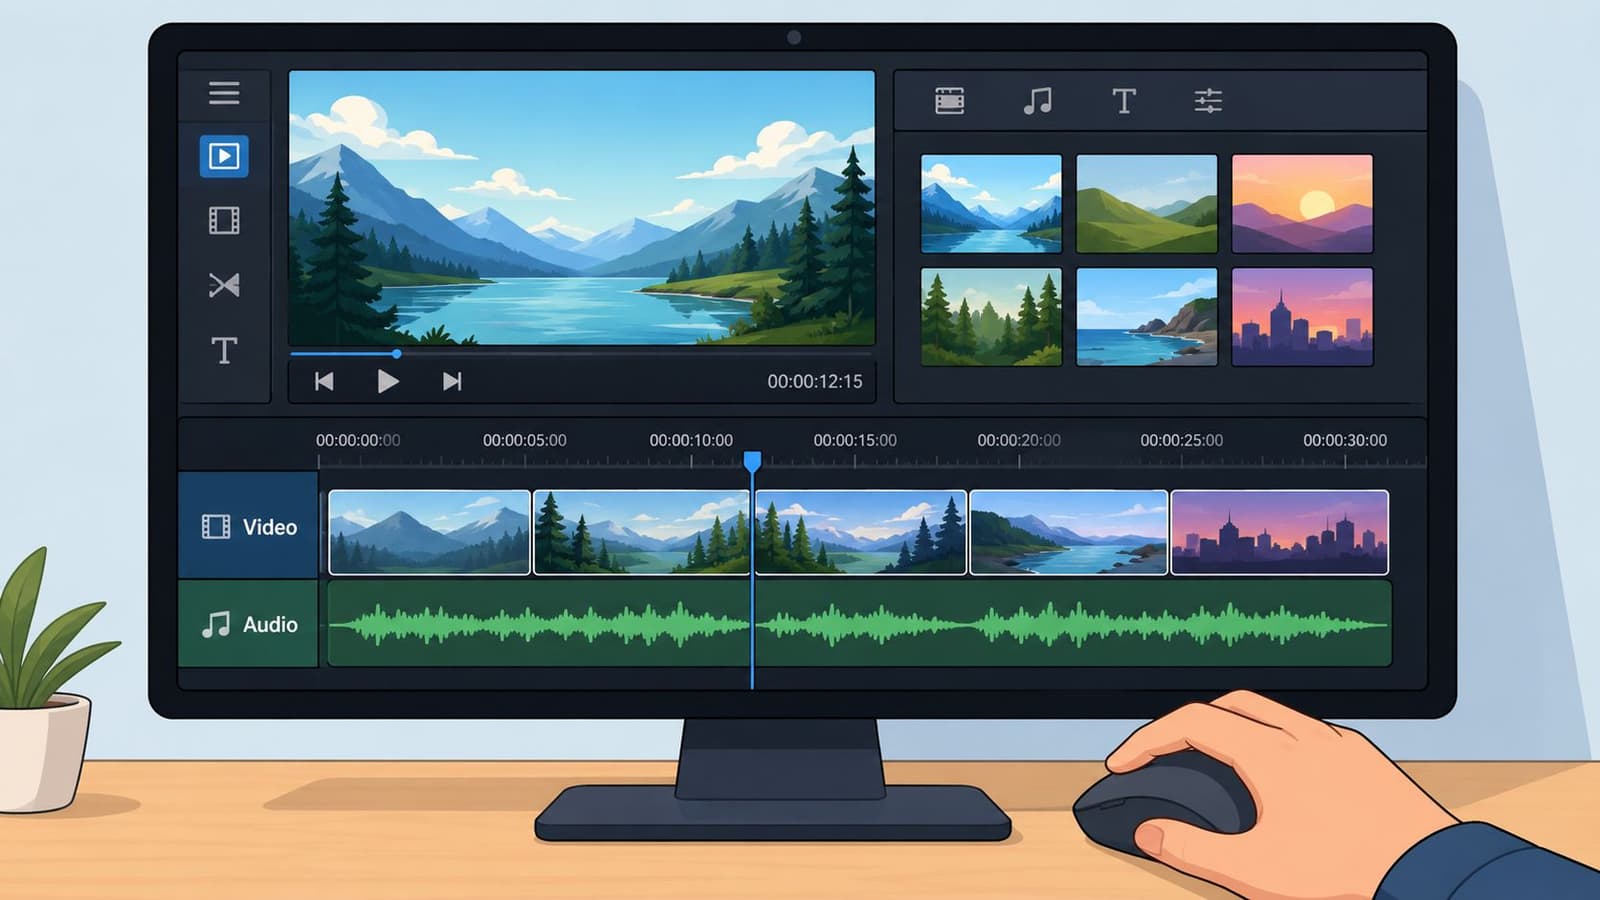
Syncing and Mixing Your Voiceover with Video
This is the point where the project either starts to breathe or starts to fight itself.
Professionals often prevent problems early by building an A/V script that maps what the audience sees and hears in each scene. That planning approach is described in Fluid's brand video production guide, which also notes common failure modes like narration rhythm not matching shot length and inconsistent loudness between voiceover and music.
If your source material already contains sound you want to preserve, it helps to know how to get audio from a video before you begin mixing everything together.
Build the timeline so the voice has room
Put the voiceover on its own track. Put music on a separate track underneath. If there are sound effects, keep those separate too. This gives you control.
Then line up the narration against visual moments that matter:
- A name appears on screen
- A photo changes
- A face turns toward camera in an animated image
- A title card lands
- A final image holds longer than the rest
When learning how to do a voiceover on a video, beginners often sync too precisely. Not every word has to hit the exact frame change. What matters is that the emotional beat matches. If the line is reflective, give the image time before and after it.
Mix for attention, not for loudness
The voice should be the easiest thing to follow in the mix. Always.
That doesn't mean the narration has to be unnaturally loud. It means the music should step back when the important line arrives. In practical terms, lower the music track under speech and let it rise in the gaps. Most editors can do this with simple volume keyframes.
Here's a short visual walkthrough if you want to watch the timeline process in action.
A few trade-offs are worth knowing:
- Rich music can create feeling, but dense arrangements can mask speech.
- Fast photo changes can create momentum, but they leave less room for a thoughtful line.
- A very full script can say more, but it can also crowd out the visual experience.
If a viewer has to strain to understand the voice, the mix is wrong.
A final pass should happen on more than one device. Phone speakers, headphones, and laptop playback reveal different problems. If the words stay clear on all three, your mix is probably in good shape.
Special Tips for Tribute Videos and Animated Photos
Tribute videos ask for a different instinct than promotional videos. You're not trying to sound polished first. You're trying to sound honest.
That's why many generic voiceover guides feel incomplete for this kind of project. General best practices still matter. A conversational tone, clear enunciation, and room for pauses are especially important when the goal is personal rather than promotional, as noted in SundaySky's voice-over guidance. But tribute pieces need one more layer of judgment. You have to decide how close the voice should feel to the memory itself.
Choose the point of view carefully
Narrative perspective changes the emotional distance of the video.
First person feels intimate. “I still hear your laugh in that kitchen.” This works well when the narrator had a direct relationship to the person or event.
Third person creates a little more space. “He made every holiday feel bigger.” This can be better for family-wide tributes where one person's voice is speaking for many.
Minimal narration can be strongest when the photos already carry a lot of weight. In that case, a few short lines placed carefully may do more than a full script.
A quick comparison helps:
| Perspective | Best use | Risk |
|---|---|---|
| First person | Personal remembrance, direct address | Can feel too private if the audience is broad |
| Third person | Shared family tribute, event montage | Can sound less immediate |
| Sparse voiceover | Strong photos, emotional music, slower pacing | Can leave too much unsaid if context is missing |
Leave space for the viewer to feel something
Animated photos often move slowly. That's a strength. Don't rush to fill every second.
If an old portrait gently pushes in, or a smiling snapshot gains a subtle sense of motion, let that image breathe. Add the line. Then allow silence. In memorial videos especially, a pause doesn't mean nothing is happening. It gives the viewer time to absorb what they're seeing.
A few choices usually improve tribute narration:
- Use your natural speaking voice: Don't put on a ceremonial tone unless it fits.
- Keep the script shorter than you think: Personal videos get heavy fast when every thought is spoken aloud.
- Record more than one emotional version: One steadier, one softer, one more reflective.
- Respect the strongest image: If a photo already carries the feeling, the voice can step back.
One of the kindest things you can do in a family tribute is avoid overproduction. A perfectly compressed, tightly edited read can still feel cold. A sincere voice with a tiny crack in it can feel unforgettable.
If you're making this for someone else, remember that the finished video doesn't need to impress an editor. It needs to reach a family.
If you're turning a cherished photo into a tribute video, birthday keepsake, or anniversary montage, Photo for Video can help you create gentle animated clips from a single still image, giving your voiceover something more alive and emotional to play against. It's a practical way to turn one meaningful frame into a moving memory you can build a full story around.