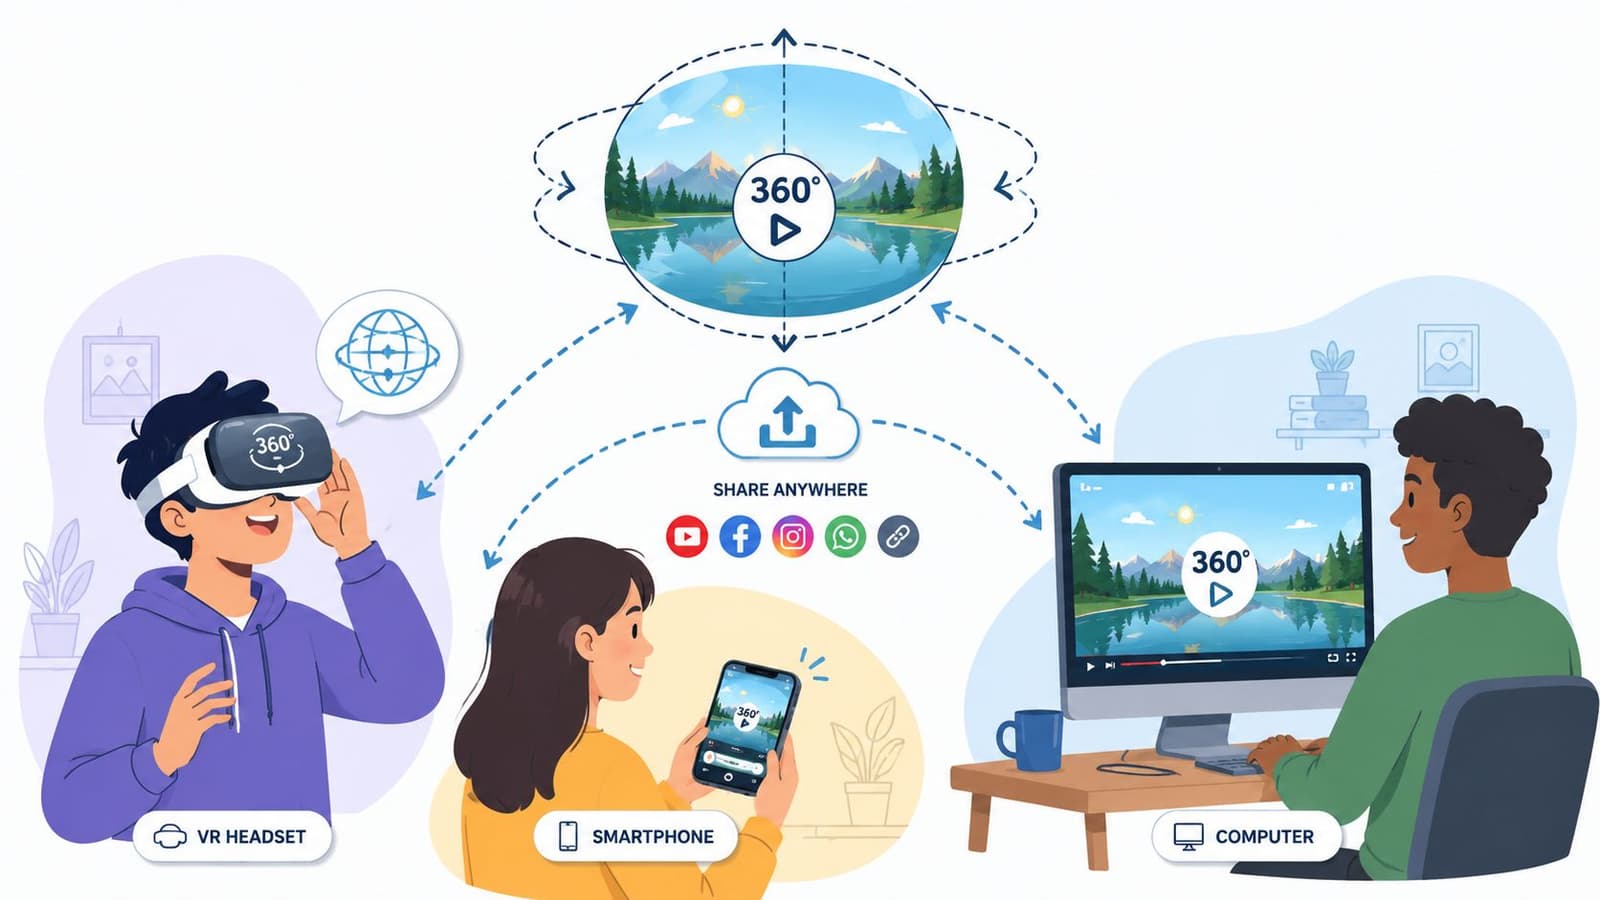
How to Make a 360 Video: A Complete Guide for 2026
Learn how to make a 360 video from start to finish. Our complete 2026 guide covers planning, gear, stitching, editing, and sharing immersive videos for events.
You're probably not trying to make a 360 video for a snowboard jump or a flashy tech demo. You're trying to hold onto a room.
Maybe it's a birthday where three generations made it into the same house. Maybe it's an anniversary dinner with stories you know you'll want to hear again. Maybe it's a memorial gathering, and what matters isn't one perfect close-up but the feeling of being there, with voices coming from every side and small moments happening in the corners.
That's where 360 video can do something ordinary video often can't. It preserves presence. A standard camera tells viewers where to look. A 360 camera lets them return to the space and choose for themselves. For keepsakes, that difference matters.
The hard part is that making a good 360 video doesn't work like normal filming. You're not composing a rectangle. You're building an experience people can step back into later.
Table of Contents
- Planning Your Immersive Story Before You Record
- Choosing Your 360 Video Capture Method
- On-Location Best Practices for Shooting 360 Video
- Your Post-Production Workflow Stitching Editing and Exporting
- How to Share and View Your Finished 360 Video
- Beyond the Tech Creating an Immersive Keepsake
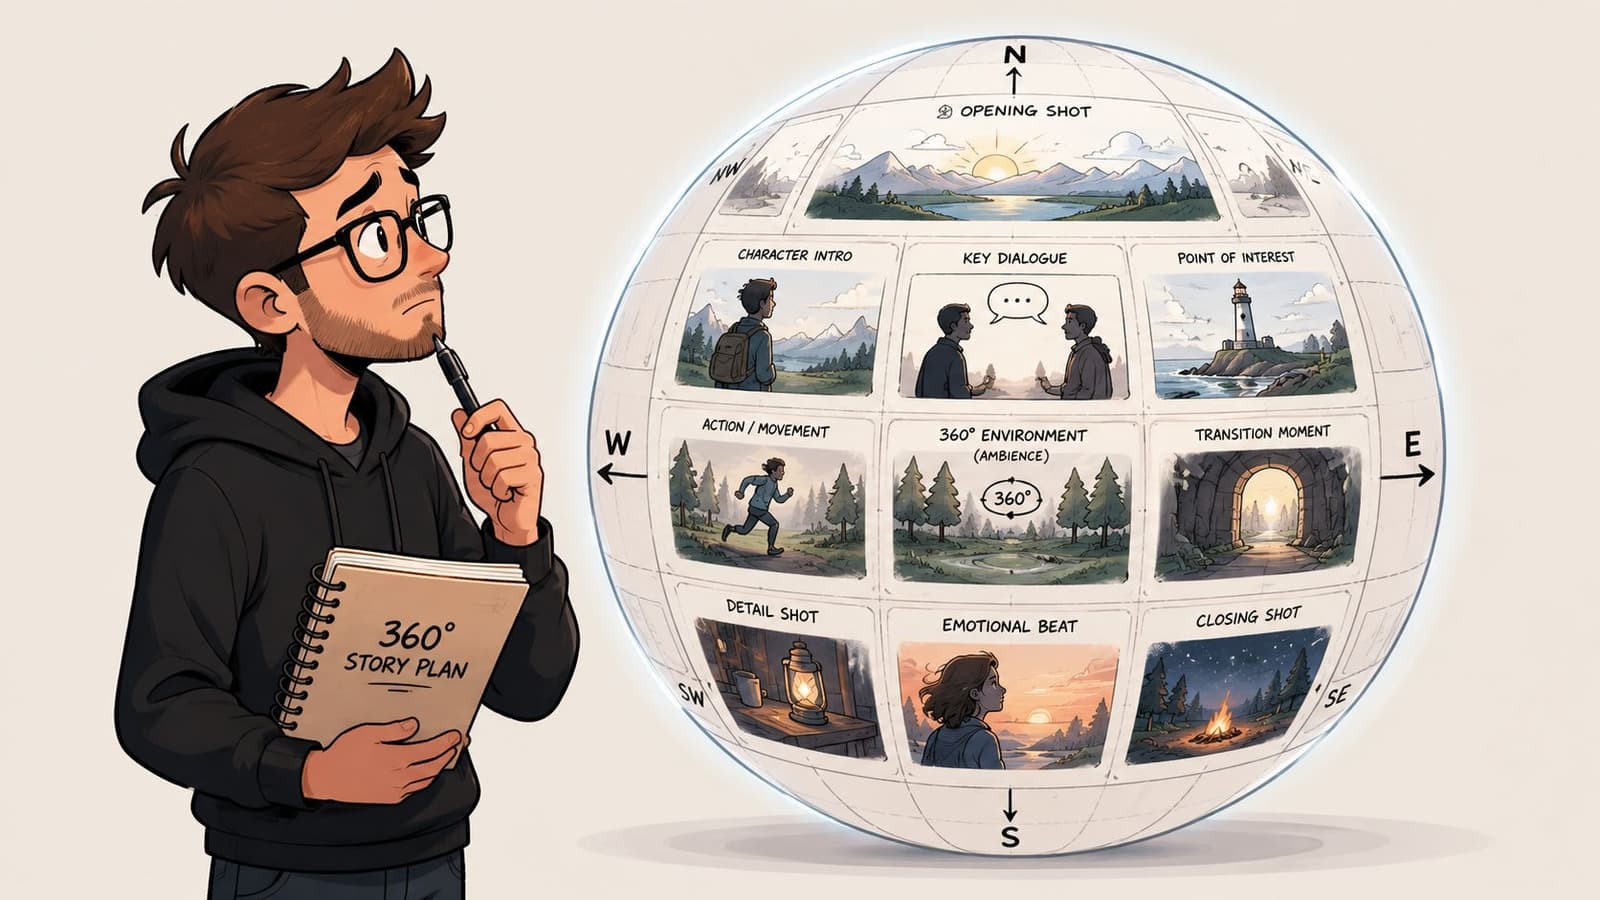
Planning Your Immersive Story Before You Record
Start with the feeling, not the gear
If you want to learn how to make a 360 video that people will revisit, start with one question: what should it feel like to stand in this moment again?
For a family keepsake, the answer usually isn't “cinematic.” It's “warm,” “busy,” “funny,” “gentle,” or “I want to hear everyone talking around me again.” That answer shapes every decision after it, including where the camera goes, when you roll, and how long you let a scene breathe.
A useful way to think about 360 is that you're designing an environment, not framing a shot. The camera sees everything. That means the side conversations, the decorations, the empty chair, the kitchen noise, and the person hanging back near the wall all become part of the memory.
If you're building a tribute piece from multiple moments, it helps to sketch the emotional sequence the same way you might plan a compilation video that flows like one story. The difference is that each scene in 360 needs room to live on its own.
Practical rule: Don't record “coverage.” Record moments with a clear emotional purpose.
Build around one human center
A good 360 video still needs a point of interest. Without one, viewers don't explore. They drift.
In a birthday scene, the point of interest might be the person making the wish. In a memorial, it might be a family member telling a story while others react around them. In an anniversary dinner, it might be a toast. The surrounding action matters, but one emotional center should anchor the space.
Before you hit record, decide these three things:
- Who matters most in this moment: Pick the person or interaction that carries the emotional weight.
- What supports it: Background laughter, people entering the room, clinking glasses, or quiet listening can deepen the scene.
- What distracts from it: Bags on the floor, someone checking a phone near the lens, or a bright lamp drawing the eye for no reason.
Plan for attention without controlling it
You can't force viewers to look in one direction, but you can guide them. Movement helps. Sound helps more. If someone begins speaking off to one side, viewers naturally turn. If a child runs into frame behind them, that becomes part of the lived feeling of the room.
A quick storyboard for 360 doesn't need to be fancy. Just note where the main action happens, what's happening behind it, and where the camera should sit in relation to the people. Think in circles, not rectangles.
One educational guide on 360 production explains that modern 360 video is made by stitching multiple camera views into one spherical image, with practical workflows that include synchronized capture, alignment, stitching in post, export, and sometimes adding metadata before upload in formats such as H.264 MP4 for a usable result in distribution (Toronto Metropolitan University Pressbooks guide to 360 essentials). That technical reality is exactly why pre-planning matters. Chaos multiplies later.
Choosing Your 360 Video Capture Method
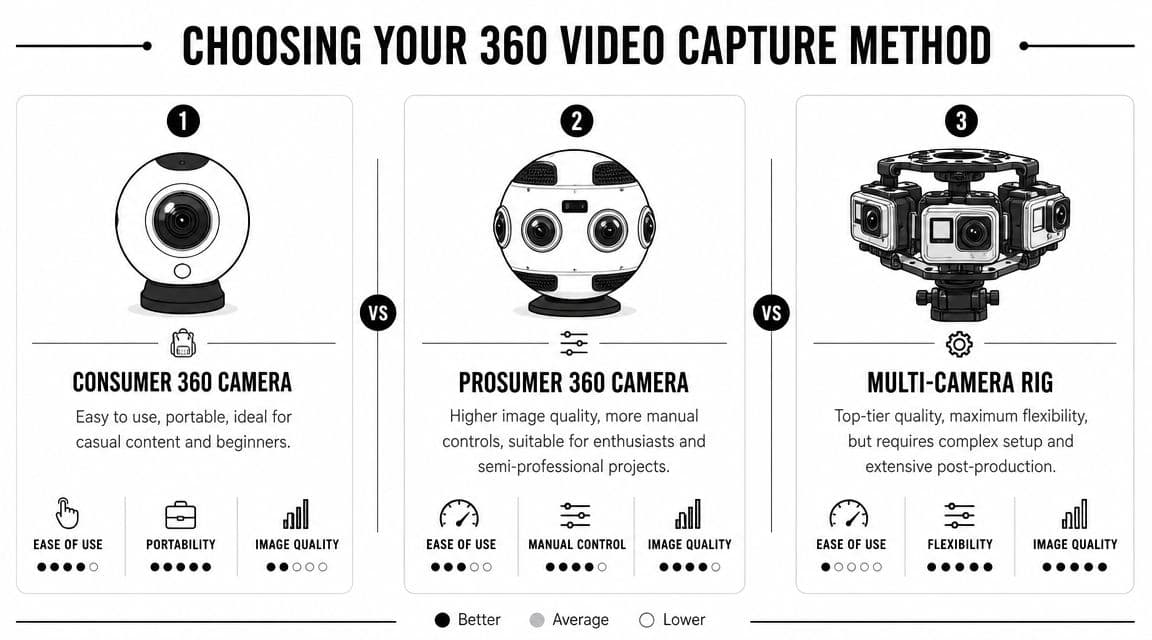
A birthday toast starts, your aunt tears up, and three relatives who never stand still finally gather in one place. In that moment, the best capture method is the one you can trust to record the room without turning the room into a set.
The first gear question isn't “what's the best camera?” It's what kind of memory are you trying to preserve, and how much complexity are you willing to carry afterward?
A beginner guide raises a point many gear roundups skip. You may not need a true 360 camera for every experiment. It explains that 360 video is usually captured with a dedicated multi-lens camera or a multi-camera rig, then stitched into a spherical file later, which makes the choice less about prestige and more about how much setup and post-production you want to handle (Lumen and Forge guide to shooting 360-degree video).
When a dedicated 360 camera makes sense
For family events, oral histories, anniversary dinners, and memorial gatherings, a consumer or prosumer 360 camera is usually the strongest option. It gives you the immersive feeling people want from a keepsake without asking everyone in the room to wait on gear.
That trade-off matters. A small dedicated camera is easier to place, easier to leave alone, and less likely to make people perform for it. If the goal is to preserve how a room felt, not just how it looked, that low-pressure setup helps.
A dedicated 360 camera is a strong fit when:
- You want low friction: Set it up quickly and keep attention on the people, not the equipment.
- You need portability: Small rigs work well at reunions, hospital visits, graveside gatherings, and living-room conversations.
- You're editing yourself: Brand-specific apps and desktop tools are usually easier to learn than custom stitching workflows.
- You care more about getting the moment than maximizing control: That is often the right call for one-time family memories.
Here's a visual way to think through the options:
When a phone workaround is enough
A phone-based method can be useful for testing. It lets you experiment with placement, room coverage, and how people react to being recorded before you buy dedicated gear.
It works best for trial runs, room studies, or projects that may end up as reframed flat video instead of a fully interactive 360 piece. That can be enough if you are documenting a space before a gathering, practicing for an interview with a grandparent, or learning where conversation naturally gathers.
It is less reliable for spontaneous moments. Phone workarounds usually ask more from you during capture, and they often ask even more later when you try to assemble or clean up the footage.
When a multi-camera rig is worth the effort
A multi-camera rig suits a different kind of project. It makes sense when the scene is controlled, the crew knows the workflow, and the final video needs a more polished result than a one-person setup usually delivers.
That might fit a formal tribute film, a museum-style family archive, or a staged remembrance piece with planned lighting and repeated takes. It does not fit many first-time keepsake projects well.
More cameras can give you more control. They also create more chances for sync problems, stitching issues, storage headaches, and missed moments while you troubleshoot. For unrepeatable scenes, simpler setups often produce the better memory because they let you stay present and keep rolling.
The more emotional and unrepeatable the moment is, the less I want a fragile setup between me and the recording.
A quick decision table
| Capture method | Best use | Strength | Drawback |
|---|---|---|---|
| Consumer 360 camera | Birthdays, reunions, informal keepsakes | Fast setup, approachable workflow | Less control than larger setups |
| Prosumer 360 camera | Higher-quality family archives, small client work | Better image control, stronger editing options | More learning curve |
| Phone workaround | Testing ideas, casual experiments | Uses gear you may already have | Often awkward, limited as true 360 |
| Multi-camera rig | Formal tribute productions, advanced creators | Maximum flexibility in capture | Demanding setup and post work |
On-Location Best Practices for Shooting 360 Video
The hardest part of a 360 keepsake shoot is not the button press. It is choosing the spot that will still feel right years later, when someone puts on a headset or drags the frame around and wants to be back in that room with the people they miss.
That changes how you work on location. A strong 360 clip does not just record an event. It preserves presence.
Place the camera where the memory lives
For family gatherings, memorials, reunions, and birthday tables, eye-level usually gives the most honest result. Set the camera where a loved one would naturally stand or sit if they were part of the conversation. In practice, that often means near the edge of the group, not in the center of traffic and not pushed against a wall.
Small shifts matter. Move the camera even a couple of feet and the emotional feeling can change from "I was there" to "I was parked in a corner watching."
Support placement matters too. Keep the tripod directly under the camera, keep the footprint tidy, and avoid last-minute adjustments once people are in place. A bad stand position or a crooked setup can leave you with awkward seams, a distracting base, or faces split across the stitch line. Those problems are much harder to forgive when the clip captures a one-time moment.
Clean the whole scene, not just the subject
360 video records the room as it really was. That honesty is part of the appeal, but it also means clutter becomes part of the memory.
Before you roll, do a slow full-circle check. Look for bags by chair legs, water bottles on the floor, jackets tossed over furniture, and bright windows that pull attention away from the people who matter. If someone is likely to stand very close to the lens, adjust early. Faces and hands can distort fast at close range, and that distortion feels especially wrong in tender moments.
Remote triggering helps because it lets you stay out of the scene. If you plan to add narration later, a short personal reflection can also help connect clips from different parts of the day. A practical guide to recording a voiceover for a video can help if you want to turn raw footage into more of a keepsake story.
The room should feel lived in, not messy. There is a difference, and viewers feel it right away.
A simple shoot-day checklist
For keepsake work, I keep the rhythm calm and deliberate.
- Arrive early enough to place the camera calmly. Give yourself time to test the view, clear the area, and choose a position without pressure.
- Pick moments with emotional duration. Toasts, shared meals, group singing, storytelling, and quiet conversations usually hold attention better than quick fragments.
- Keep the camera still unless movement adds meaning. A static camera often feels more natural in 360, especially when the main action is people interacting around it.
- Record longer than feels necessary. In family footage, the pause before someone speaks and the laughter after the main moment often become the part people treasure.
- Protect the audio. Room tone, overlapping voices, and little reactions carry a lot of the feeling, especially in memorial or reunion footage.
- Take a second pass if the moment can be repeated. You may never need it, but a safety take can save a meaningful scene.
Restraint usually wins here. One calm, well-placed shot of the right moment will mean more later than a busy collection of clips that never lets the viewer settle into the memory.
Your Post-Production Workflow Stitching Editing and Exporting
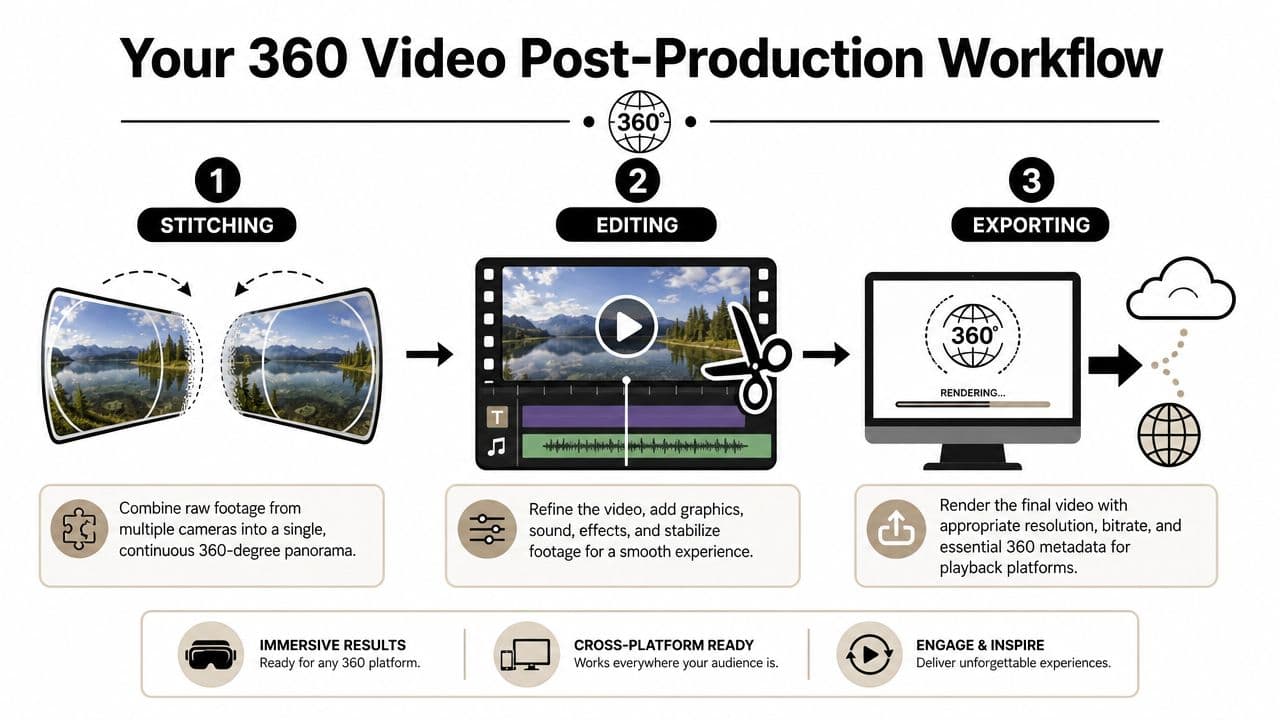
Post-production decides whether your 360 footage feels like a place people can return to or just a technical experiment they watch once.
That matters more with family footage, memorials, reunions, and milestone gatherings. A small stitching error in an action clip may feel tolerable. The same error across someone's face during a toast or beside an empty chair in a remembrance video pulls people out of the moment immediately.
Stitching the scene into one view
Raw 360 footage often starts as separate lens views or files that still need to be turned into a proper spherical video. Stitching joins those views so the room feels continuous and people look natural as they move across the seam.
If you shot on a dedicated consumer 360 camera, the camera brand's software usually handles most of the first pass. If you used a multi-camera or higher-control setup, expect to spend more time checking alignment, horizon level, and how bodies or furniture cross from one lens area to the next.
The practical check is simple. Rotate through the full sphere and watch the moments that matter most. Faces near the camera, hands passing plates, hugs, and people leaning in to talk are where bad stitching shows up first. Walls and floors can hide minor flaws. Human connection does not.
A MAGIX walkthrough on 360 editing recommends setting up the project in 360 mode, importing the stitched or raw footage, checking seam quality, trimming at natural cut points, and using a dedicated stitching correction tool if adjacent views do not align cleanly (MAGIX walkthrough for 360 editing).
Editing in a sphere instead of a frame
Editing 360 video asks you to think about viewer comfort and attention at the same time. The software usually shows the sphere as a flat equirectangular image, but your audience will experience it as a room around them.
That changes the editing rhythm.
Fast cuts, heavy digital movement, and constant reframing can feel exciting in short demos, but they often work against keepsake footage. For family and memorial videos, slower pacing usually holds up better. Leave a little room before and after a line. Let laughter finish. Give the viewer time to look around and notice who is standing nearby.
One workflow tutorial for 360 post uses a 2:1 panorama project, 30 fps, and H.265 for delivery, while also noting that low-light footage may benefit from grain reduction during export, whereas clean daylight footage often looks better without it (studio tutorial covering 2:1 360 panorama workflow).
Audio matters here as much as the image. In a keepsake piece, room tone, quiet reactions, and imperfect little overlaps often carry more feeling than aggressive music editing. If you plan to add narration, use your 360 footage as the visual base and build the story carefully with a voiceover recording approach that fits naturally over family video.
Editing mindset: Ask what will make this memory easier and gentler to revisit.
If you also want a standard flat version, this is the stage where reframing helps. You can use the 360 master like a virtual camera and create a conventional widescreen cut for relatives who do not want to drag around a sphere on a phone or wear a headset.
Export settings that protect the memory
Export problems are frustrating because the edit may be solid and the uploaded result still looks wrong. The usual failure points are projection settings, codec choice, bitrate, or missing spherical metadata.
As noted earlier in the article, beginner 360 software often includes trimming, reframing, and export presets that are good enough for a first project. What matters is checking that your final file stays in a proper 360 format and that the platform can recognize it as spherical after upload.
The 2:1 timeline and H.265 workflow linked above is a useful reference point for efficient delivery. Some creators still export H.264 MP4 when device compatibility matters more than file efficiency. Neither choice is automatically right. H.265 usually gives better compression at similar quality, while H.264 is often easier for older devices and simpler playback setups.
Before you render the full piece, export a short test clip. Upload it privately if needed. Confirm that the platform reads it as 360, that the image is not stretched, and that motion feels stable when you look around.
360 Video Stitching and Editing Software Options
| Software | Primary Use | Best For | Cost |
|---|---|---|---|
| Insta360 Studio | Stitching, basic edits, reframing | Beginners using Insta360 cameras | Free |
| GoPro Player | Stitching and basic handling of supported footage | Users in the GoPro ecosystem | Varies by workflow |
| Adobe Premiere Pro | Full editing and reframing | Editors who already work in Premiere | Paid |
| Final Cut Pro | Full editing on Mac | Mac-based creators handling large files | Paid |
| DaVinci Resolve | Editing, color, finishing | Editors who want strong color tools | Free and paid versions |
| MAGIX Movie Studio or related MAGIX tools | 360 editing and stitching correction tools | Beginners wanting guided 360 controls | Paid |
A final pass before export saves a lot of regret later:
- Watch the seams all the way around: Look for split faces, bent door frames, broken arms, or lighting shifts.
- Trim with patience: In 360, viewers may be looking somewhere else when the cut happens.
- Check titles and graphics carefully: Flat overlays can stretch or sit in awkward places inside the sphere.
- Test the horizon: A tilted room feels more distracting in 360 than in standard video.
- Render a short sample first: It is faster to catch metadata or playback issues on a test than on a full family archive piece.
The goal is not technical perfection for its own sake. The goal is a finished video that lets someone step back into the room, hear the voices, and stay with the memory instead of noticing the software.
How to Share and View Your Finished 360 Video
A finished file isn't the finish line. A 360 keepsake only works if the people you care about can open it, understand it, and enjoy it without technical confusion.
Why some 360 exports fail online
One of the biggest playback problems is that a platform may not recognize your file as spherical even when the video itself is fine. A tutorial focused on playback compatibility notes that exports need the correct 360 metadata tags for platforms like YouTube to recognize them as spherical, that monoscopic projection is the common format, and that creators may also want to transform the footage into a normal flat video for easier viewing (YouTube tutorial on 360 metadata and sharing).
If your upload looks stretched or behaves like a normal flat file, metadata is one of the first things to check. Some editing apps write those tags automatically. Others don't.
That's also why compression matters. A 360 file asks a lot from playback, and bad compression can make an already demanding format feel muddy or fragile. If you're preparing a YouTube delivery, it helps to understand how YouTube compression changes uploaded video.
Give people more than one way to watch
The best sharing strategy for family and memorial projects is rarely one file for everyone. It's usually one immersive version and one easy version.
The immersive version is for viewers on platforms that support 360 playback, whether they're using a headset, dragging around on a desktop, or moving a phone to look around the room. That version preserves the sense of presence.
The easy version is a reframed flat export for relatives who won't interact with a 360 player, or for use inside a larger tribute montage. Same memory. Different delivery.
A simple sharing plan looks like this:
- Upload the 360 master to a platform that supports spherical playback. Check recognition after upload.
- Export a flat version for social sharing and family group chats. Remove friction for less technical viewers.
- Label files clearly. People should know which version is interactive.
- Test on more than one device. Desktop, phone, and TV playback can feel very different.
The real goal of sharing isn't proving you made a 360 video. It's helping someone step back into the room with as little friction as possible.
Beyond the Tech Creating an Immersive Keepsake
The technical workflow matters because it protects something fragile. Not just footage. Presence.
A good 360 keepsake doesn't succeed because every seam is invisible or every export setting is perfect. It succeeds because someone can return to a birthday table, a wedding dance, a family kitchen, or a memorial gathering and feel the room around them again. They can hear where the laughter came from. They can turn toward the person who was listening. They can notice details that a flat edit would have cropped away.
That's why learning how to make a 360 video is worth the extra effort for certain moments. You're not only documenting what happened. You're preserving what it felt like to be there.
If you keep the process simple, the workflow becomes manageable: plan the emotional center, choose the least complicated capture method that can do the job, place the camera where a person would want to stand, edit with restraint, and share it in a way real people can practically watch.
For action footage, novelty can carry the format. For family history, novelty fades fast.
What lasts is recognition. A room. A voice. A glance across the table. The sense that for a minute, someone you miss is present on every side.
If you're turning old family photos into motion for a tribute, memorial, or anniversary video, Photo for Video can help you create short living-memory clips from a single image. It's a practical way to add gentle motion between your filmed moments, especially when you're blending keepsake photos with newer video in one polished edit.