How to Scan Old Photos: A Practical Guide for 2026
Learn how to scan old photos with a flatbed scanner, phone, or camera. Our 2026 guide covers settings, restoration, and animating your digitized memories.
You've probably got a box, album, or drawer full of prints that haven't been touched in years. Some are curled. Some have fingerprints or dust. Some have a name and date scribbled on the back that nobody in the family has copied down anywhere else.
That's usually when people start searching for how to scan old photos. Not because they want a technical hobby, but because they want to keep something from disappearing. A good scan preserves the image, but it also preserves the story attached to it. If you do the job well once, you won't need to pull fragile originals out over and over again.
The workflow below is the one that holds up in real life. It balances quality, time, and sanity. It also avoids the common mistakes that leave people with a folder full of mediocre files they have to redo later.
Table of Contents
- Preparing Your Photos for a Perfect Scan
- Choosing Your Scanning Method
- Essential Settings for Quality and Preservation
- A Simple and Efficient Scanning Workflow
- Post-Scan Cleanup Organization and Backup
- Bringing Your Scanned Memories to Life
Preparing Your Photos for a Perfect Scan
The hardest part usually isn't the scanner. It's the first hour at the table with a dusty pile of loose prints, half-labeled envelopes, and albums that are starting to come apart. Prep work decides whether the scanning session feels orderly or exhausting.
If a print is brittle, faded, curled, or stuck in an old sleeve, slow down. Don't force anything flat if it resists. Handle the edges when you can, keep food and drinks away from the workspace, and clean the scanner glass before the first scan rather than after you notice streaks on ten files.

Start with sorting, not scanning
A mixed pile slows everything down. Sort first so you're not making decisions one photo at a time at the scanner.
A simple batch system works well:
- Group by type: Keep standard prints, tiny wallet prints, negatives, and album pages separate.
- Group by story: Sort by event, family branch, decade, or household if that's easier to recognize quickly.
- Group by condition: Put damaged, torn, or heavily faded items in a separate pile for slower handling.
- Group by priority: Start with the images that matter most. If time runs short, the most meaningful material is already safe.
That last point matters. People often begin with the easiest photos instead of the most irreplaceable ones. I'd rather see someone digitize the best family portraits, handwritten snapshots, and aging album pages first than spend a day on duplicates.
Practical rule: Your first scan session should protect the most meaningful originals, not clear the neatest pile.
If you're thinking beyond scanning and into long-term care, this guide on the best way to preserve old photos pairs well with the workflow here.
Clean gently and handle less
Old prints don't need aggressive cleaning. They need restraint.
Use a soft microfiber cloth or a small air blower to remove loose dust. If a print has surface debris, brush it away lightly before it ever touches the scanner glass. Clean the glass often, because a tiny hair on the scanner can repeat across file after file.
A few practical handling habits help:
- Keep one clear work area for “not yet scanned.”
- Keep a second area for “already scanned.”
- Return each photo immediately to the correct stack after scanning.
- Use gloves selectively. Cotton gloves can help with glossy or fragile items, but clean dry hands often give better control with thin prints.
Curled photos are common. If the scanner lid doesn't hold them flat enough, apply only gentle pressure. Don't bend a print back into shape by hand. The goal is safe capture, not cosmetic correction at the table.
Scan the back before the story disappears
This step gets skipped constantly, and it's one of the biggest mistakes in family archiving.
Archivist-oriented guidance emphasizes that many backs contain names, dates, locations, and captions, and recommends scanning both sides because the story is often on the reverse, not just the front image, as noted by archival advice on scanning photo backs and captions.
That means checking every print before you scan the front. If there's writing, studio stamping, album notation, or even a partial clue, capture it. For many families, the back answers the question future viewers will ask first: “Who is this?”
A practical habit is to keep front and back files paired in the same batch. If the front is “Smith_Family_Picnic_01_front,” the reverse should be “Smith_Family_Picnic_01_back.” That simple discipline prevents orphaned notes later.
Choosing Your Scanning Method
No single method is best for every collection. The right choice depends on what you're scanning, how much quality you need, and how much time you're willing to spend.
Individuals typically approach photo scanning with one of three primary objectives. They need an archival-quality copy of important prints. They need quick digital versions for sharing. Or they need a faster setup for a large project that includes odd sizes, albums, or delicate items.
The flatbed scanner for careful archival work
A flatbed is still the most dependable option for reflective prints. It gives you control over placement, cropping, and settings, and it handles fragile photos more gently than methods that require complicated positioning.
Practical guides recommend 300 dpi as the minimum and 600 dpi as a safer standard for old prints. One guide also notes that many home scanners can reach up to 1,200 dpi, and AARP cites consumer flatbed scanners starting at about $59, which shows how accessible home scanning became as hardware prices fell. That same guidance explains the trade-off clearly: a 4x6-inch photo at 300 dpi is roughly 1.2 megapixels, while 600 dpi captures about 4.8 megapixels, which gives you much more room for cropping, restoration, or larger display use in the future, according to Artifact Uprising's scanning recommendations.
Flatbeds are best for the patient archivist. If you're preserving family history, scanning favorite portraits, or planning future restoration, this is the method I'd trust first.
Phone scanning apps for speed and convenience
Phone apps are useful when the goal is access, not a long-term master file. They're handy for quickly sharing an album page with relatives, grabbing a reference copy from a family gathering, or capturing a label before you repack a box.
They're less dependable when you need consistent lighting, straight edges, or the best file for future editing. Reflections, uneven perspective, and automatic processing can creep in without you noticing until later.
That doesn't make them bad. It makes them situational. If your priority is “good enough today,” a phone can be the right tool. If your priority is “I only want to do this once,” use a scanner.
A camera setup for large batches and awkward originals
A DSLR or mirrorless setup works well when a flatbed becomes too slow or too limiting. Large album pages, mounted items, and oversized prints often fit better under a camera than on scanner glass.
This method takes more setup. You need even lighting, a stable support, and careful alignment. But once the rig is dialed in, it can move faster than a flatbed while still producing excellent results.
Original format matters here too. Prints are one thing. Film is another. Guidance for family archiving recommends treating negatives at much higher resolution, often around 3,000 dpi to produce a 5–20 megapixel file, because film contains more recoverable detail than a paper print, as explained in this guide to scanning prints and negatives.
Here's the practical comparison I use:
| Method | Best For | Quality | Speed | Cost |
|---|---|---|---|---|
| Flatbed scanner | Important prints, careful archiving, restoration-ready files | High | Slow to moderate | Moderate entry cost |
| Phone app | Quick sharing, casual digitizing, temporary access | Fair to good | Fast | Low if you already own the phone |
| Camera setup | Large batches, oversized items, album pages, advanced users | High when set up well | Fast once dialed in | Higher setup effort |
The best scanning method is the one that matches the value of the originals and the amount of time you can realistically give the project.
Essential Settings for Quality and Preservation
Most disappointing scans come from default settings. The scanner works, but it doesn't capture what the print contains. If you want files you won't regret later, change the settings before you begin.
For old family photos, three choices matter most: resolution, file format, and how much automatic correction you allow the software to apply.
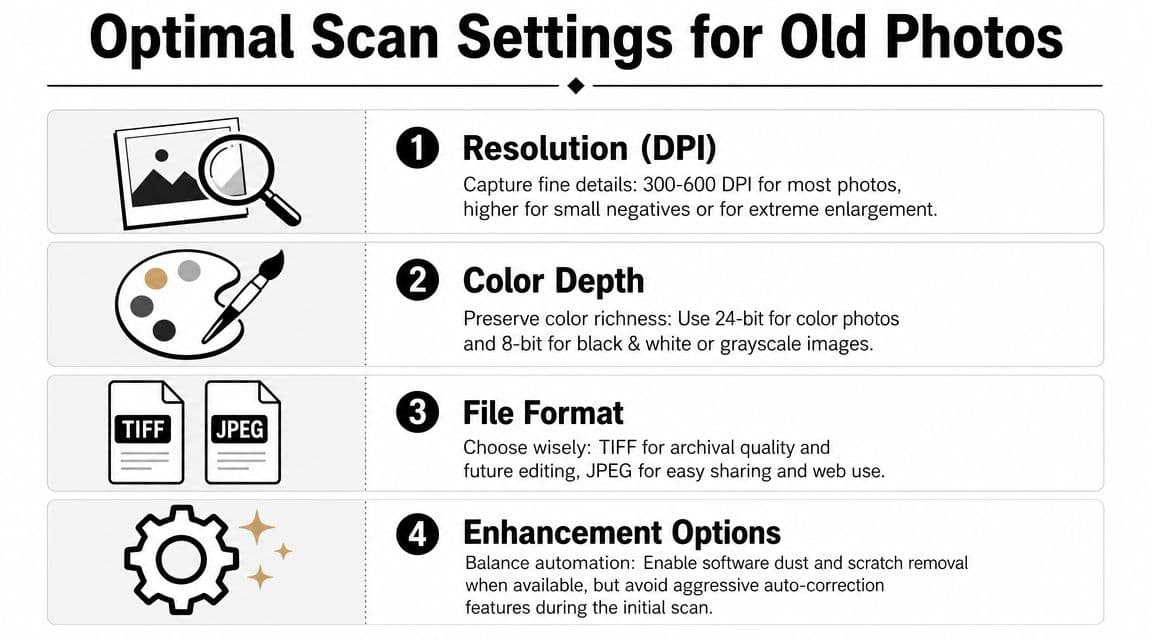
Resolution is the setting that matters most
Think of resolution as the amount of usable visual information you capture the first time. If you underscan, you can't invent detail later.
Expert guidance places a practical ceiling for most reflective prints at about 600 PPI, because scanning above that usually adds little effective detail. It also gives size-based recommendations that are more useful than one blanket rule: about 300 PPI for 8×10-inch or larger prints, 400 PPI for 6×8 or 6×9, 480 PPI for 5×7, 600 PPI for 6×4, 720 PPI for 3×5, and 1200 PPI for 2×3 or smaller, with the goal of producing roughly an 8-megapixel working file. The same guidance also notes 4000 PPI for negatives and slides, in line with cultural-heritage practice, according to Damien Symonds' scanning guidelines.
In plain terms:
- Large prints need less PPI
- Small prints need more PPI
- Negatives and slides need much more than prints
If you don't want to overthink it, 600 PPI for a typical print is a safe working habit.
Choose file formats with a master and a copy in mind
A preservation file and a sharing file serve different jobs.
Use TIFF for your archive master when your scanner offers it. TIFF keeps more image data intact and is the better choice if you may crop, retouch, or reprint later. Use JPEG for easy sharing, emailing, slideshows, and family group chats.
A simple rule keeps things manageable:
- Scan master: TIFF
- Sharing copy: JPEG
- Never edit your only master destructively
If storage space is tight, don't throw away the best files. Keep the master version for your best and most meaningful images first.
Save the file you'll want ten years from now, not just the one that's easiest to text today.
Use light enhancements sparingly
Automatic tools can help, but they also flatten tone, overcorrect color, or erase subtle detail. That's why I prefer a conservative first scan.
A balanced starting point looks like this:
- Dust and scratch removal: Worth testing if your scanner offers it
- Aggressive auto color fixes: Usually better left off for the master scan
- Heavy sharpening: Skip it
- Cropping: Fine, if you aren't trimming away meaningful borders or notes
For black and white prints, it's often still smart to scan in color mode if your software allows it, because older prints can hold tone and staining that a harsh grayscale conversion may discard. The broader principle is simple: capture more now, decide later.
A Simple and Efficient Scanning Workflow
Once the prep and settings are handled, consistent progress stems from rhythm. A good workflow should feel repeatable, not fragile. If every photo needs a custom decision, you'll stall out fast.
For standard prints on a flatbed, I keep the process boring on purpose. Boring is good. It means the workflow is stable enough to repeat for hours.
Build a repeatable rhythm
Start by grouping photos of similar size and orientation. That keeps preview windows cleaner and reduces constant setting changes.
Then work in this order:
- Clean the glass
- Place one or several photos with a little space between them
- Run a preview scan
- Draw separate crop boxes for each image
- Check orientation before final scan
- Save with a useful filename immediately
- Move scanned originals to a finished stack
If your scanner software lets you detect multiple photos in one preview, use it carefully. It can save time, but it sometimes crops too tightly or clips borders. I still check every frame before committing.
This short walkthrough is a helpful visual companion to the process:
For typical prints, 300 dpi is the absolute minimum and 600 dpi is the safer quality setting for home scanning. Many home scanners also reach 1,200 dpi, which provides about 4× the resolution needed for a standard print, giving you room for future cropping and restoration, as described in this practical guide to getting a high-resolution photo.
What to turn off and what to check
The fastest way to ruin consistency is to let the software improvise.
Check these settings before a big batch:
- Auto exposure changes: Turn them off if they shift from photo to photo
- Auto color restore: Use cautiously, if at all, on first-pass archival scans
- Auto straighten: Helpful sometimes, but verify the results
- File destination: Confirm the right folder before every session
What works well is batching similar prints together. Black and white snapshots from the same album often scan well under one setting. Glossy color lab prints from the same decade usually behave similarly too.
What doesn't work is mixing tiny wallet prints, large matte portraits, and damaged photos in the same pass. That creates constant interruptions and sloppy files.
Keep one session focused on one kind of material. Your speed goes up, and your error rate drops.
Post-Scan Cleanup Organization and Backup
A successful scan session can still leave you with a mess. If your files are called “Scan001,” “Scan002,” and “FinalFinal2,” you've just created a digital shoebox.
The fix is simple. Do a light cleanup, name files in a way humans can understand, and back everything up before you move on to the next box.
Make basic fixes without over-restoring
Your first edit pass should be gentle. The goal is clarity, not reinvention.
Good first-pass cleanup usually includes:
- Cropping to the photo edge: Keep borders if they include studio marks, handwritten notes, or the visual character of the print
- Rotating and straightening: Especially important for album scans and snapshots placed quickly on the glass
- Light tone correction: Enough to make the image readable, not enough to erase age
- Spot cleanup: Best saved for the most meaningful photos, not every frame
If you want to improve a favorite image later, dedicated editing tools can help. This guide to online photo retouch options is useful once your core archive is safely scanned.
Rename files so people can actually find them
File naming should answer basic questions without opening the image.
A practical structure looks like this:
- Date if known
- Event or place
- People if identifiable
- Front or back when relevant
Examples:
1978_Summer-Picnic_Joan-and-Mike_front.tif1978_Summer-Picnic_Joan-and-Mike_back.tifUnknown-Date_Grandpa-in-Uniform_01.tif
If you don't know the exact date, say so. “Unknown-Date” is far better than pretending certainty. You can also add names, locations, and notes in your photo software's metadata fields later, which helps future searching without changing the image itself.
Back up your archive before you move on
Don't wait until the whole project is finished. Back up while the work is fresh.
A practical routine is to keep your master scans in one main folder, copy them to an external drive, and keep another copy in cloud storage or another physical location. What matters most is redundancy. Hard drives fail. Laptops get replaced. Folders get deleted by accident.
The emotional part of scanning is the photos. The disciplined part is backup. Both matter.
Bringing Your Scanned Memories to Life
Once you've created a clean, high-quality scan, you've done more than copy a photograph. You've made it usable again. It can go into a family archive, a memorial slideshow, an anniversary tribute, or a birthday video without needing to be rescanned from scratch.
That's also why good scans matter for motion-based storytelling. A clean file with preserved detail, natural grain, and accurate tone gives you far better material for turning a still image into something that feels alive rather than gimmicky.

The strongest results usually come from a single meaningful frame. A wedding portrait. A grandparent looking straight at the camera. A childhood snapshot with just enough detail in the face and clothing to hold up when subtle movement is added. If the scan is weak, every flaw gets carried forward. If the scan is strong, the final tribute feels warmer and more believable.
That's the deeper reason to learn how to scan old photos properly. You aren't just preserving objects. You're preserving moments in a form your family can revisit, share, and build on.
If you want to turn a well-scanned family photo into a short, tasteful moving keepsake, try Photo for Video. It transforms a single still image into a gentle 5 to 6 second living memory that works beautifully for birthdays, memorials, anniversaries, and tribute edits.