Master Syncing Audio with Video for Flawless Edits
Get pro tips for syncing audio with video. Discover manual alignment, automatic tools, and expert tricks for flawless sound in your montages & clips.
You've probably got the story already. The photos are chosen. The pacing feels close. You found the voice note, the song, or the small room sound that makes the whole tribute feel personal instead of generic.
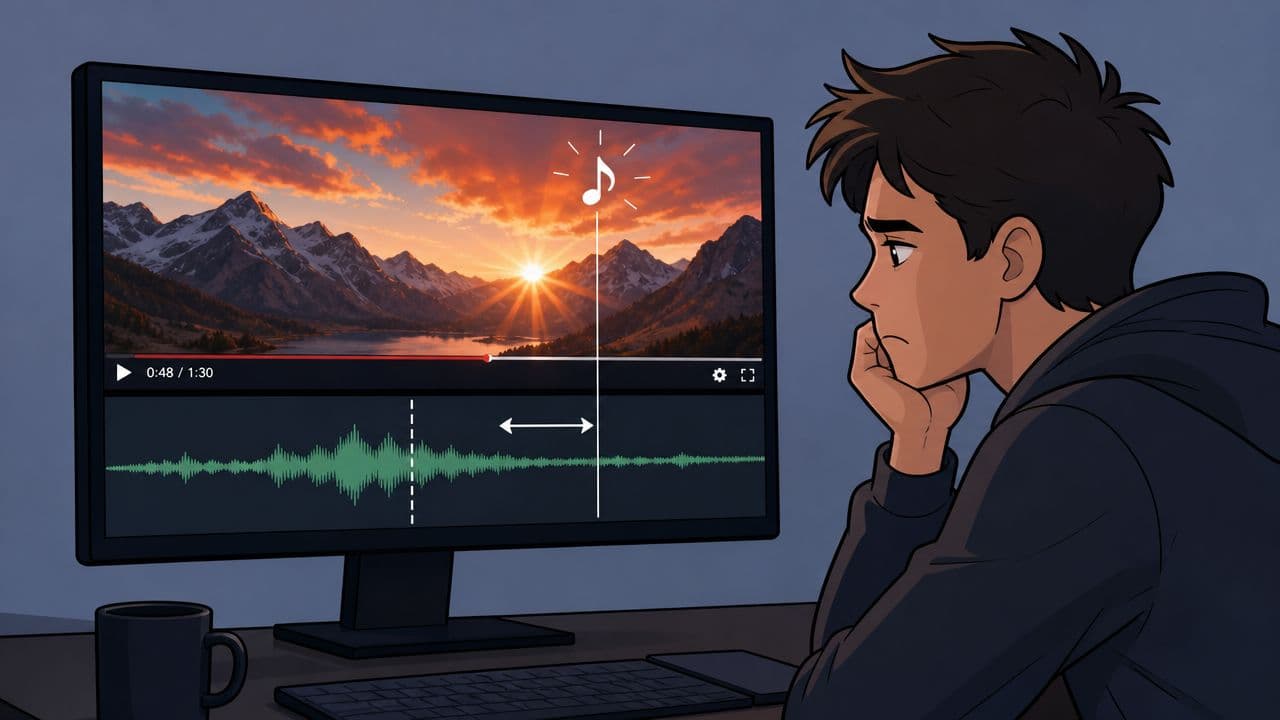
Then you press play, and something feels wrong.
A smile lands after the musical swell instead of with it. A spoken memory starts a beat late. A soft transition looks fine on mute, but with audio on, the whole sequence feels slightly disconnected. That tiny mismatch is enough to break the emotional spell, especially in short montage work where every image change carries weight.
Table of Contents
- Why Perfect Audio Sync Is Non-Negotiable
- The Three Core Methods for Aligning Sound and Picture
- A Practical Syncing Workflow in Your Video Editor
- Troubleshooting Common Sync Problems and Audio Drift
- Syncing Audio for Photo Montages and Social Clips
- Good Sync Is Invisible But Great Sound Is Unforgettable
Why Perfect Audio Sync Is Non-Negotiable
When sync is off, viewers usually don't say, “the audio is misaligned.” They say the video feels awkward, cheap, or oddly flat. In a tribute edit, that matters more than most creators expect, because the whole piece depends on trust. The audience has to believe each image arrives when the feeling arrives.
Professional media doesn't treat sync as a vague artistic preference. It treats it as a measurable standard. The European Broadcasting Union says audio and video sync should stay within +40 ms and -60 ms, and film lip sync is often cited as acceptable only up to 22 ms in either direction, according to this overview of audio-to-video synchronization standards. Those are narrow margins, which explains why even “slightly off” can register immediately.
Emotional edits expose timing mistakes fast
A documentary interview can sometimes hide a tiny sync issue if the content is strong enough. A photo montage can't. There's less motion, fewer distractions, and often a more exposed soundtrack. That means the timing between a beat, a lyric, a breath, and a visual change does more of the storytelling.
Practical rule: If a montage moment is meant to make someone feel something, sync it deliberately. Don't leave it “close enough.”
That doesn't mean every image cut needs to land exactly on a beat. It means your timing choices need to feel intentional. If a memory should bloom with the music, let it bloom with the music. If a voiceover should start before the next photo appears, do that on purpose too.
Bad sync breaks immersion before viewers know why
The biggest mistake I see is treating audio as something to tidy up after the visual edit is done. In emotional work, audio is not the finish line. It's the structure underneath the finish.
Good syncing audio with video makes the edit disappear. The viewer stops noticing software, transitions, and clip length. They just feel the memory.
The Three Core Methods for Aligning Sound and Picture
Every editor ends up using the same three sync approaches, whether they're cutting a memorial slideshow, a wedding speech, or a multi-camera interview. The difference is knowing which one saves time and which one creates cleanup work later.
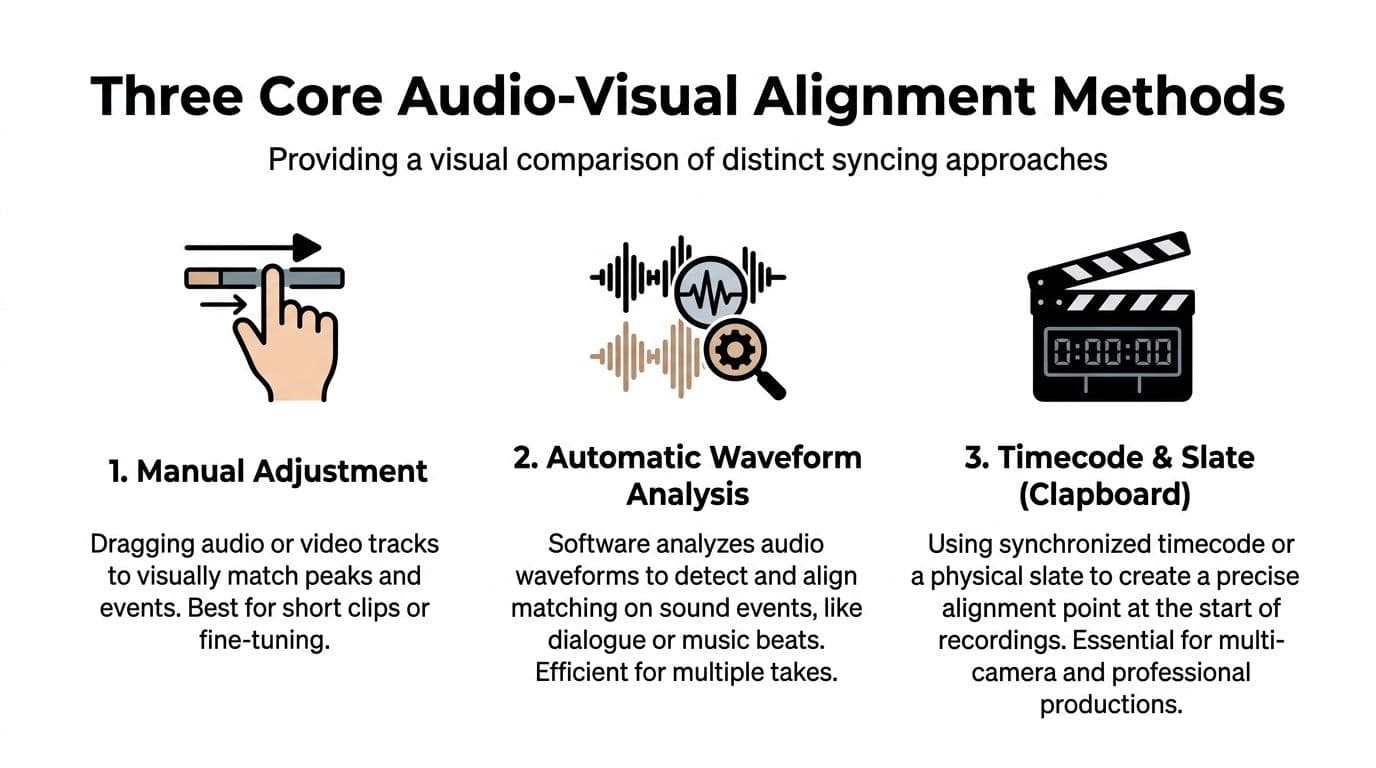
Manual waveform matching
This is the fallback that never really goes away. You place the camera clip and the separate audio recording on different tracks, zoom in, find a sharp transient like a clap, tap, or plosive consonant, and line up the peaks.
It's simple, and that's why it's reliable.
Manual matching works best when:
- You have one or two clips: No need to overcomplicate a short tribute segment.
- Metadata is missing: No timecode, weak file names, no auto-sync confidence.
- You need fine control: Sometimes software gets close, but your ear catches a slight mismatch.
The weakness is speed. On a larger project, it becomes tedious. It's also less forgiving when the camera scratch track is noisy or buried.
Automatic waveform syncing
Most modern editors can compare the low-quality camera audio to the clean external recording and align them automatically. This is often the fastest method for interviews, speeches, and any footage where both devices captured the same event.
The reason it works is straightforward. Even rough onboard camera audio still contains the timing pattern of the original sound. The software reads that pattern and matches it to the cleaner source.
This is the method I'd choose first for:
- Multiple takes of the same scene
- Ceremony or speech recordings
- Projects where you need to move quickly without losing accuracy
If you also need to isolate or reuse the original recording for another step, it helps to understand how to get audio from a video before you start reorganizing tracks.
Automatic sync is fast when the camera captured usable reference audio. When that scratch track is weak, manual sync usually wins.
Timecode and markers
Timecode is the cleanest professional answer. In broadcast and live production, timecode became the standard way to align media over time, and modern workflows built on shared timing systems keep audio and video aligned even when they're processed separately, as explained in this broadcast synchronization overview.
If you're not running a formal timecode setup, markers and slates still do a similar job. A clapboard, hand clap, or spoken marker gives you a precise alignment point at the start.
Here's the practical comparison:
| Method | Best for | What can go wrong |
|---|---|---|
| Manual waveform sync | Short clips, rescue jobs, missing metadata | Slow on big projects |
| Auto waveform sync | Interviews, speeches, multi-take edits | Fails if scratch audio is weak |
| Timecode or slate | Multi-camera shoots, repeatable workflows | Requires setup before recording |
For tribute editors, the smartest habit is using all three when needed. Auto-sync first, manual correction second, and a clear clap or marker at recording time whenever you can manage it.
A Practical Syncing Workflow in Your Video Editor
The cleanest workflow is still the standard one. Import the camera clip and external audio, make sure audio is set to 48 kHz for video, zoom into the waveform, and align a hard transient like a clap. Premiere Pro and Resolve can automate much of that, according to this practical sync guide.
Before you sync anything
Check the boring stuff first. It saves real time.
- Match your frame rates: If your cameras don't record at the same frame rate, long edits get messy fast.
- Use 48 kHz audio: Video workflows expect it. Mixing in 44.1 kHz material can create timing problems over longer sequences.
- Keep scratch audio on import: Don't mute or delete the camera audio too early. The editor may need it to build the sync.
- Name clips clearly: “Recorder_01” beats “Zoom0007” when you're matching files under pressure.
If you're adding narration after the visual cut, it also helps to review a clean voiceover workflow for video so your spoken track doesn't create a second round of sync problems later.
Premiere Pro, Resolve, and Final Cut Pro
Premiere Pro is usually direct. Select the video clip and external audio in the bin or timeline, choose the sync option, and tell Premiere to use audio. It analyzes the waveform and creates a merged or aligned result. For speeches and family interviews, it's often accurate enough on the first pass.
DaVinci Resolve works similarly. Select the matching clips, use auto sync based on waveform, and let Resolve build the alignment. Resolve tends to be especially comfortable when you're organizing multiple camera angles and want synced bins before you start cutting.
Final Cut Pro also supports sync workflows, but the core logic is the same as the others. Bring in the camera clip and external audio, select both, create the synchronized result, then inspect the timeline rather than assuming it's perfect because the software said so.
How to verify the result
Auto-sync saves time. It does not remove the need to check.
Use this quick verification routine:
- Check the first obvious mouth movement or transient: A clap, consonant, or visible contact sound.
- Jump to the middle: Make sure sync hasn't drifted.
- Check the end: Hidden problems typically become apparent there.
- Disable the camera audio after confirmation: Keep only the external track active unless you want room tone from both.
If sync looks right but feels wrong, trust your ear and your eye together. Editors miss problems when they rely on one and ignore the other.
For tribute work, I also recommend checking transitions with music on. A clip can be technically aligned and still land emotionally late. That's not a sync failure in the strict engineering sense, but it is an editing failure, and the audience experiences both as the same thing.
Troubleshooting Common Sync Problems and Audio Drift
You line everything up, the opening looks perfect, and ten minutes later the audio is late. That's one of the most irritating problems in post, because it makes you doubt your first sync decision when the actual issue is usually drift.
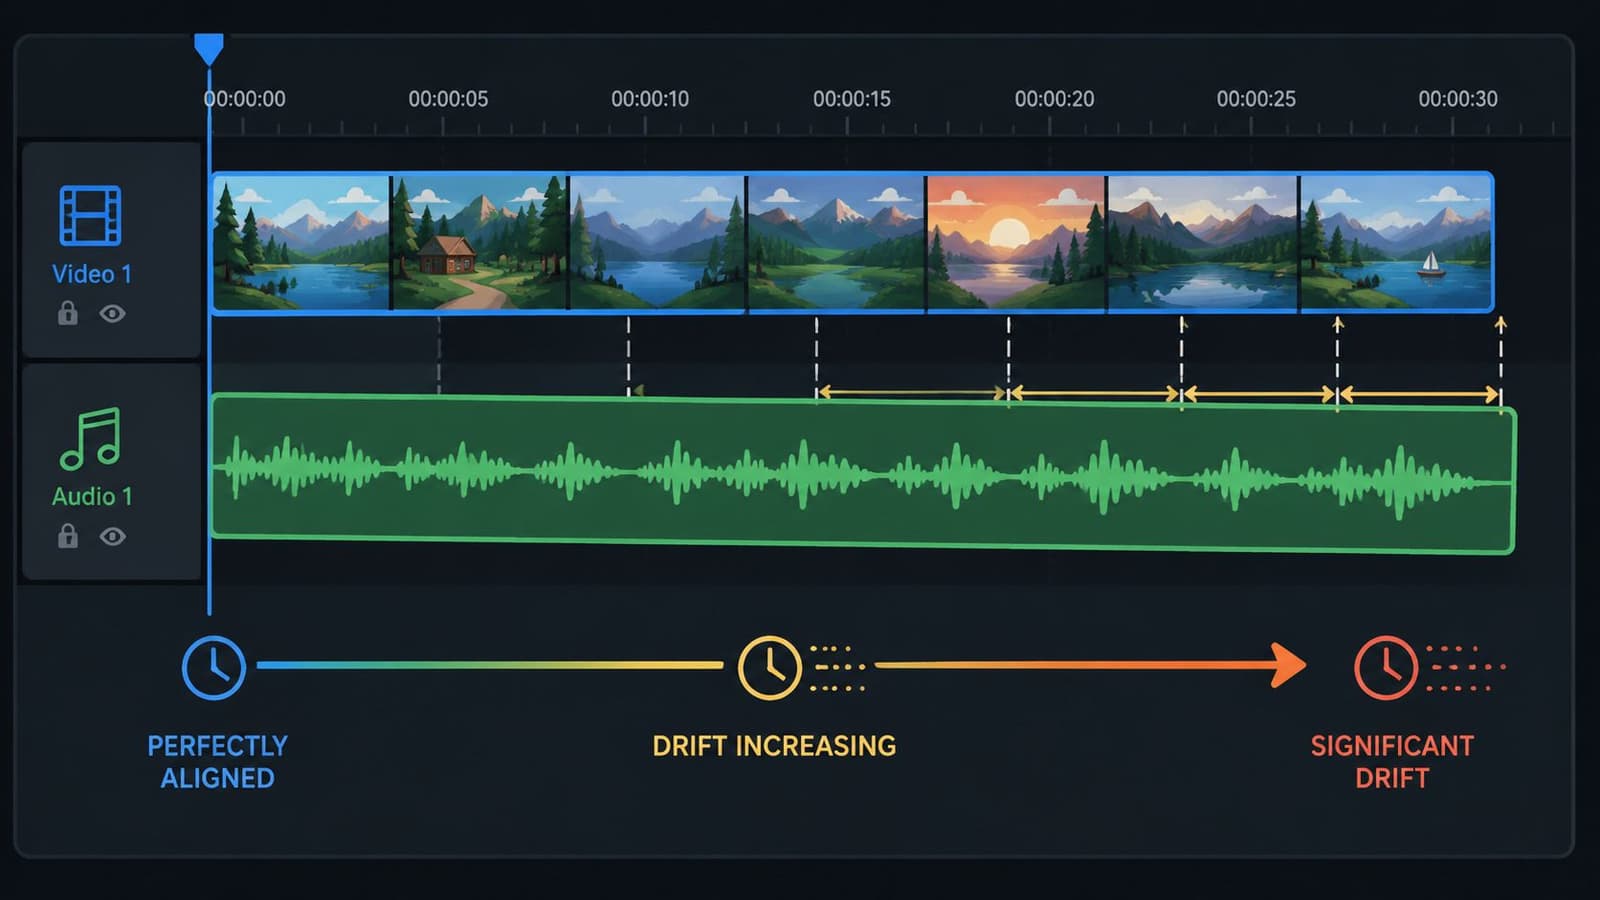
Most basic tutorials stop at initial alignment. Real projects don't. A major issue in longer recordings is multi-source drift, caused by cameras and recorders running on different internal clocks, which means sync has to be checked and sometimes corrected later in the timeline, as noted in recent work on synchronization offset estimation.
Why clips drift after a clean start
Drift usually comes from one of four places:
- Different internal clocks: Two devices can start together and gradually separate.
- Wrong sample rate assumptions: Imported audio may not behave the way the editor expects.
- Variable frame rate phone footage: Phones often create clips that look normal until you try long-form syncing.
- Export or conform issues: A clip may have been transcoded in a way that changed timing behavior.
The fix depends on the cause. If you only keep nudging the end of the clip without diagnosing the source, you'll keep redoing the same work.
Fixes that actually work
Start with the least destructive correction.
- Resync at multiple points: If the clip drifts only slightly, cut the audio and realign in sections.
- Transcode variable frame rate footage: Convert phone clips to a constant frame rate before the serious edit.
- Confirm sample rate: If a recorder captured audio in a nonstandard way for your project, convert it properly before syncing.
- Stretch only when needed: For long clips with consistent drift, a tiny speed adjustment on audio can hold sync from start to finish.
A related cleanup step often gets skipped. Once sync is fixed, make the video readable too. If you're posting memorials, family reels, or social edits, adding closed captions to a video helps viewers stay with the piece even when they watch with sound low or off.
A quick visual walkthrough can help if you're diagnosing timeline behavior in an editor:
Check the whole timeline, not just the first line
This is the habit that separates a clean export from a frustrating one. Don't judge sync from the beginning only.
Good sync work includes checking the beginning, middle, and end. Drift is often invisible until you go looking for it.
For short tribute videos, this may sound excessive. It isn't. Even a relatively short piece can include clips from phones, scans turned into motion shots, downloaded recordings, and separate voice tracks. Mixed sources create mixed problems.
Syncing Audio for Photo Montages and Social Clips
Photo montages change the syncing conversation. You're often not matching spoken lips to live sound. You're matching feeling to timing. That makes the work more subjective, but not less precise.
Use the soundtrack as a timing map
When I cut a tribute montage, I don't start by asking where the photos should go. I start by asking what the audio is already doing. Where does the music lift? Where does it pause? Where does a voice crack slightly, or where does a line land that deserves visual space?
That gives you anchor points. Then the visuals serve them.
A practical approach:
- Mark emotional beats: Chorus entries, lyric turns, piano hits, pauses.
- Place your strongest images first: Don't waste your most powerful photo on a filler beat.
- Ripple trim around the music: Shorten or extend visual duration until the montage breathes with the track.
- Use motion sparingly: Slow pushes and gentle pans work better than flashy movement in remembrance edits.
Let audio lead or trail on purpose
Not every transition should cut exactly on the beat. Some of the best montage timing comes from letting sound arrive slightly before picture, or linger after it.
That's where J-cuts and L-cuts help, even in simple family edits. A spoken memory can begin over the previous image and guide the viewer into the next one. Music can continue across a visual change so the sequence feels continuous instead of chopped up.
A tribute doesn't need constant beat-matching. It needs timing that respects the memory and the mood.
Repurposing changes the sync job
A montage that feels right in a horizontal timeline can feel cramped after a vertical reframe. Visual emphasis changes. Text placement changes. Perceived timing changes too, because the eye now travels differently across the frame.
That matters more now because dubbed and reformatted content is far more common. After YouTube introduced auto-dubbing, viewers watched over 20 million hours of translated videos in the first six months, and some channels saw 25% of watch time from dubbed videos, according to YouTube's discussion of auto-dubbing adoption. For editors, the takeaway is simple. Sync is no longer just about one master export. It has to survive repurposing, language changes, and platform edits.
If you're making short social memorials or anniversary reels, review every version separately. Don't assume the sync that worked in one format automatically feels right in another.
Good Sync Is Invisible But Great Sound Is Unforgettable
The best sync work never announces itself. Nobody compliments a tribute by saying the waveform alignment was excellent. They remember the moment the music rose with the photo, the pause before a spoken name, the way the sequence felt complete.
That's why syncing audio with video isn't a technical chore you rush through. It's the first creative decision that makes the rest of the sound work possible. Once sync is solid, you can shape pacing, trim music, build transitions, and let silence do its job.
There's also a useful lesson in newer AI research. One recent approach improves sync by separating audio into speech, effects, and music before mapping timing to visuals, as described in this research on multi-stream audiovisual alignment. That idea applies in editing too. Treat those elements as separate jobs, not one audio blob, and your timing decisions get sharper.
Get the sync right first. Then make it beautiful.
If you're building a tribute, memorial reel, or anniversary montage from treasured family photos, Photo for Video can help you turn a single still image into a short living-memory clip that's ready to drop into your edit. It's a practical way to create gentle motion from old scans or phone photos, then pair those clips with music, voiceover, and carefully timed transitions that make the final piece feel personal.